


Table of Contents
Imagine an advertising tool that helped you reach your ideal customers based on what they like, their interests, and their behaviors. A tool that saved you time and money by optimizing your ad delivery to get your message in front of those most likely to convert.
That's what you get with Facebook advertising, a platform used by many ecommerce entrepreneurs, especially those just starting out without much advertising experience or a big budget to spend. Anyone can fuel their business growth with Facebook ads, as long as they’re willing to learn the basics.
In this beginner's guide, we'll look at what makes Facebook such a popular advertising platform with so many brands and walk you through step-by-step how to set up a Facebook ad campaign to drive sales for your business.
Table of contents
- Why use Facebook for advertising?
- Setting up your Facebook Business Manager
- Installing the Facebook pixel
- Understanding Facebook Audiences
- Creating a Facebook ads campaign
- Setting up your ad sets
- Choosing your creative
- Optimizing your Facebook campaigns
- Start using Facebook ads to grow your business
Why use Facebook for advertising?
With so many options, deciding where to spend your marketing budget can be difficult. What makes Facebook particularly attractive for new and experienced business owners boils down to three things:
1. Driving traffic from an active and engaged user base
Facebook is a place where we connect with family and friends, and—as much as we hate to admit it—it’s pretty darn addictive. Facebook reportedly has more than two billion active monthly users, and those users spend more time on Facebook than on competing social networks. In addition, Facebook owns Messenger and Instagram, two other popular mobile apps accessible to Facebook advertisers through its advertising platform. That’s a lot of active, engaged traffic.
2. Targeting customers based on demographics, interests, and behaviors
Facebook is designed for sharing personal updates and information, such as vacation photos, new songs you’ve discovered, and relationship statuses, with your network. All the likes and connections made on Facebook and Instagram create detailed user profiles that advertisers can tap into through targeted ads. Facebook advertisers can match their products and service against a long list of the users' interests, traits, and behaviors, resulting in a higher likelihood of reaching their ideal customers.
3. Generating brand awareness
Most businesses have a Facebook and/or Instagram business page they use for connecting with their fans and customers on social media. When you decide to use paid ads on Facebook and Instagram, you can opt to have them come from your brand’s social pages. This often results in increased brand exposure and new followers for your company, which is one of the benefits of advertising on social platforms.
Step 1: Setting up your Facebook Business Manager
Many of the people who give up on their Facebook advertising efforts do so because they set up their account incorrectly or become so overwhelmed by Facebook’s myriad ad options that they never make it to the point of actually running a campaign.
So, to start off on the right foot, the first step is to ensure you set up your Business Manager account correctly.
Business Manager is the section of Facebook that will house your Facebook ad account, business pages, and other tools you’ll need to run your ads.
To create your Business Manager account, go to business.facebook.com and click Create Account.

Facebook will ask you for your business name, your Facebook business page (create one first if you don't have one), your name, and your email address.
Next, you’ll need to create or add an existing advertising account. This can be done by choosing Business Settings in the Business Manager menu, then clicking Accounts and Ad Accounts. You will be given the option of adding an existing ad account, requesting access to an ad account, or creating a new ad account. If you’ve never advertised on Facebook before, click Create a New Ad Account and follow the prompts.

Now that you’ve set up Business Manager and connected it to your Facebook business page and ad account, your home screen should look like this:

This is your advertising hub, where you can navigate to all the different areas of your business on Facebook.
Step 2: Installing the Facebook pixel
One of the most common frustrations among new Facebook advertisers is understanding whether or not their ads actually worked. It’s possible to boost a post, or even set up an advertising campaign in Ads Manager, but without installing the Facebook pixel you won't know whether an ad drove any sales on your website.
The Facebook pixel is the connection point between your Facebook ads and your website. The pixel is a tracking code you need to create within your Business Manager account and then add to your website before you begin paying for ads. It shows you all the actions being taken by visitors coming to your website through your Facebook ads. Essentially, the Facebook pixel tells you not only if your ads drove results but which audiences and pieces of creative those conversions came from.
Setting up your Facebook pixel in Shopify
Setting up the Facebook pixel on your website is easier than it sounds and rarely requires digging around in code.
If you're using Shopify, setting up your Facebook pixel is as easy as copying your pixel ID (a 16-digit number) from your Business Manager account and pasting into the Facebook pixel ID field, located under Online Store in the preferences section of your Shopify store. (For more information, check out Shopify’s own guide.)
You should start seeing your website’s activity within a few hours of adding your pixel ID to your Shopify store. Stats such as visitors, add to carts, and purchases are recorded in your Business Manager account under Pixels.
Step 3: Creating Facebook Audiences
Targeting the right people with your ads is one of the keys to being successful with Facebook advertising. Facebook has billions of Facebook users worldwide, so finding those most likely to be interested in your brand or product requires the use of Facebook’s audiences feature.
Audiences is a section within Business Manager where you can create lists of people to target with your ads. There are several different features available within the audiences section to help you define these lists, but they can be divided into two broad categories: retargeting and prospecting.
Retargeting: Converting warm audiences
Someone who has visited your website added something to their cart, or followed you on Instagram is more likely to consider buying something from you—they might just need a little encouragement.
If you’ve ever browsed a brand’s website and then found yourself targeted by its ads every time you open Facebook or Instagram, that’s called “retargeting,” and it’s one of the most effective forms of Facebook advertising.
You can create retargeting audiences using the Custom Audiences feature, located in the Audiences section of Business Manager. Custom Audiences offer you the option to tap into all the data captured by your Facebook pixel and business pages.

When creating a Custom Audience, you are given a list of different sources to draw from. The three main sources ecommerce businesses will want to use are customer file, website traffic, and engagement.
1. Customer file
Customer file allows you to upload a list of email addresses, phone numbers, and any other contact information you’ve collected from customers or leads. Facebook matches this information back to its own users so you can target them directly with your ads. Creating an audience using a customer file is great for re-engaging past customers with new products or reaching email subscribers who haven’t yet made a purchase.
2. Website traffic
Website traffic allows you to create a retargeting list for reaching your website visitors. Here, you can create lists of various sizes, based on actions taken or pages visited on your website. Common retargeting lists that generally convert well include those who visited your website in the past 30 days or added something to their cart in the past seven.
3. Engagement
If you have an active Facebook or Instagram page for your business or have been experimenting with ads that are getting engagement (i.e., likes, comments, and shares), you might want to retarget these engagers as well. Selecting Engagement from the Custom Audiences options takes you to another list of various types of engagement you can retarget. Whether you have a video collecting lots of views or an event that had a large number of attendees, retargeting different groups of engagers is an effective way to bring prospects who may be interested in making a purchase to your website.
Prospecting: Finding new customers
Finding new customers is an even better way to scale your business using Facebook ads than retargeting past customers and converting website browsers.
Looking for new customers is often referred to as “prospecting” and involves advertising to those who have not purchased from you or interacted with your business online. For small and medium-sized businesses, this encompasses the majority of Facebook’s billions of active users, and deciding how to start narrowing down that list can be difficult.
To help, Facebook created two useful tools that help businesses find the best potential new customers:
1. Lookalike Audiences
One way Facebook finds good prospects for your business is by using a list of customers or leads you’ve already collected. Lookalike Audiences use the data from your Custom Audiences to create a new audience filled with Facebook users that share similarities with your existing customers.

Lookalike Audiences can be created using any of your Custom Audiences, and range in size and likeness from 1% to10% of a selected country’s population. A 1% Lookalike Audience contains people who most closely resemble the Custom Audience source and therefore are an easy first target for your prospecting campaigns.
As you expand your targeting and increase your budget, moving to a 3%, 5%, and eventually 10% Lookalike Audience eventually can provide you with more scale while still being tied to a user profile that matches your customer.
2. Interests, behaviors, and demographics
If you don’t have a list of past customers or website visitors to create a Lookalike Audience, you can use Facebook’s interest, behaviors, and demographic data to create prospecting audiences using the saved audiences option.

Here’s a breakdown of each category, with examples of sub-groups within each one:
- Interests related to pages and content Facebook users have interacted with (e.g., K-pop, scuba diving, exercise)
- Behaviors are actions taken by users that were recorded by Facebook (e.g., celebrating a birthday, moving to a new city, having a baby)
- Demographics include user profile information (e.g., new moms, engineers, college grads)
There are likely several audiences you’ll want to test from all of the options available within interests, behaviors, and demographics. The Audience Insights tool can help you narrow down these options and identify categories for testing.
Audience Insights can be found in Business Manager under the Plan section of the main menu. It allows you to use your Facebook page or enter demographic information about your potential customers. The tool reveals information about your potential audience, such as what pages they are apt to like on Facebook, what devices they use, and what towns or cities they live in.

The information gathered in Audience Insights can be used to identify new Interests for targeting experiments, as well as placements and locations that might work for your chosen demographic.
Since interest, behavior, and demographic audiences are usually quite broad and consist of hundreds of thousands to millions of users, it’s good practice to test them individually so you can find which one works best. Once you have narrowed in on audiences that convert through your ads, you can start experimenting with additional audience layers to broaden your prospecting campaigns.
Step 4: Creating a Facebook Campaign
The ads you see in our Facebook feed—those images, videos, and carousels accompanied by the word “Sponsored”—are actually part of a larger setup created by advertisers called a campaign.
The first step in creating your ads is creating a campaign for them to live within. The structure of a campaign, and its corresponding Facebook ads, looks like this:

Within each campaign is an ad set. This is where you choose your audience, budget, and targeting, as well as the ad users will see. A single campaign can contain multiple ad sets, allowing you to test various audiences and individual ads against each other to find which of each performs best, so you can focus there.
Choosing an objective for your campaign
To begin creating your first campaign, go to the Ad Manager within your Business Manager account and click the Create button. From there, you will be asked to select an objective.

There are three categories of objectives within Facebook ads: awareness, consideration, and conversion.
Under each category is a short list of more detailed options, such as traffic, video views, and product catalog sales. You should consider what your goal is as a business and what you want to achieve with your Facebook ads, and let the answers guide your decision.
Here are some examples of how different goals will affect the campaign objectives you set:
- If you want to increase sales on your website, set your objective to Conversions
- If you are having trouble making sales in your online store, you might want to choose Add to Cart (which typically costs less than Conversions)
- If you aren’t selling a product yet but want to generate buzz or awareness, the Brand Awareness objective is a good way to get low-cost impressions
- If you are having trouble driving traffic to your website, choosing Traffic as an objective can help create a retargeting list for another campaign
- If you want more likes, comments, and shares on a post to create social proof, set your objective to Engagement
No matter what objective you choose, Facebook will always charge you for impressions—the number of people your ad is served to. It is important to communicate to Facebook what your objective is so your ads will be optimized to reach your goal. If you choose Traffic but are actually looking for website purchases, you won’t be guaranteed to reach your goal because it was not chosen as your objective at the campaign level.
Before moving onto ad sets, you will need to also name your campaign, an important consideration that's easy to overlook.
Coming up with a naming convention for your campaigns, ad sets, and ads help keep your account organized. Naming conventions are a system you create to help you identify your objective, who you’re targeting, and where your campaign fits into your overall strategy, at a glance. Your campaign names can also identify which Facebook audience (e.g. prospecting or lookalike) the campaign is targeting and other key information: Prospecting – Conversions – 03.24.19
How you choose your naming conventions is up to you. The most important thing is that you are consistent so your account stays organized and easy for you, or other members of your organization, to navigate.
Step 5: Setting up your Ad Sets
After choosing your campaign objective, Facebook directs you to the ad set level, where you’ll have the opportunity to choose:
- Which audience you wish to target
- The budget you want to spend
- The placement of your ads within Facebook’s network of products.
You may be asked to provide more information on the type of event you want Facebook to optimize for, depending on what you chose as your objective. For example, if you chose Conversion, hoping to get more sales on your website, you will need to choose the type of conversion event you’re hoping for, within the ad set section:

Note: Facebook can only optimize for conversion events it has seen on your website. If you haven’t received any purchases or add to carts, the option to optimize for these events may not be available to you. In this case, you can choose Traffic and aim to unlock the option to optimize for purchases down the line.
Setting your budget and schedule
The next step within ad sets is to enter your budget and choose whether you want it to be a daily budget or a lifetime budget. Deciding how much to spend depends on several factors:
- How much money you’ve budgeted for marketing: you can only spend what you can afford
- The cost of your product: higher cost items generally require a higher ad spend
- The objective you’re optimizing for: sales-focused objectives like purchases usually cost more than awareness-focused objectives like engagements and clicks
- Your average customer acquisition cost: if you have tried paid advertising on other platforms and have a customer acquisition cost, you will want to apply it here
You always want to make sure you are giving Facebook ads a fair shot by allocating enough budget to achieve your goal. Once your ads are published, you need to allow time (and budget) for Facebook’s “learning phase”—the period when its algorithm examines your data and begins optimizing to successfully meet your objective.
Audience
Within ad sets, you will be given the option to select and refine a prospecting or retargeting list you created in the Audiences section. Choosing locations, genders, ages, and languages can help narrow your audience further and provide more variations to test in different ad sets.

Further down the page, is the option to add detailed targeting through Facebook behaviors, interests, or demographics. Here, you can opt to use these categories to create a new audience to layer on top of your existing audiences, or simply stick to a Custom or Lookalike Audience you’ve selected above.
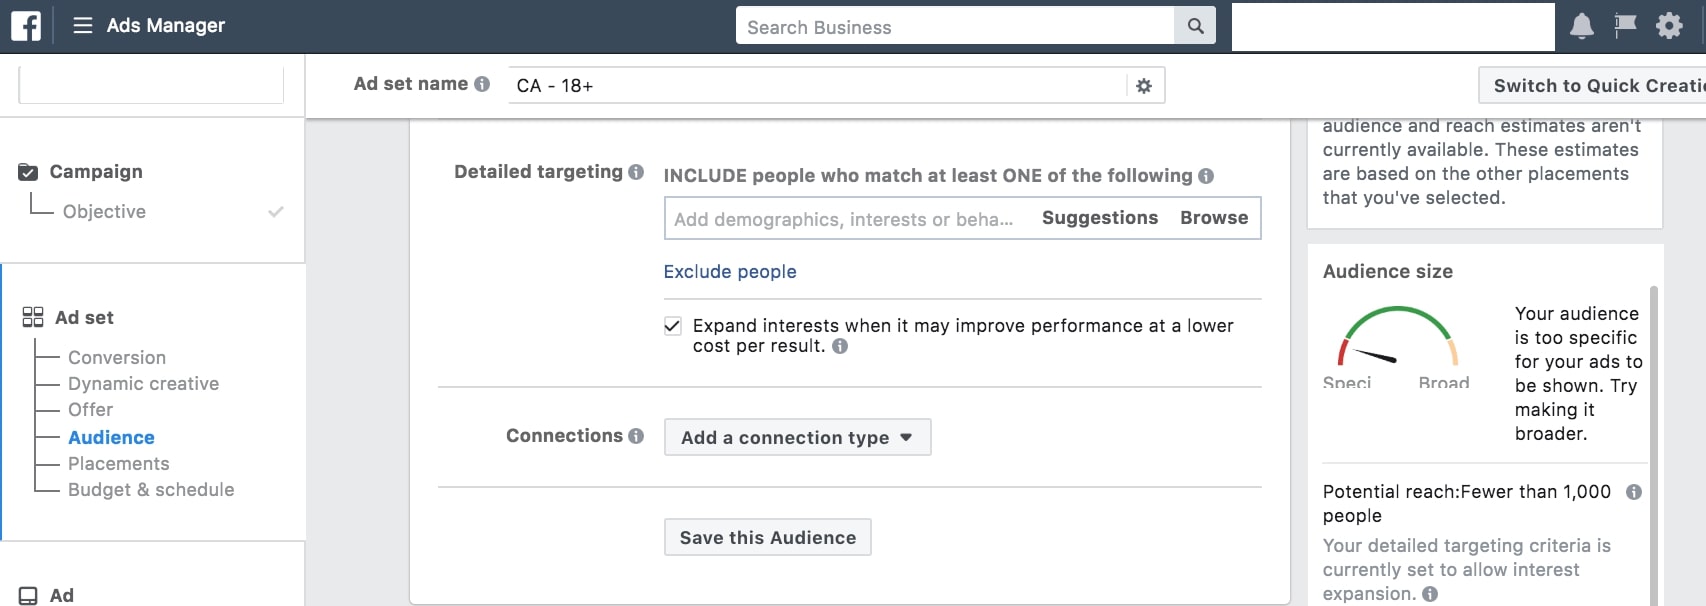
At the ad set level, you also can target people based on a Connection by tapping into lists of people who like your business page, app, or events, as well as their friends. If you have a large number of people that fall into these categories, targeting based on connections could put your ad in front of a great prospective audience.

Placements
Finally, ad sets give you the ability to select where you want your ad to appear. As mentioned above, Facebook owns other popular apps, giving it the ability to place ads outside its own News Feed. If you are interested in reaching only Instagram users, for example, ad sets let you exclude all other placements.

Facebook recommends selecting automated placements for your ad set. This option allows Facebook to optimize for your campaign objective by using all placements available to produce the best results.
Step 6: Choosing your creative (your ad)
The final step in creating your Facebook ad is coming up with the creative—the ad itself.
Facebook advertising is quite different than traditional advertising and has its own set of best practices for creative that actually converts.
When creating an ad, you will be given the option to select the Facebook business page and/or Instagram account that will present your ads. This secondary benefit is a great opportunity to grow brand awareness and social media followers, even if it isn’t your overall campaign objective.

Retargeting with dynamic product ads
One of the most common Facebook ad formats in ecommerce is the dynamic product ad. If you’ve ever browsed a store online and then been retargeted with the exact products you viewed, you have seen a dynamic product ad in action. These ads pair your Facebook pixel data and your Facebook product catalog, so visitors to your website are shown products they looked at or added to their cart.

The Facebook product catalog is another connection between your business website and your ad account that can be set up within Business Manager, under the Assets menu. You can create a catalog through your Facebook pixel or, if you are using Shopify, you can add the Facebook sales channel and sync products seamlessly to your ad account.

Once your catalog is created and you’re ready to make a dynamic product ad, return to the Ad Manager and create a new campaign with Product Catalog Sales as the objective. This will allow you to select your product catalog at the ad set level, as well as customize who you want to show relevant products to.

Aside from retargeting past purchasers or website browsers, you can also use dynamic product ads for prospecting. If you choose this option, Facebook will show products on your store it believes will be relevant to new prospects, based on their profile data, even if they haven’t visited your website before.
Step 7: Optimizing your Facebook campaigns
Setting up a campaign on Facebook is an important first step, but learning how to monitor its performance and optimize it over time is necessary if you want to succeed on the platform. Typically, you will want to check in on your Facebook ads at least once a day (even more frequently as you increase your spend).
It might be tempting to make changes to your targeting or turn off an ad if you don’t see purchases after one day, but it’s important to be patient.
Facebook ads need time to optimize so the algorithm can learn who is most interested in what you’re selling. If you aren’t sure whether you should turn off your ad, try waiting until it gets at least 1,000 impressions before investing more or shutting it down to test something new.
Creating a funnel
Prospecting and remarketing are both important audiences to target, but they generally work best when done together to create a “funnel”.
A funnel is a marketing strategy based on the simple fact that the vast majority of people you market to aren’t ready to buy right at that moment. A funnel-based approach to marketing focuses on tailoring your advertising depending on your audience’s intent to purchase and familiarity with your brand and products.
Creating a funnel on Facebook can be done by targeting a cold audience of prospective customers, such as a Lookalike Audience or a behavior-based audience in one campaign, and retargeting those who visit your website in another campaign. As you scale your advertising budget, your funnel can become more intricate, with multiple campaigns that target customers at different points within the funnel:
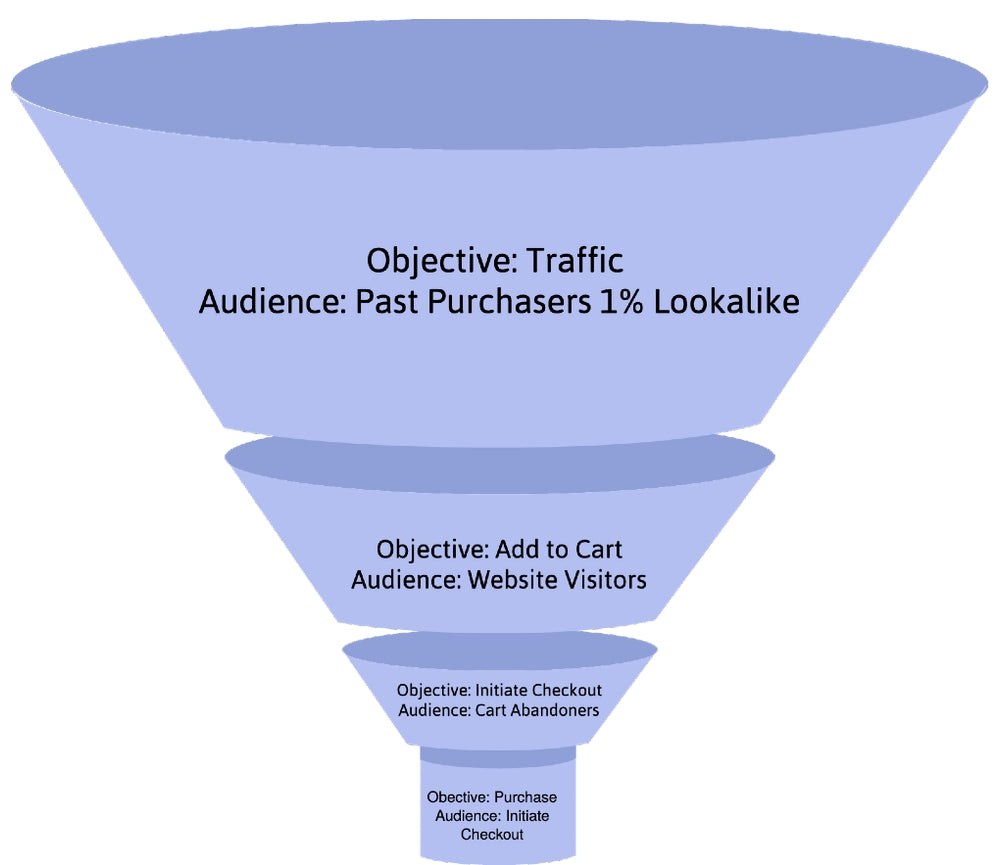
The above example shows how one campaign can be used to drive awareness and traffic from a larger audience at the top of your funnel and subsequent campaigns can re-engage or retarget that traffic to bring them back to purchase.
If prospecting is not generating sales for your business, choosing a less expensive, higher-funnel objective, such as traffic or add to carts can create a list of prospects to retarget with a second campaign. This effectively will create a funnel with your Facebook ads, where you can serve each audience different types of creative that bring prospects back to your website to complete a purchase.
Start using Facebook ads to grow your business
The Facebook advertising platform is designed to be easy to use for those with little to no experience with digital marketing, making it even more attractive to bootstrapped entrepreneurs who don’t want to pay an agency to run their ads.
If you take the time to learn the basics of Facebook advertising, set up your account correctly, and launch a campaign, Facebook ads can continue to fuel your business as it grows.
This article was originally published by our friends at Shopify.


