
Quick Decision Framework
- Who This Is For: Shopify merchants who sell physical products and are running or planning pop up shops, farmers markets, craft fairs, or outdoor retail events and want their booth to look as credible as their online store.
- Skip If: You are still pre-launch or have not yet confirmed a physical event date. Come back when you have a confirmed event on the calendar and a real need to show up with branded presence.
- Key Benefit: Design and order a professional branded canopy tent in a single session using a browser-based 3D tool, so your booth commands attention and converts foot traffic instead of blending into the background.
- What You’ll Need: Your brand logo in SVG, PNG, or PDF format, your brand color hex codes, a confirmed event date, and a budget of approximately $300 to $800 for a quality 10×10 printed canopy depending on configuration and supplier.
- Time to Complete: 15 to 30 minutes to design using the 3D studio; 7 to 14 business days for production and shipping. Order at least 3 weeks before your event date.
Your tent is the first thing a shopper sees before they know your product exists. If it looks like every other white canopy at the market, you have already lost the conversation before it started.
What You’ll Learn
- Why your canopy tent is one of the highest-leverage branding investments a Shopify merchant can make before a pop up event.
- What a 3D design studio for custom canopy tent printing actually does and how it eliminates the guesswork that leads to expensive reprints.
- How to use the design tool to place logos, set brand colors, and preview all tent panels before committing to production.
- What design principles consistently outperform at outdoor events, based on patterns across merchants at every stage from first market to multi-event operators.
- When to order, what format your files need to be in, and how to avoid the most common mistakes that delay production or produce results that do not match your brand.
Most Shopify merchants spend weeks perfecting their product pages and then show up to their first pop up under a plain white canopy with a hand-lettered sign. I have watched this happen at farmers markets, street festivals, and trade events across North America. The product is great. The booth is invisible. The brands doing consistent volume at physical events have figured out something the newcomers haven’t: your tent is a billboard, and it is working from the moment someone enters the venue, not the moment they reach your table.
The good news is that professional branded canopy tents are no longer the exclusive territory of brands with graphic design teams and large production budgets. The 3D design studio model has changed the economics and the timeline. You can design your tent in a browser, see exactly how your logo wraps around each panel, and place an order in the same session. Whether you are doing your first market or running events every weekend, this is the tool that closes the gap between your online brand and your physical presence.
This guide covers how the technology works, what to design for maximum impact at a pop up, and how to think about your tent as a long-term asset rather than a one-time expense.
Why Your Canopy Tent Is Your Most Valuable Pop Up Asset
A branded canopy tent is the single highest-leverage physical branding asset for a Shopify merchant running pop up events. Everything else at your booth, the table, the product display, the signage, operates within the visual frame your tent creates. If that frame is generic, everything inside it reads as generic too.
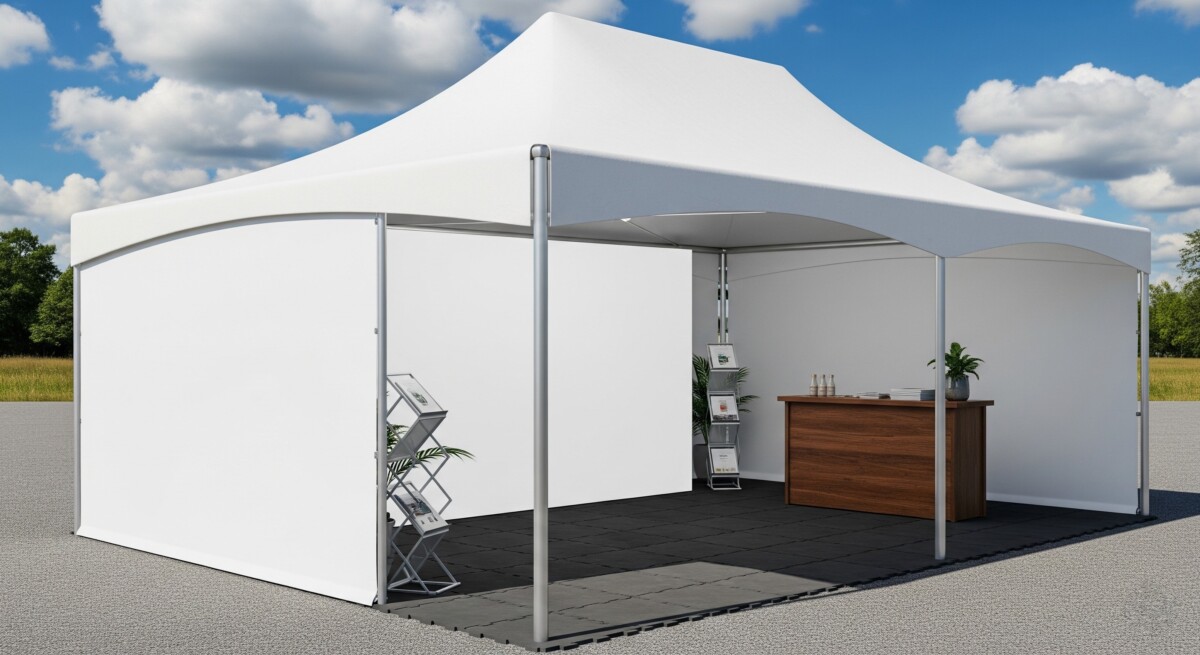
The merchants I have seen consistently outperform at physical events treat their tent as a permanent brand installation, not a temporary shelter. A 10×10 printed canopy gives you roughly 40 square feet of branded surface area visible from 50 to 100 feet away depending on the venue. That is more visible real estate than most brands buy in a month of digital advertising, and it works passively for every hour you are set up.
The practical case is just as strong as the brand case. A quality printed canopy lasts 3 to 5 years with proper care. If you run 10 events a year, you are amortizing a $600 investment across 30 to 50 events. That works out to $12 to $20 per event for your most visible brand asset. No digital channel comes close to that cost per impression for a merchant at this stage.
For Shopify merchants who are new to physical retail, the tent is also a signal to other vendors, event organizers, and potential wholesale buyers that you are a real brand with real staying power. I have heard from multiple merchants that their first wholesale conversation at a market started because someone saw their tent from across the venue and wanted to know more. If you are still thinking through the full economics of running a pop up, the guide on planning your first physical pop up shop breaks down exactly what to expect from your first event and how to set goals that make the investment worthwhile.
The investment also compounds. Unlike paid ads that stop the moment you stop spending, a branded tent keeps working every time you set it up. Brands that commit to a professional physical presence early tend to build local recognition faster, which reduces the marketing work required for each subsequent event.
What Is a 3D Design Studio for Custom Canopy Tent Printing
A 3D design studio for custom canopy tent printing is a browser-based tool that lets you build and preview your full tent design on a realistic 3D model before the file goes to production. Instead of working from flat template mockups that require you to mentally project how your logo will look wrapped around a curved valance, you see the actual tent rotating in real time as you make changes.
The core workflow is straightforward. You select your tent size (typically 10×10, 10×15, or 10×20), choose which panels you want printed (roof, valances, sidewalls, or all of the above), upload your logo and brand assets, set your colors, and position everything using drag-and-drop controls. The 3D rendering updates instantly. You can spin the tent to check all four valances, zoom in on logo placement, and compare different color combinations before committing to anything.
Platforms like designing and ordering custom printed canopy tents online have built this workflow directly into their ordering process, which means the file you approve in the design studio is the production file. There is no back-and-forth with a designer, no waiting for a proof that looks different than you expected, and no guessing about how your brand colors will render on fabric.
For Shopify merchants who are not graphic designers, this matters more than it might seem. The most common reason branded tents disappoint merchants is not poor print quality. It is poor visualization at the design stage. When you are working from a flat template, it is genuinely hard to predict how a logo that looks great on a screen will translate to a 10-foot-wide fabric panel in direct sunlight. The 3D preview eliminates that uncertainty. If you are still in the early stages of understanding what a pop up actually involves, the breakdown of what a pop up shop actually costs and delivers gives you the full picture before you commit to equipment purchases.
The file format requirements are standard. Most tools accept SVG and PDF for logos, which preserves vector quality at any size. PNG files work for photographic elements. If your logo only exists as a low-resolution JPEG, get a vector version before you start. A designer can recreate most logos in vector format for $50 to $150, and it is a one-time cost that improves every piece of branded print material you ever produce.
How the 3D Design Process Works Step by Step
The design process in a modern 3D tent studio typically takes 15 to 30 minutes from first upload to final approval, assuming your brand files are ready. Here is what the workflow looks like in practice.
You start by selecting your tent configuration. The most common choice for Shopify merchants running pop up events is a 10×10 with a full-color printed canopy top and matching valances on all four sides. This gives you maximum brand visibility from every direction. If you are budget-conscious, a printed top with branded valances on the two most visible sides (typically the front and one side panel) is a reasonable starting point that still reads as intentional and professional.
Once your configuration is selected, you upload your logo. The tool places it on the tent surface and you use the controls to resize, reposition, and align it. The 3D model shows you exactly how the logo sits on the fabric, including how it wraps at the corners where valances meet. This is the detail that flat mockups consistently get wrong, and it is where most of the design surprises happen at production. Seeing it in 3D before you approve eliminates that risk entirely.
Color selection comes next. Most tools let you either enter hex codes directly (which is what you want if you have brand guidelines) or select from a swatch palette. Entering your exact brand hex codes is the right move. Fabric printing uses a different color space than screen display, and the 3D preview accounts for this, giving you a more accurate representation of the final printed output than a standard monitor preview would.
The final step is a full review pass. Rotate the tent through 360 degrees, check every panel, zoom in on text if you have included any, and confirm the logo placement looks balanced from the angles a shopper would actually see at an event. Most platforms generate a production-ready proof at this stage that you approve before the order goes to the print queue.
Common Pop Up Formats and Which Tent Setup Fits Each
Not every pop up event calls for the same tent configuration, and the right setup depends on your format, your goals, and your budget at your current stage. The patterns I have seen across merchants at different stages are consistent enough to give you a clear decision framework.
Farmers markets and weekend craft fairs are the most common starting point for Shopify merchants moving into physical retail. At these events, you are typically in a row of vendors with foot traffic passing in front of your booth. A 10×10 tent with a printed top and front valance is the minimum viable setup. The front valance is the first thing a shopper reads as they approach. Your brand name, a short descriptor, and your primary brand color on that panel does more work than any other single piece of booth equipment.
Outdoor trade shows and brand activation events call for a more complete setup. At these events, traffic approaches from multiple directions, and you often have competitors within direct eyeline. Full-perimeter printing on all four valances, plus optional sidewall panels, ensures your brand reads clearly regardless of approach angle. For merchants doing $50K to $500K in annual revenue, this is the configuration worth investing in, because you are likely running enough events to fully amortize the cost within a single season.
Corporate marketing activations and sponsored events have the highest visibility stakes. If your tent is appearing at an event alongside established brands, a partial print setup will read as underprepared by comparison. Full print, clean design, and consistent brand colors are non-negotiable at this level. The event marketing strategies that drive attendance guide covers how to think about event presence holistically, including how your physical setup connects to your pre-event and post-event marketing.
For merchants just starting out who are not yet sure how many events they will run, a standard 10×10 with a printed top is the right starting point. It is a reusable asset that works at any format, and it immediately separates your booth from the plain white canopy crowd without requiring a large upfront commitment.
Design Tips That Actually Work at a Pop Up
The most effective canopy tent designs share a few consistent characteristics, and they are not what most first-time designers focus on. The instinct is to include as much information as possible. The reality is that the designs that convert the most foot traffic do the opposite.
Your brand name and primary logo should be the dominant element on every panel. At a busy outdoor event, a shopper has roughly 2 to 3 seconds to register what your booth is about as they walk past. That is enough time to read a brand name and form a first impression. It is not enough time to read a tagline, a product description, and a web address. Save the detail for your table signage and packaging. The tent’s job is to make someone stop, not to close the sale.
High contrast between your background color and your logo color is more important than brand color accuracy. A navy blue logo on a medium blue background may look fine on a screen and be completely unreadable at 30 feet in direct sunlight. If your brand palette has low contrast combinations, choose the highest-contrast version for your tent. The 3D design studio lets you test this in real time, which is one of its most practical advantages over flat mockup tools.
Keep text to an absolute minimum. Your brand name is enough. A one-line descriptor (“Handmade Ceramics” or “Small-Batch Hot Sauce”) can work if it genuinely helps orient a first-time shopper, but anything longer creates visual noise. Phone numbers, website URLs, and social handles belong on your business cards and packaging, not your canopy.
Use all your panels consistently. A common mistake is to design a strong front valance and then leave the side and back panels as solid color or blank. From inside the venue, your side panels are often the most visible surface. Consistent branding across all four valances creates the impression of a permanent, established brand rather than a first-time vendor. The full pop up shop marketing guide for 2026 covers how your physical setup connects to the broader marketing system that drives event ROI.
Finally, think about your tent as a photography backdrop. At every event, customers and passersby will photograph your booth. A well-designed branded canopy turns those organic photos into unpaid brand impressions every time they are shared. Merchants who have thought about this intentionally often design their tent with a clean, photogenic background in mind, knowing that the UGC value extends well beyond the event itself.
Frequently Asked Questions
How long does it take to design and receive a custom printed canopy tent?
The design process using a 3D studio tool typically takes 15 to 30 minutes if your logo files are ready in SVG or PDF format. Production and shipping usually runs 7 to 14 business days depending on the supplier and your location. Plan to order at least 3 weeks before your event to account for any production delays or shipping variability. If you are ordering for the first time, give yourself 4 weeks to be safe. Rush production is available from most suppliers but adds cost, typically 20 to 40 percent above the standard price.
What file format does my logo need to be in for canopy tent printing?
Vector formats are the standard for large-format fabric printing. SVG and PDF files preserve logo quality at any print size without pixelation. AI (Adobe Illustrator) files are also widely accepted. If your logo only exists as a JPEG or low-resolution PNG, it will likely print with visible pixelation on a 10-foot panel. A graphic designer can convert most logos to vector format for $50 to $150, and it is worth doing before you order any large-format print material. Most 3D design studio tools will flag low-resolution uploads before you reach the approval stage.
How much does a custom printed canopy tent cost for a Shopify pop up merchant?
A quality 10×10 custom printed canopy tent with a printed top and valances typically runs $300 to $800 depending on the supplier, the number of panels printed, and the material weight. Heavier-weight fabrics (600D polyester and above) cost more but last significantly longer and hold color better through repeated outdoor use. For merchants running 5 or more events per year, the higher-quality option almost always pays for itself within the first season. Budget options under $200 exist but typically use lighter materials that fade faster and are more susceptible to wind damage at outdoor events.
Can I use a custom canopy tent for indoor events like trade shows?
Yes. A standard pop up canopy tent frame works at most indoor trade shows, though you should confirm with the event organizer that tent structures are permitted in your booth space. Some indoor venues have height restrictions or fire code requirements that limit overhead structures. For indoor use, the printed fabric panels provide the same branding value as outdoors, and the 3D design process is identical. The main difference is that indoor lighting conditions vary significantly from outdoor sunlight, so high-contrast designs that read well outdoors will also perform well indoors.
How do I take care of a custom printed canopy tent so it lasts multiple seasons?
The most important maintenance habit is drying the canopy completely before storing it. Packing a wet or damp canopy is the primary cause of mildew and color degradation. After each event, allow the fabric to air dry fully before folding and storing in the carry bag. For cleaning, a soft brush and mild soap solution handles most dirt and staining without damaging the print. Avoid pressure washing, which can strip the UV coating on the fabric. Store the frame in its carry bag in a dry location. With proper care, a quality printed canopy should last 3 to 5 years of regular event use.