

Planning is an essential part of any successful web design project.
By outlining the scope of your project at its onset, you will be better equipped to identify and avoid roadblocks that would otherwise steer your progress off track.
One of the most effective tools for planning your project is the schedule. A project schedule allows you to outline, assess, and communicate the essentials of a job and includes its deliverables, timeframe, and the resources allotted to individual tasks.
While several automated project planning tools exist, they often have expensive monthly fees. If you don’t want to spend your hard-earned revenue on automated software, you can easily create project schedules with any essential worksheet software you may already have access to.
This article will walk you through the importance of project scheduling, offer you a few tips for creating your own schedule, and share some scheduling templates you can use in your web design or development projects today.
Before we dive into the how-tos of scheduling, I want to stress the influential role that scheduling plays in the success of your web design projects.
Scheduling is all about keeping your workflow as organized as possible. At its core, it allows you to define your project’s final deadline and determine the milestones that must be met to hit that deadline. Identifying these dates from the start will help keep you and your team accountable for delivering all project components. As you progress through these milestones, you can track, evaluate, and forecast the timeline and budget associated with your project.
Schedules aren’t only valuable for internal usage but play an essential role in client management. These planning documents help you establish clear expectations with your clients about their project’s anticipated milestones and workflow. Plus, getting client buy-in on your schedule means you can more easily expect overrun costs or scope creep.
Now that we’ve covered why schedules should become a critical part of your team’s project management workflow, let’s dive into some tips for creating your project schedule.
Want to spruce up your mockups? Check out our list of funny lorem ipsum generators.
Regardless of how excited you are to jump right in, it would be best to start your new projects by creating a comprehensive schedule. Not sure where to start? I’ve outlined a seven-step framework for making your project schedules below:
You can use a few templates when scheduling your web design projects. Below, I’ve included three schedule formats and explained when it’s best to use each.
A work breakdown schedule (WBS) is an outcome-oriented planning tool that can be used to organize a project’s scope into manageable chunks visually. That means rather than focusing on the actions needed to be taken, this scheduling tool focuses on the end deliverables. The layout of a WBS is very similar to your standard wireframe, but rather than the pages and folders of a website, you will map out the project by its components.

A typical WBS starts at the top-level deliverable (a finalized website in our example above) and is broken down into individual sub-deliverables. Sub-deliverables should be organized into what are called “work groups,” which can be defined categorically by discipline (if you work solo) or department (if you work in a team environment). As you can see above, one of the project’s work groups is “design assets,” sub-deliverables include product page layout, collections page layout, and homepage layout.
The structure of a WBS relies on something called the 100% rule. Under this rule, the final deliverable represents 100% of your work and costs. For each subsequent sub-deliverable, you should apply a percentage value associated with the total amount of work and the budget. The value of all sub-deliverables within a work group should add up to the total percentage of that group, while all work groups combined should add up to 100%.
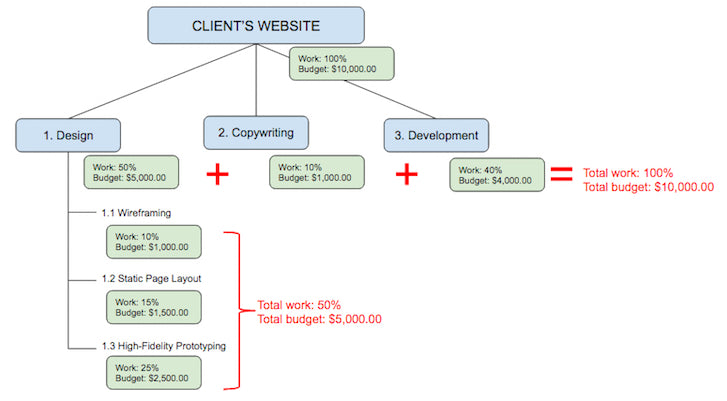
The WBS is primarily used for internal purposes and is excellent for strategically defining and organizing your project from a high level. It provides a detailed overview that can help you identify risks in your workflow before they happen. For example, if a sub-deliverable is running behind schedule, you must look at your WBS to determine how that delay will impact other project components. Since the WBS allows you to categorically estimate the cost and effort associated with all facets of your project, it should only be used internally (unless you want your client to be privy to your margins).
The insight you get from mapping out your entire project with a WBS will put you in a better position to accurately build out your project timeline in a Gantt chart.
You might also like 3 Organizational Strategies to Prevent Scope Creep
The Gantt chart is one of the most popular scheduling documents for managing projects in the creative industry. If you’ve never used one before, a Gantt chart is a simple two-dimensional schedule that outlines the anticipated timeline of your client’s project. They are most suitable for jobs spanning a few months.
Unlike the WBS, Gantt charts are generally used for client-facing situations as they only showcase project deliverables and timeframes for completion, with no mention of cost information. The structure of a Gantt chart is relatively simple: deliverables are organized across the leftmost column of the chart, while the top row is used to illustrate the project’s timeframe across those deliverables. The timescale is organized by deliverable, using the sequential order defined above. This will help you manage the project flow and give you an idea of when to loop in certain team members.

Here’s a quick breakdown of the components that should always be included in your Gantt chart:
Once you and your team feel comfortable with the schedule, you should send it to your client for final approval before starting any work. They will review it and let you know if any problems exist. Once they’ve signed off on the schedule, keep their approval email in your records to safeguard you from any clients demanding additional work not included in the program.
While Gantt charts can be your go-to schedule for client-facing emails, they also play an essential role internally in tracking sub-deliverables’ progress and anticipating cost overruns. To make your Gantt chart more helpful in cost-tracking, add a column beside your sub-deliverables to show the total amount of billable hours used thus far by you or your contributors. From there, you can compare the entire billable hours column against the forecasted schedule and budget to identify any cost overrun risk.
Clients are busy people and don’t want to spend time digging through an email chain to find the schedule you attached twelve emails ago — and, as their consultant, you shouldn’t force them to. That’s why it’s your job to update them regarding their project’s progress proactively.
When giving these updates, whether to show headway or reflect scheduling changes, you might feel required to provide them with a new version of the Gantt chart you created at the project’s onset. While updating the Gantt chart is vital for your internal records, sharing that document for simple scheduling updates or check-ins is unnecessary.
Instead of sending them your revised Gantt chart every time it is updated (which can lead to version control issues), it’s good practice to include a barebones version of your schedule within the email. That way, your client can quickly review your schedule updates and reply to your message, regardless of where or what device they use.
Here’s an example of a simple email you could send your client when you’ve updated your project schedule:
Hey CLIENT,
I just wanted to chat about our project. Given our progress over the last couple of weeks, I’ve included an updated schedule for you to review and approve.
| PROJECT NAME SCHEDULE | |
| Line Item | Delivery deadline |
| Wireframe v1 | EOD, May 14 |
| Client review/feedback | May 15 |
| AGENCY revises WF, sends v2 | EOD May 16 |
| Client review/approval | May 17 |
| AGENCY to create a copy | EOD May 18 |
| AGENCY designs v1 | EOD May 22 (2 days) |
| Client review/feedback | May 23 |
| AGENCY revises design, sends v2 | EOD May 24 |
| Client review/feedback | May 29 |
| AGENCY finalizes plan, sends v3 | EOD May 30 |
| Client review/approval | May 31 |
| AGENCY code v1, send a preview link | June (2 days) |
| Client review/feedback | June 5 |
| AGENCY revises, sends v2 (FINAL) | June 6 |
Let me know if the revised timeline looks good to you. Otherwise, do not hesitate to contact me if you have any questions regarding the updates above.
Thanks,
YOUR NAME
Now that you’ve seen the value of a comprehensive schedule for your web design and development projects, you’re free to take your project planning to the next level.
We’ve put together a project planning toolkit that includes templates of the schedule styles covered above. Feel free to download and use our project planning templates to help you create your own project schedules. And as always, let us know what you think in the comments below!

