Shopify is the most popular eCommerce platform among online merchants. It comes with all the core functionalities you need for creating and launching an online store.
Shopify will help you with designing your shop, displaying products, accepting payments, and much more. In short, Shopify offers a lot. And while the range of features may seem overwhelming, setting up a store is surprisingly fast and straightforward.
So, how about you find it out for yourself? We’ll help you out and outline all the necessary steps you need to take to register, set up, and launch your first Shopify store.
Follow these steps to start a Shopify store:
New to Shopify? Take a look at these guides as well:
Your business name should be short and memorable.
Typically, one or two words are ideal. If you prefer to use three or four short words, try to create a phrase that your audience will be able to remember easily.
Also, the name must be original, meaning that it’s not already used by any other company. The same goes for URLs—do a domain name search before you register your store.
If you’re out of ideas, try Shopify business name generator or any other free generator you can find online.
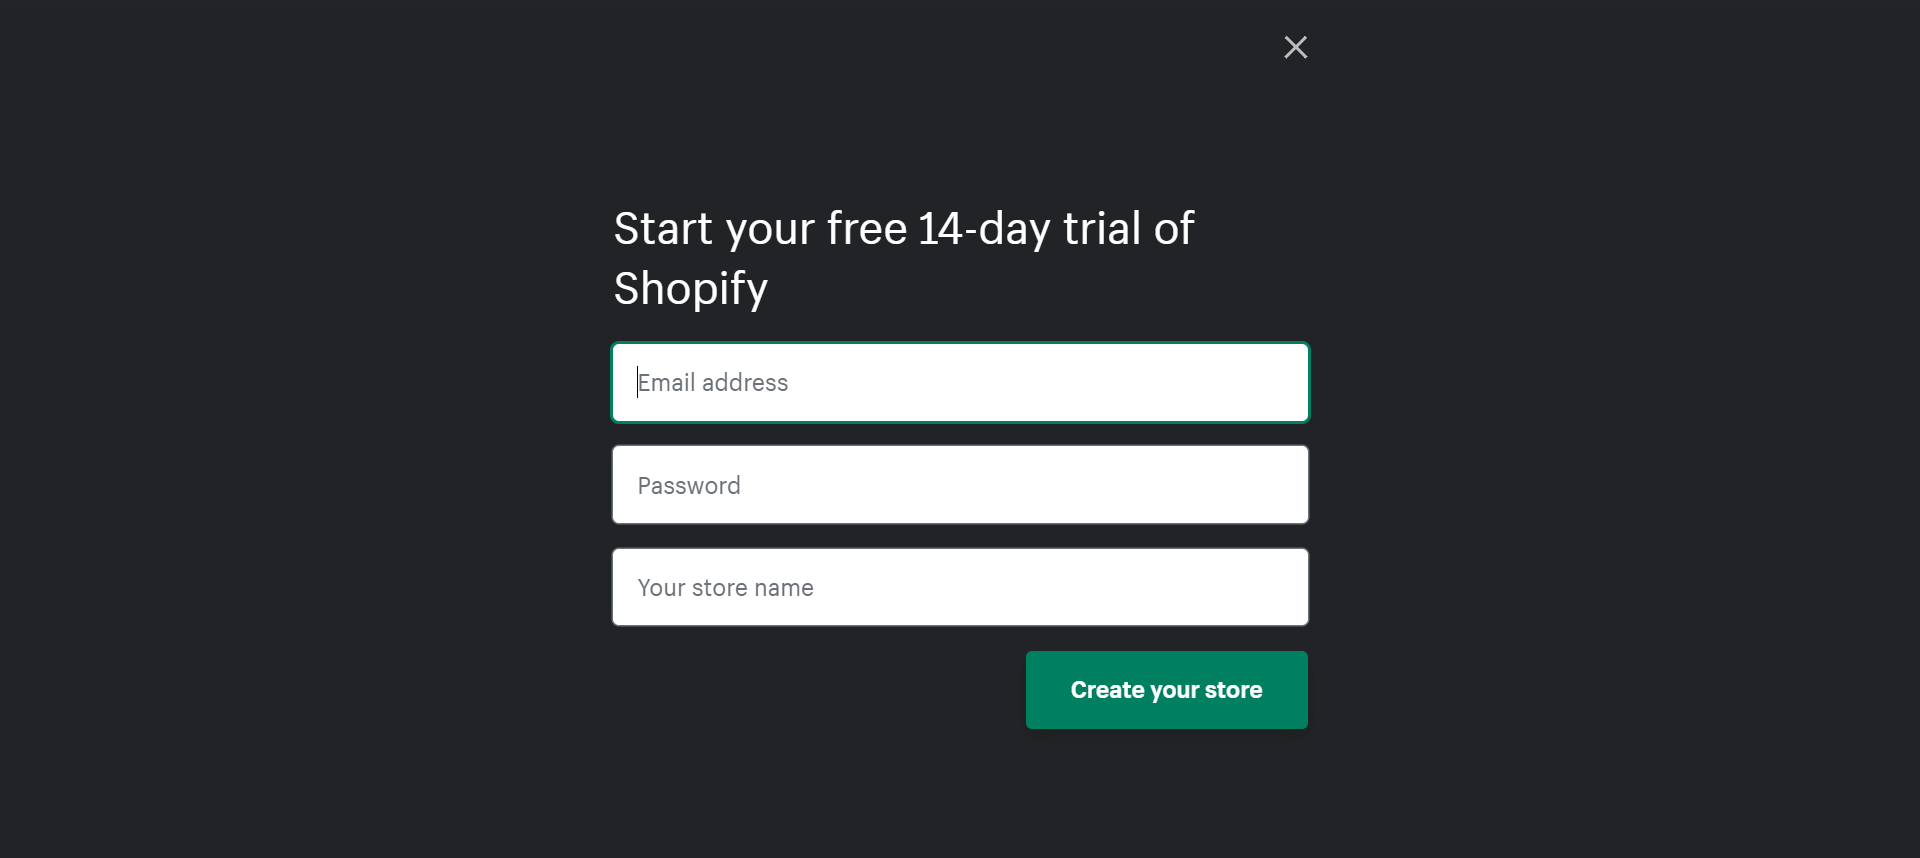
To begin, click the Start free trial button and enter your email address, password, and store name in the signup form.
Your store name must be at least four characters. If a store name you entered already exists, the signup form will prompt a message.
The store name will become your default URL (e.g.: yourstore.myshopify.com) and you won’t be able to change it (unless you buy a custom domain).
When you’re done, click the Create your store button.
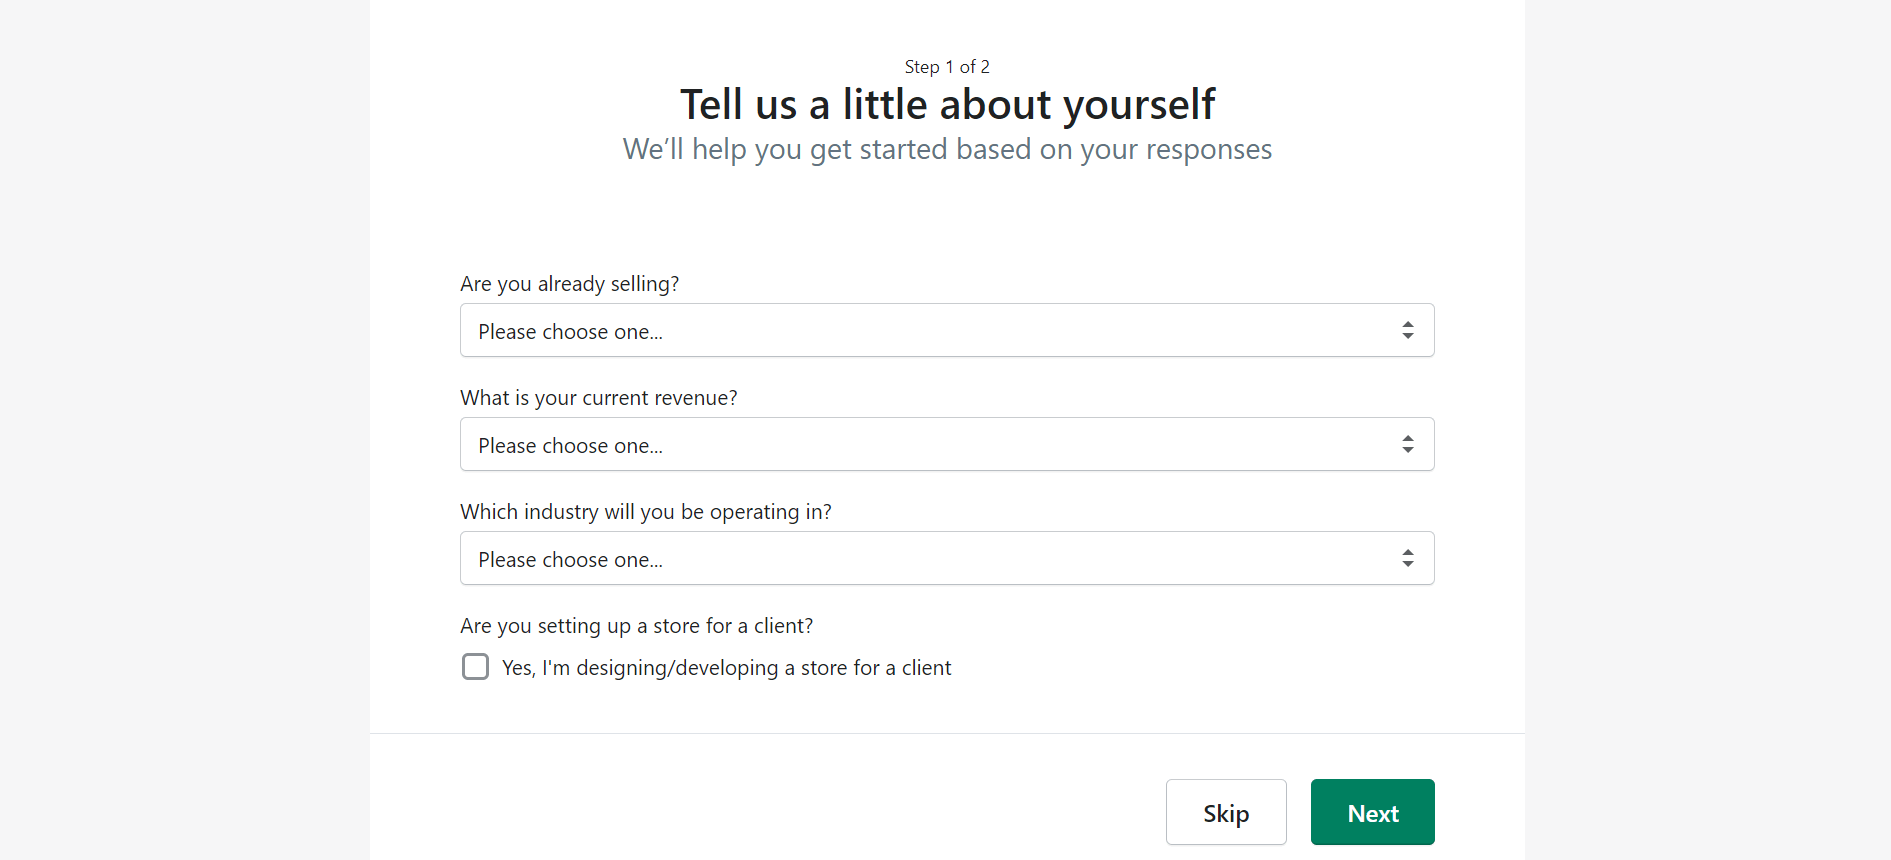
There are two more steps to go through.
First, you’ll be asked to fill in more details about your products, revenue, and business industry. You can skip it or select “I’m just playing around” and “I’m not sure” to continue.
Then, you’ll need to provide your business address. Click Enter my store to finish the registration process.
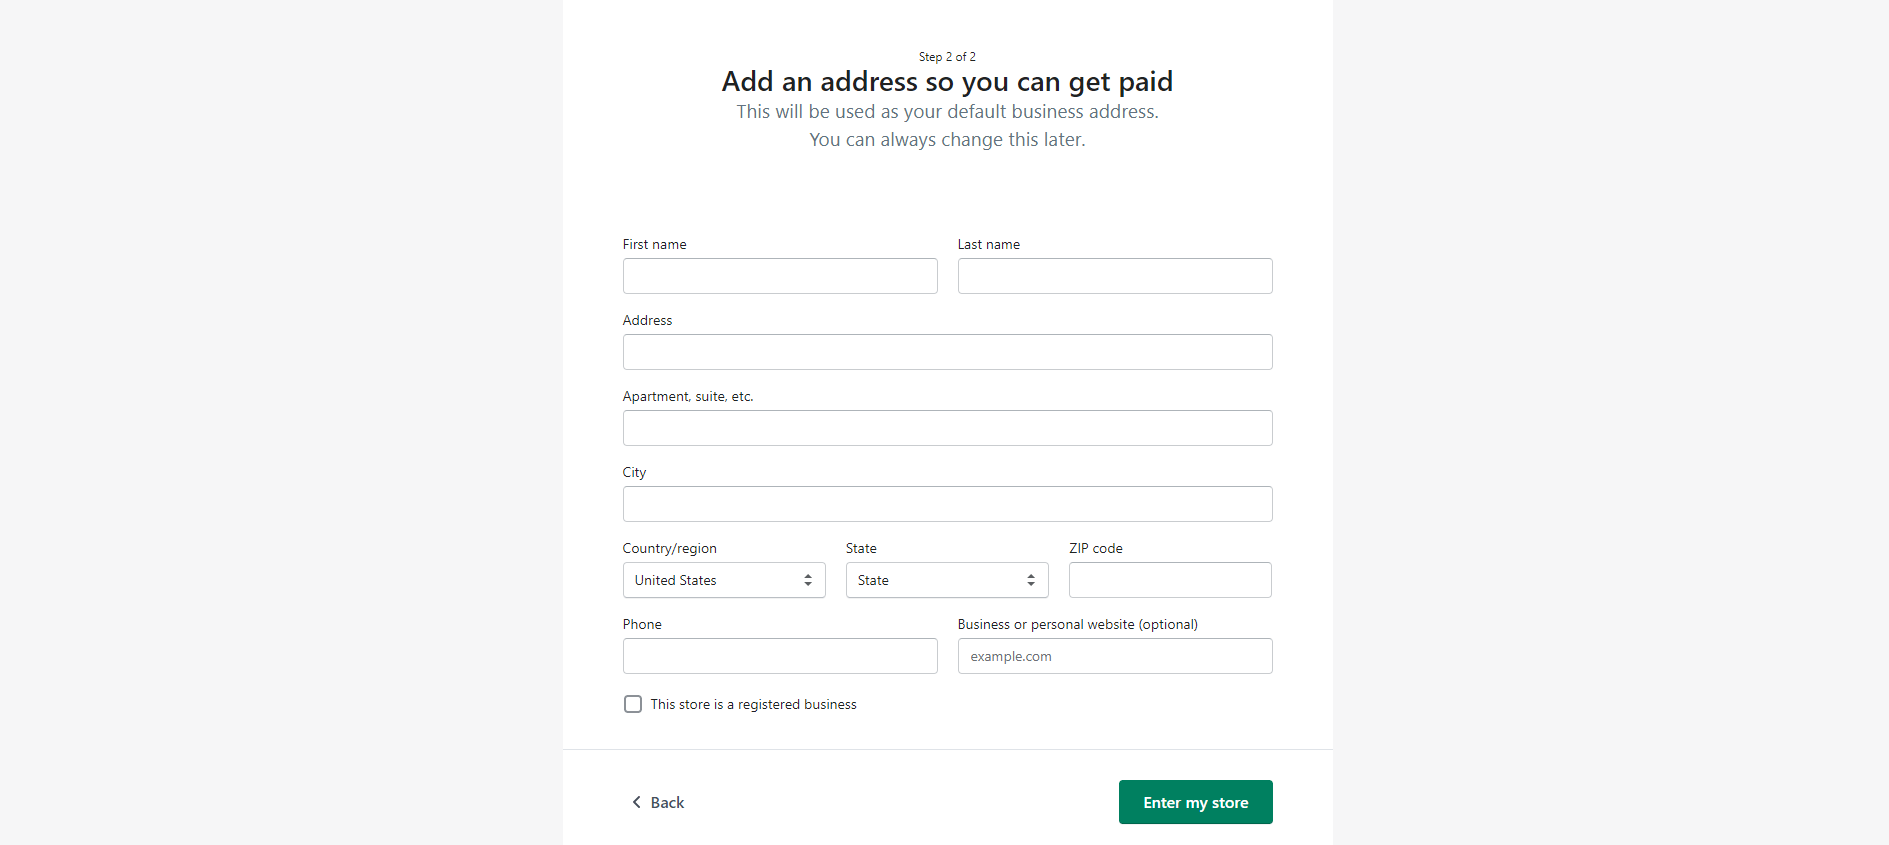
Your Shopify account is now active and you can try out all the features, including premium ones, for free for the duration of the trial period.
After you’ve signed up, you’ll be taken straight to your store admin panel where you can customize a range of different settings to fine-tune your store.
Navigate to the bottom left corner of your Shopify admin panel and click the gear icon to access the Settings page.
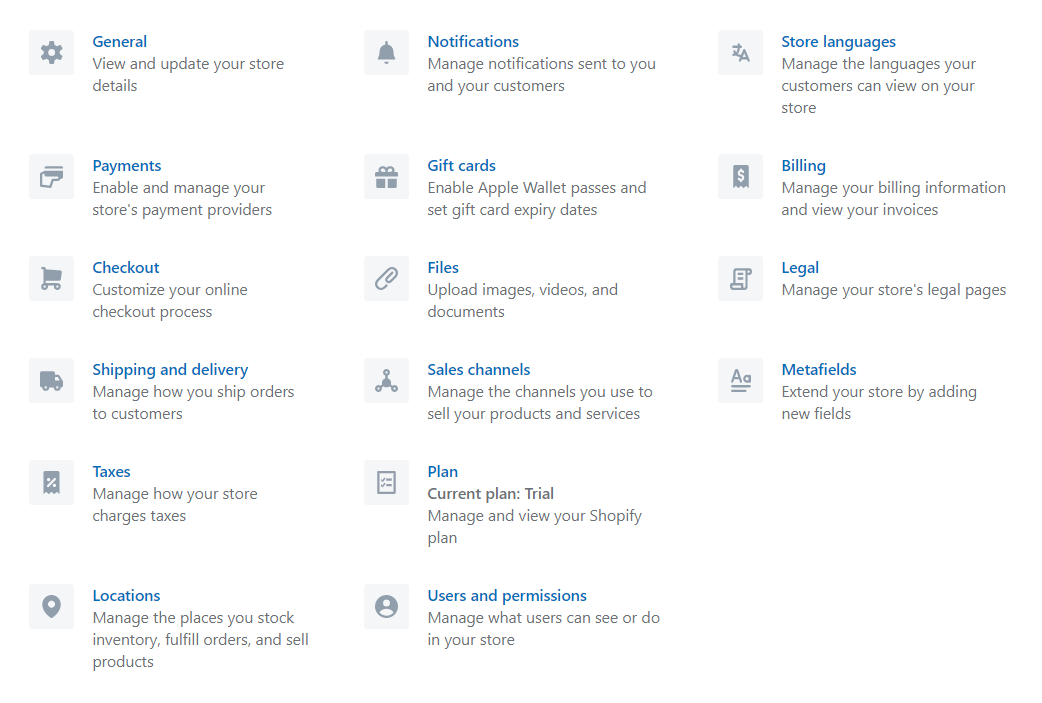
Start with filling out all the store details in the General part that covers all the information about your business your customers need to know.
Next, let’s move to other important settings under General, namely Payments, Checkout, Shipping and Delivery, and Legal.
You can also sign up for Shopify Payments. For that, you’ll be asked to provide your business information, product information, as well as personal and bank account details. This method will spare you the transaction fees (if you’re eligible).
When you’re happy with your payment capture and gateways methods, hit the Save button to save your settings.
Shopify will automatically send abandoned cart emails that will go out ten hours after someone abandons their cart. This feature is turned on by default.
Save your changes and move on to another settings page.
Tip: You can enhance your shop’s functionalities by adding apps such as Shopify shipping and order tracking apps. You can discover many more in Shopify AppStore.
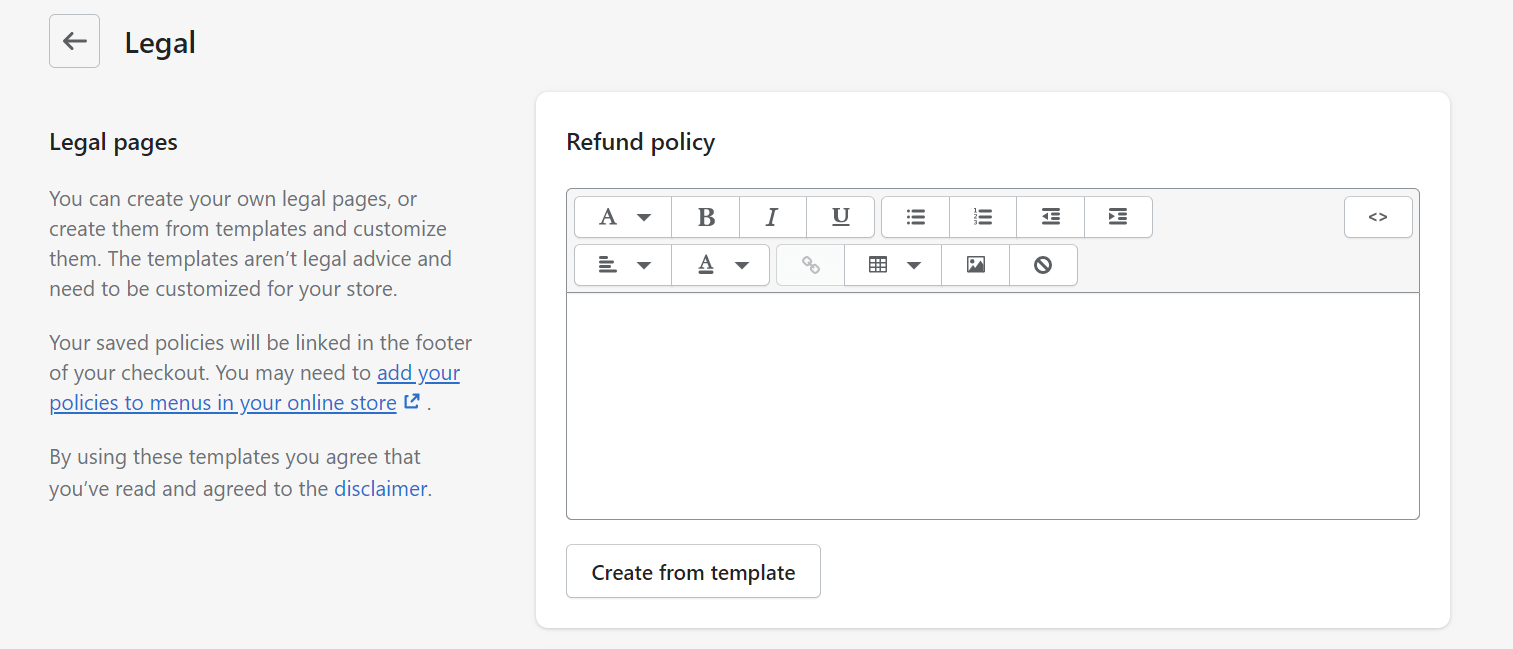
However, you may want to consult a professional to make sure you’re charging the right amount. You can also add a tax override for region-based products and customize the shipping rates if you’re shipping to designated areas.
When everything’s set up, don’t forget to click Save.
The excellent store design is not just the website’s homepage, blog, landing page, and product pages. There are a few other pages you’ll need to take care of to improve the customer experience in your store.
To add and edit new pages, go to Online Store > Pages.
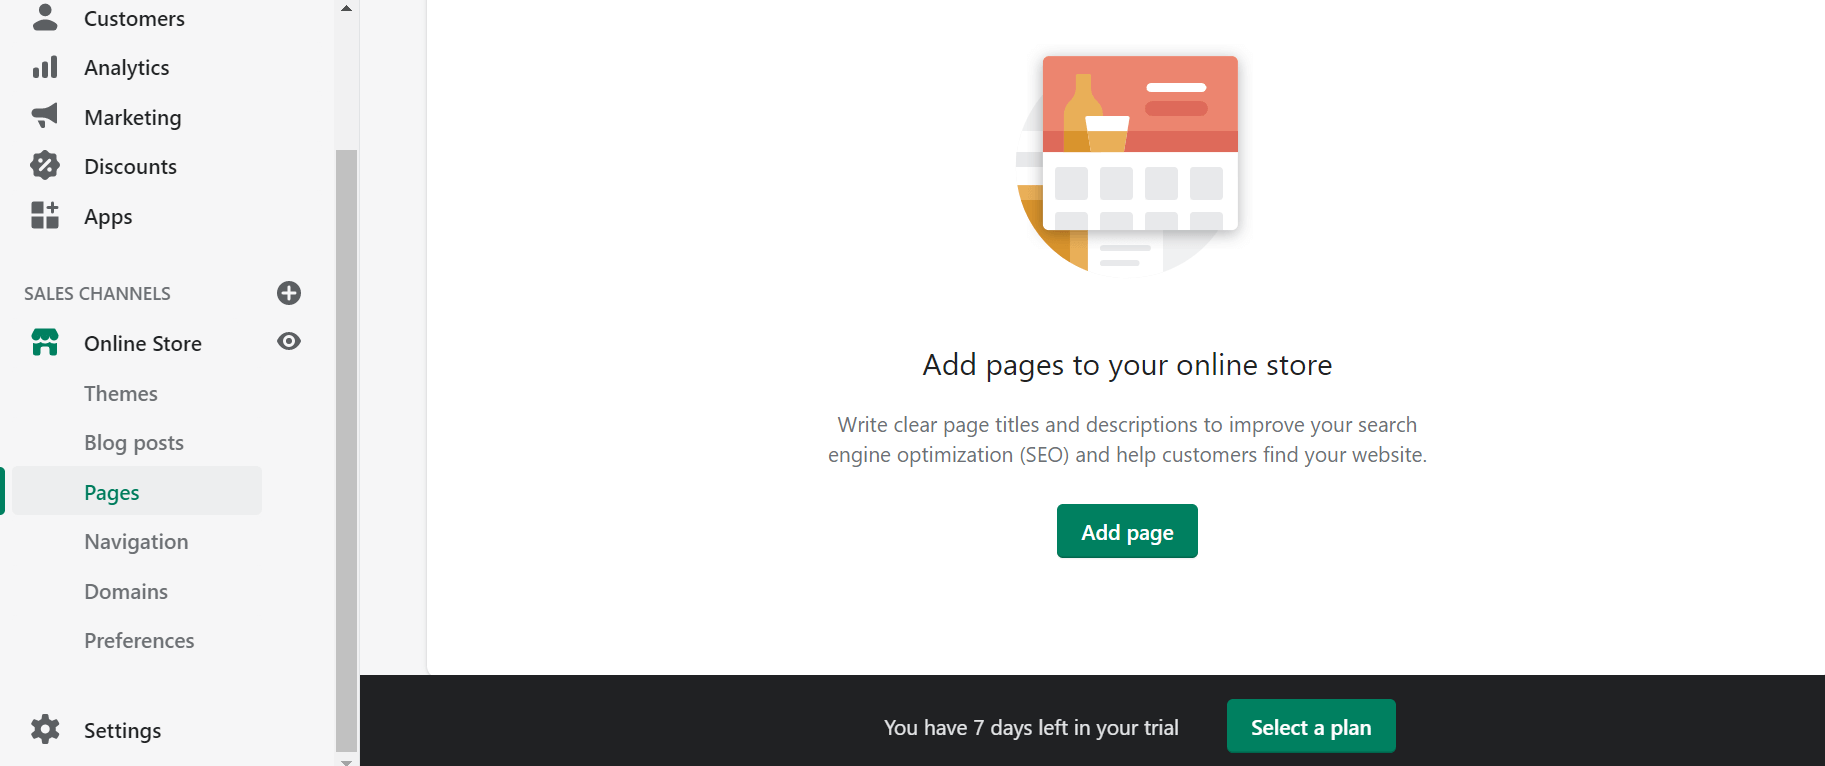
We’re going to start with the Contact Us pages.
Click the Add page button to open the page editor. Fill in the page title and content. In the Template section on the right, choose “contact” from the drop-down menu.
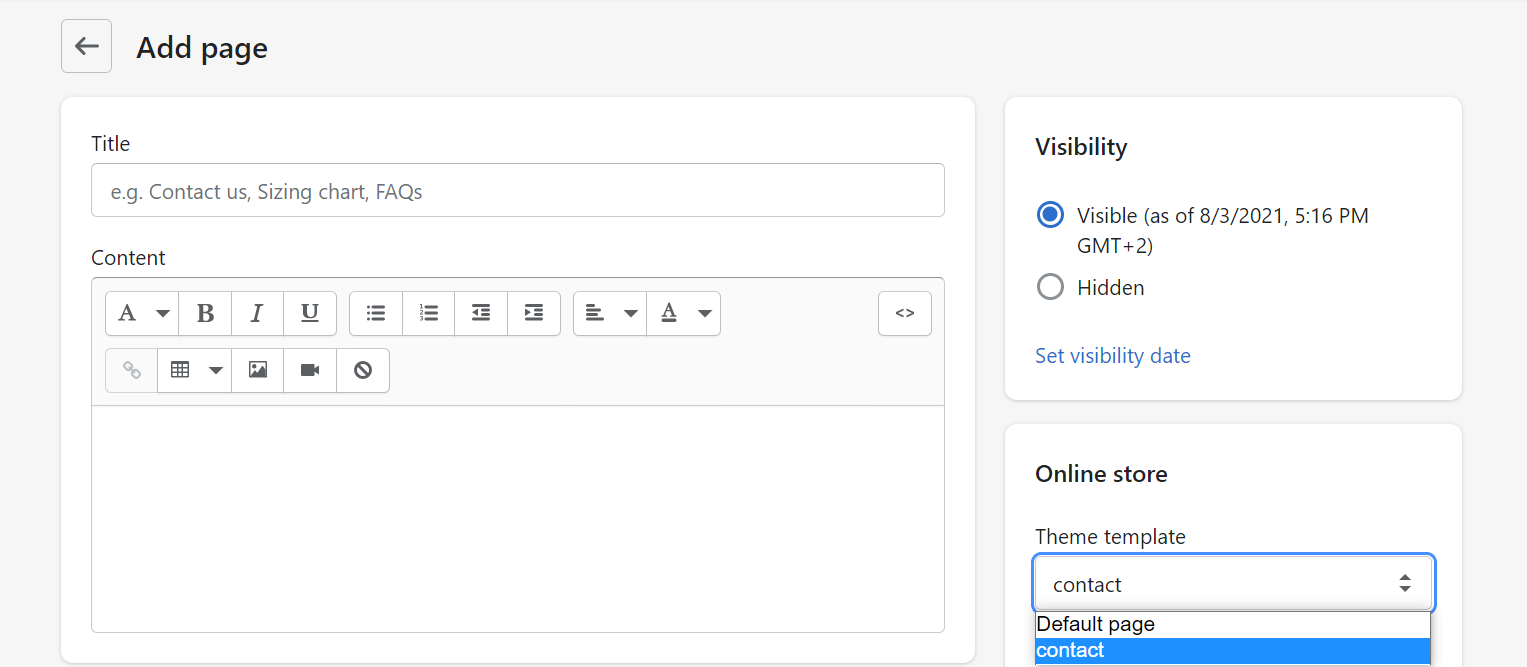
The Contact Us page is often one of the most visited pages. It’s also going to be an important element of your store. That’s because it will help your existing customers to resolve their issues. It will also help you convert your prospects.
A link to a contact page can be located in the top menu or in the footer.
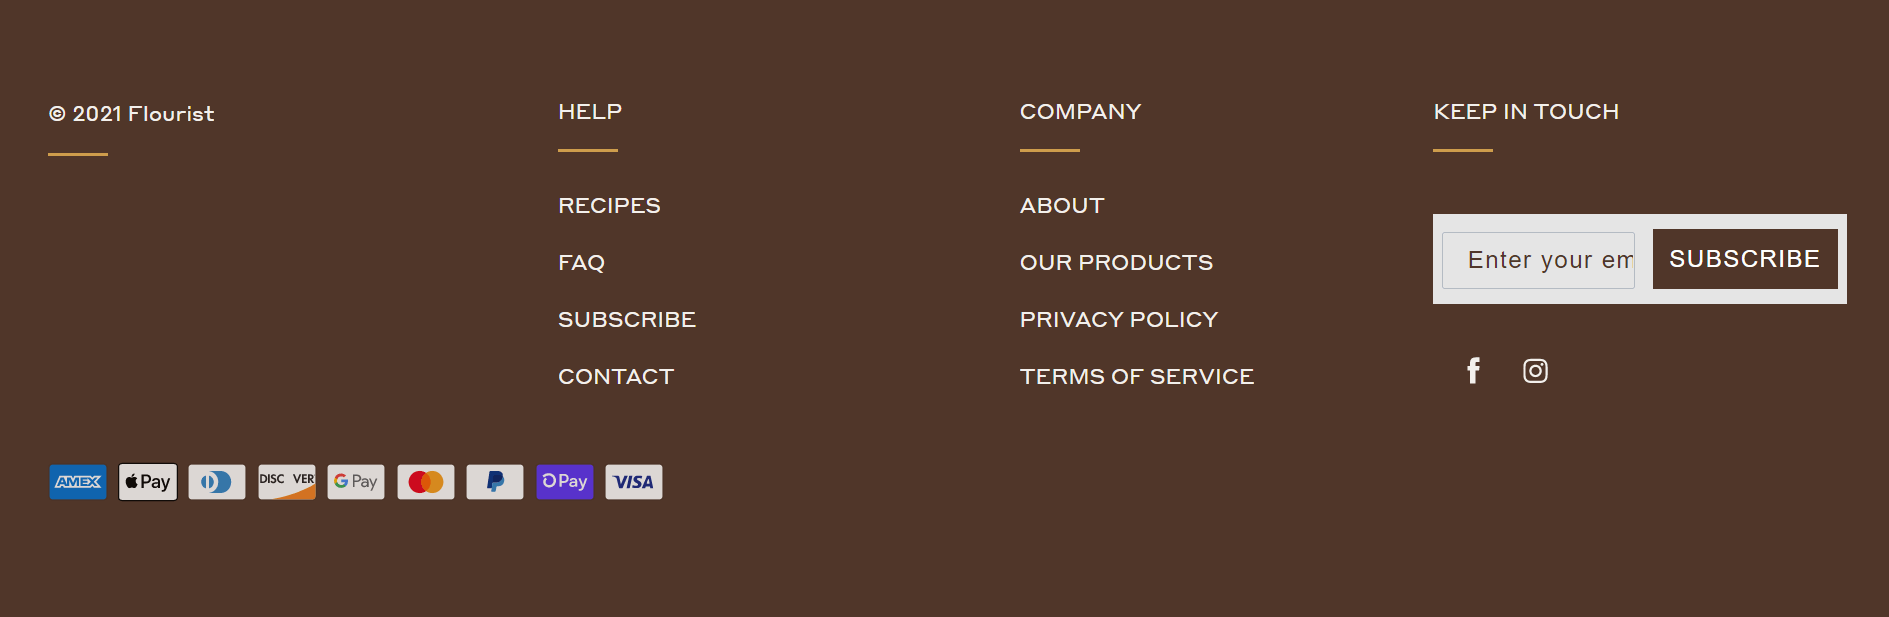
The contact page usually includes contact details such as an email address, a phone number, and links to social media profiles. But that’s a bare minimum. Depending on your store and goals, you may want to offer more than that.
Here are a few ideas on what else you can add to your Contact Us page to make it more customer-friendly:
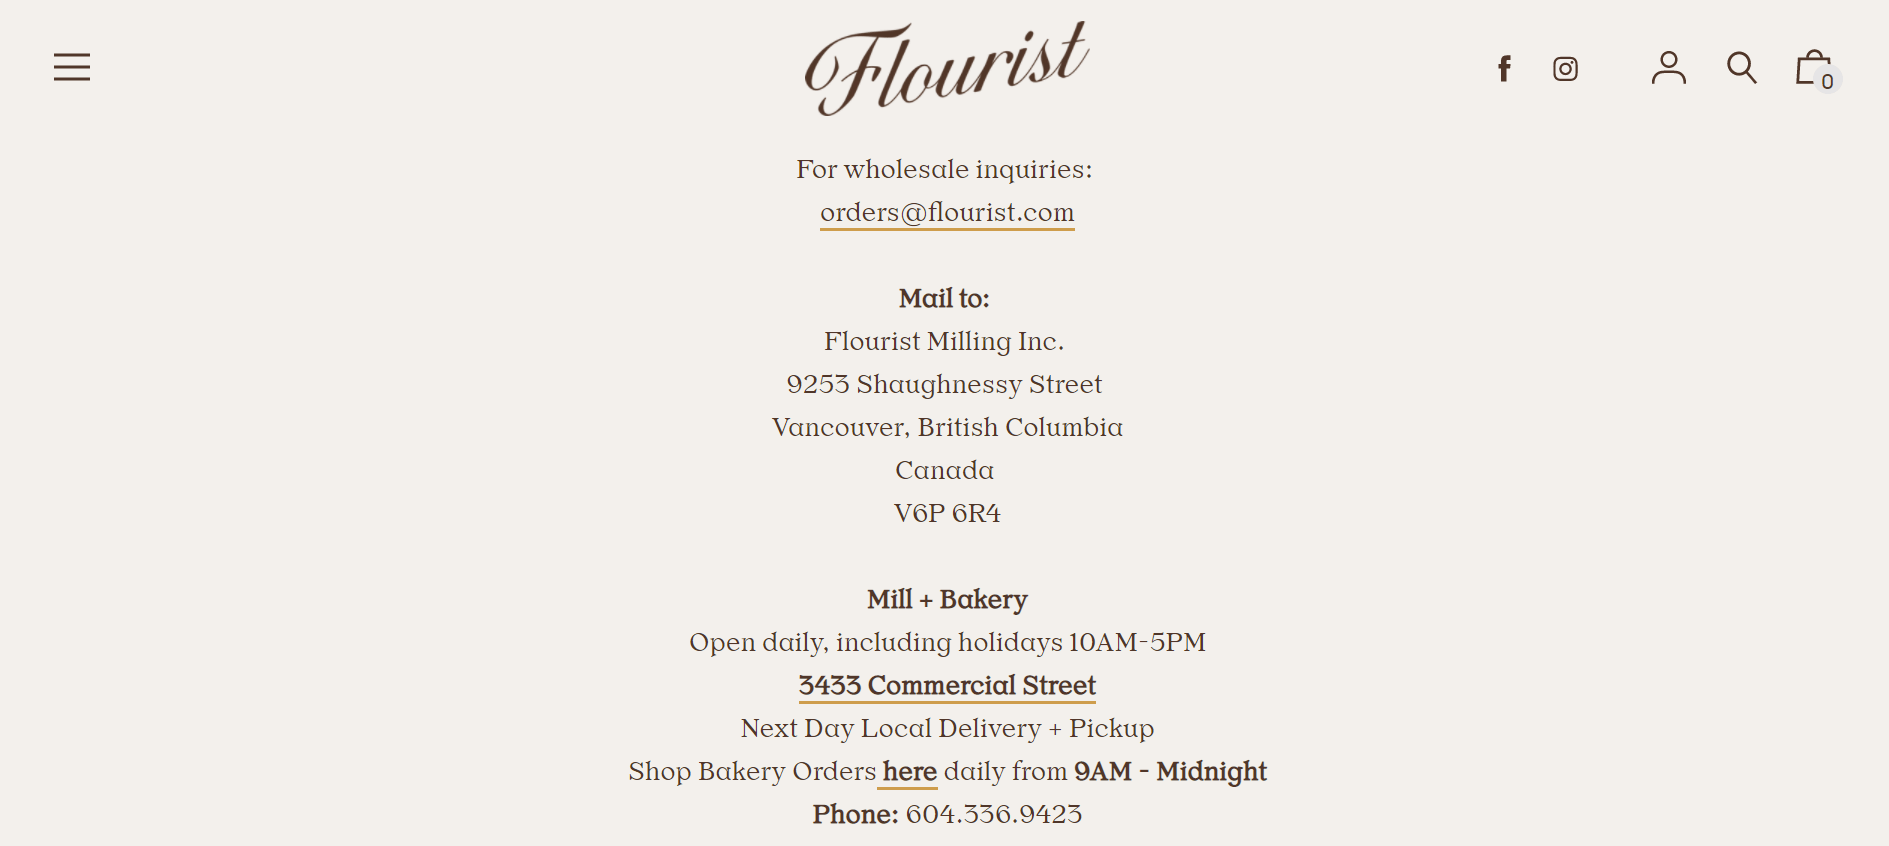
The last thing you’ll need to do is SEO optimization. Click the Edit website SEO link under the page editor and provide meta title and meta description for your Contact Us page.
Try to include a few good keywords in your description to help your prospects find you through the search engines.
Tip: Use Shopify SEO apps to optimize your store for search engines.
An About Us page is a special page that gives you a chance to tell your audience your story. It’s a place to explain who you are, what inspired you to sell your chosen type of goods, and why it matters to you.
It helps your audience identify with your brand and entices them to shop with you.
What makes the About Us page great?
First, the page should be informative to the point of giving your audience an idea about who you are and what kind of goods they will find in your store.
It should also be engaging. You can include, for example:
Here’s a good example of an About Us page that also features the description of the brand’s owner.
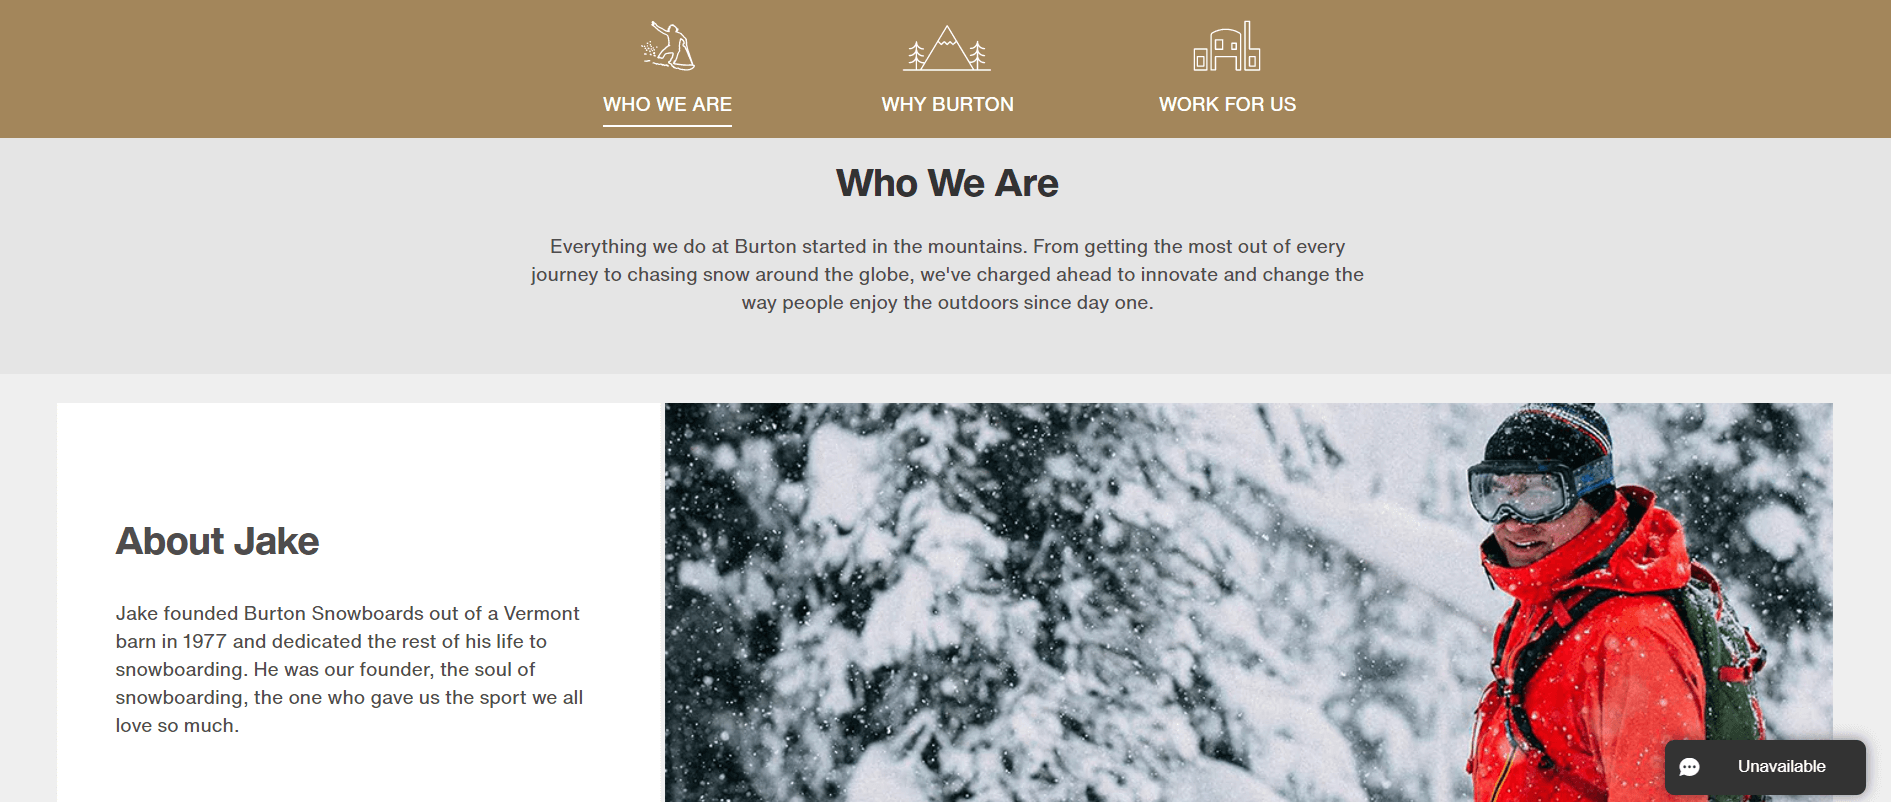
As previously, don’t forget to optimize your About Us page and Save it before you start editing another one.
A privacy policy is a legal statement that informs your visitors how your store collects, stores, shares, and protects their data. This data typically includes buyers’ names, addresses, contact details (phone, email) date of birth, and their behavior on your website.
The specific contents of a privacy policy document depend on the laws that are in force in the countries in which your business operates. Most countries have their own set of guidelines regarding what information is eligible for collection and how it may be used.
Privacy laws include GDPR, CCPA, CalOPPA, PIPEDA, Australia Privacy Act, and many more.
You absolutely need this page but you don’t need to be a lawyer to create one. Shopify offers a handy online privacy policy generator you can use for free.
The main purpose of a Frequently Asked Questions (FAQ) section is to answer questions your customers might have before they reach out to your support agents.
An FAQ page can become an effective element of your store website because it:
Although there are no official rules on how a FAQ should be structured, there are some good practices you may want to follow:
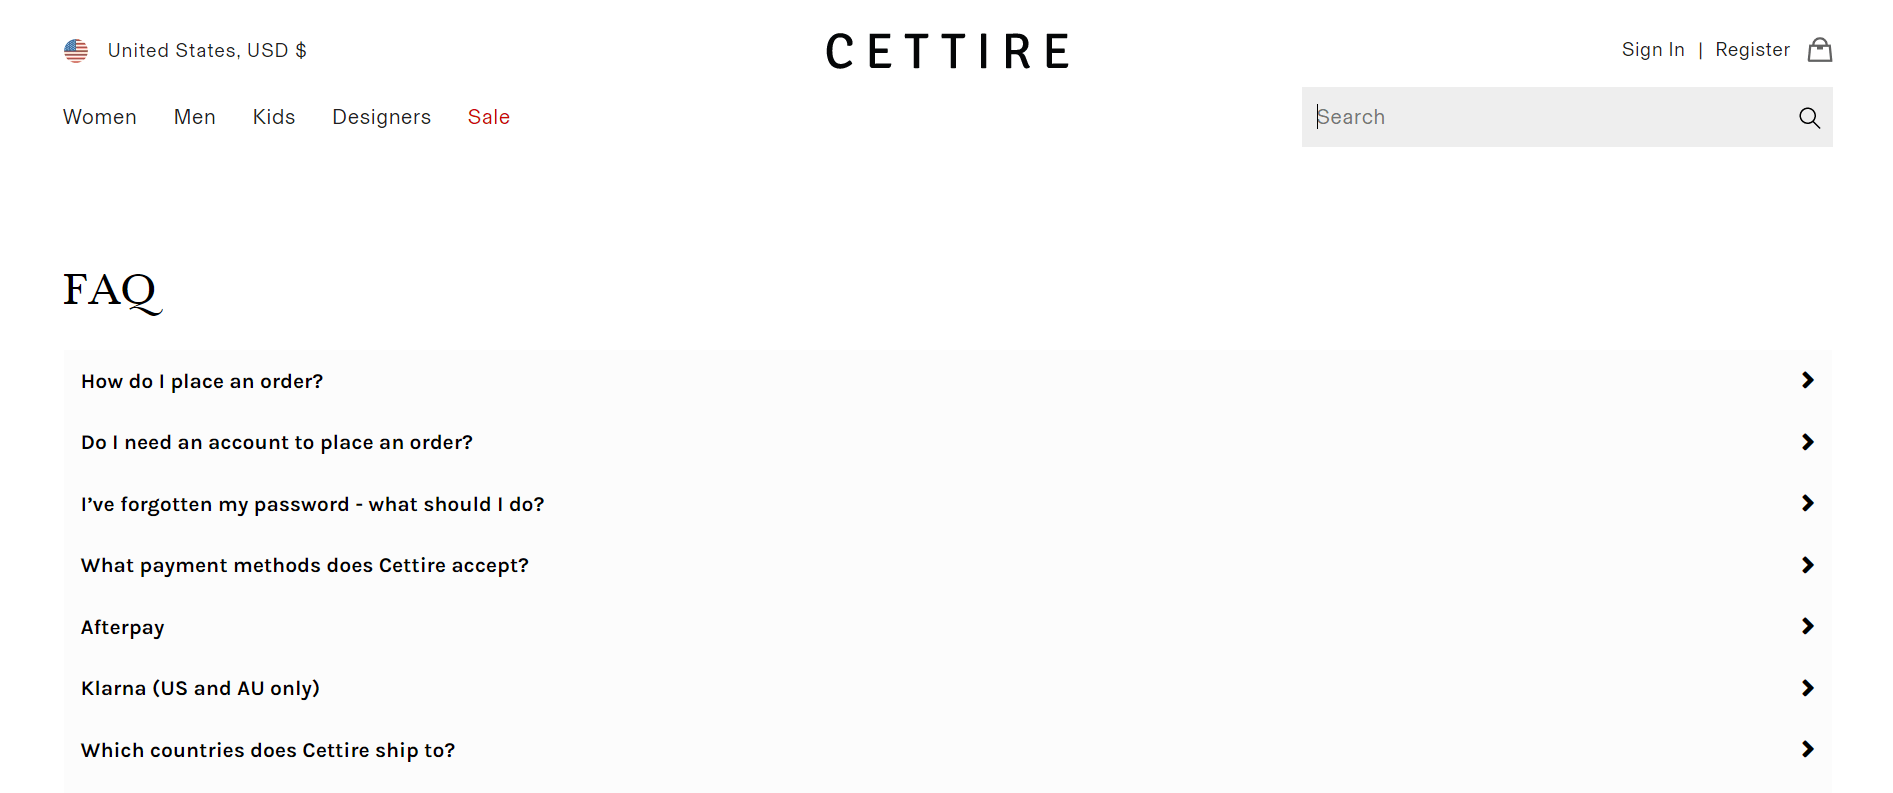
If you plan to start with a simple and short FAQ, then using the Shopify editor will probably do the job. But why not make it great straight away?
You can easily create a stunning FAQ section with dedicated Shopify page builder apps, such as PageFly, Easy FAQ Page, or HelpCenter. There are, of course, many other similar apps so be sure to visit the Shopify App Store for more.
You’ve done a lot so far. Good job! But before you’re ready to open your Shopify store, you still need to do a few things, including adding products for customers to buy.
You can add a product (or update information about it) from the Products page in your Shopify admin dashboard.
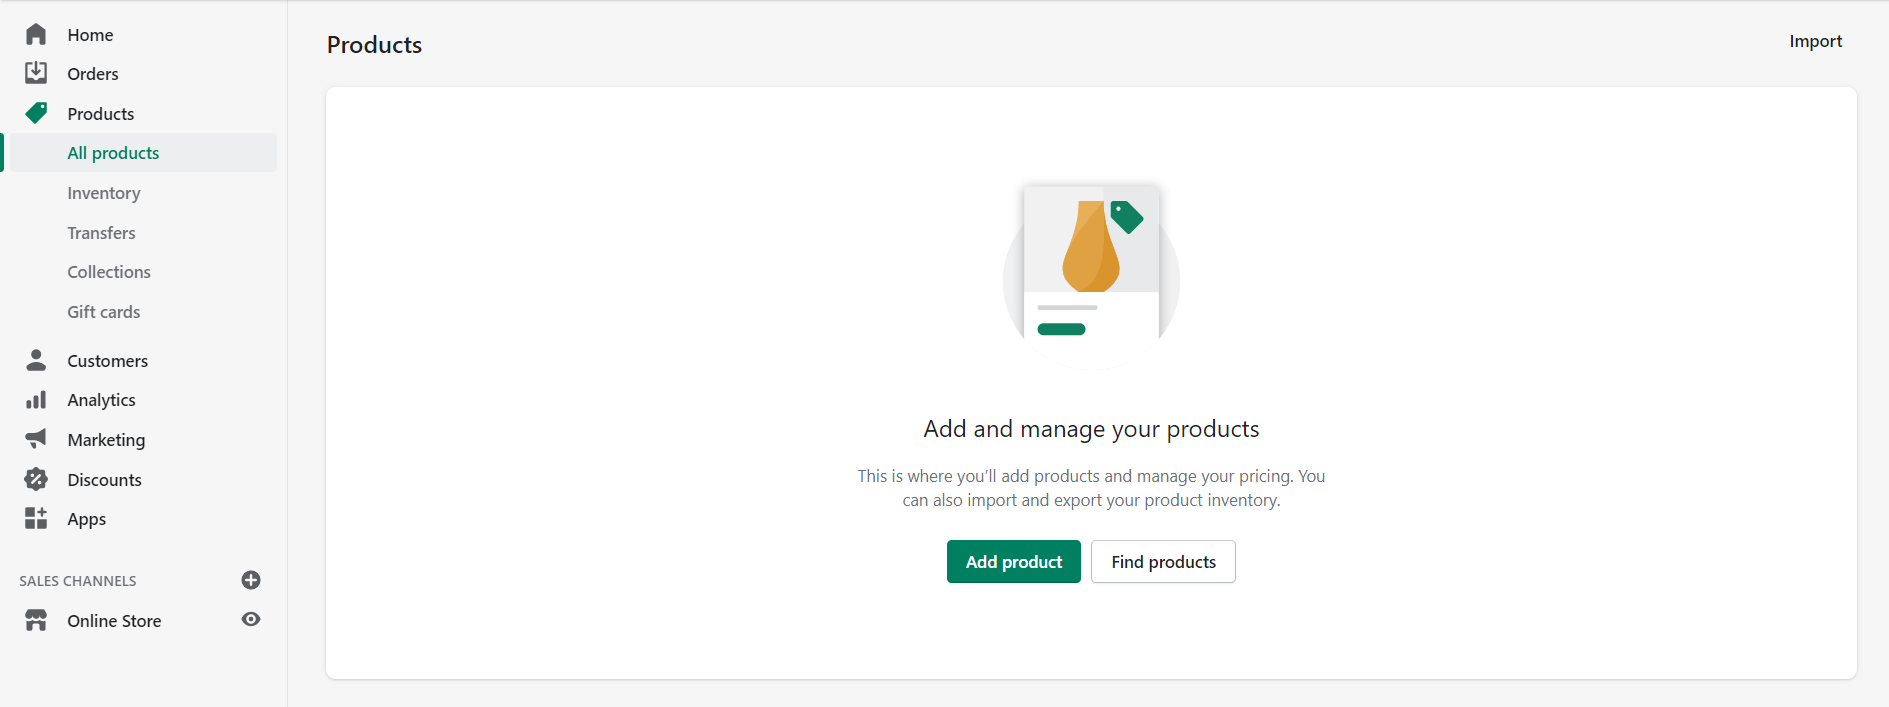
Click the Add product button and enter a title and description for your product, along with additional details. The details include:
Tip: Like any other page, products pages are a great opportunity to improve your organic traffic. When writing your product title and description copies, try to optimize them for popular keywords and phrases.
You can help your customers find your products in your store by adding tags. You can also use tags to create automated collections. You can apply up to 250 tags to each product.
Click Save.
After you add your products, collections, pages, and policies, you need to organize them so that your customers can find them.
To view and change your online store navigation, go to Online Store > Navigation page in your Shopify admin.
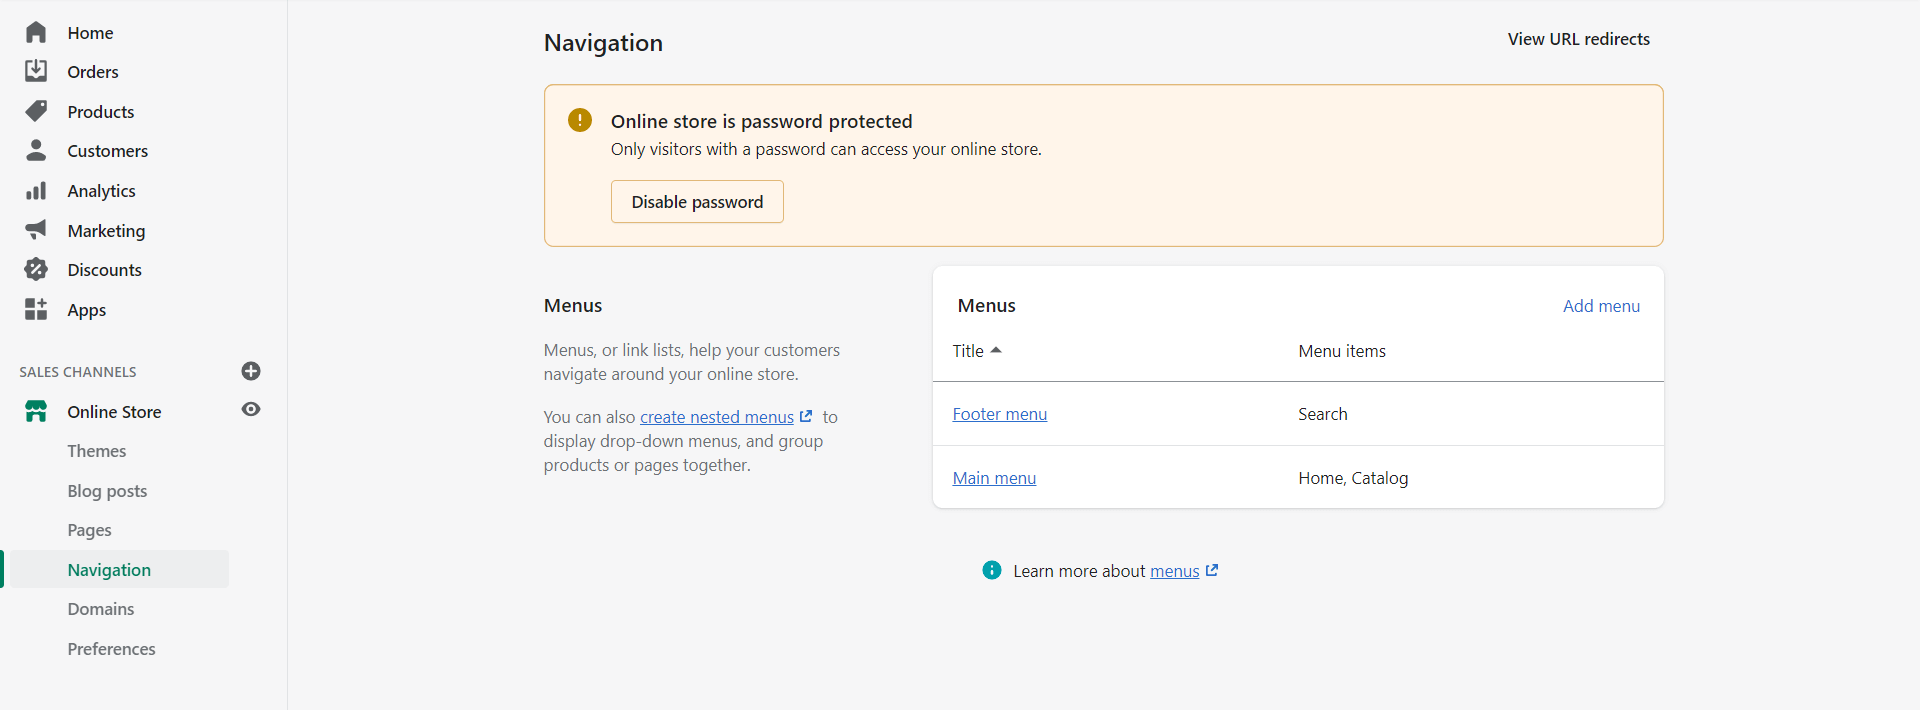
On the Navigation page, you’ll build a structure for the website menu but its look and location will depend on your store’s theme.
The items you put in the menu can have multiple dropdown levels. For example, if you sell electronics, you can group a collection of mobile phones under one menu.
Your store has two default menus that appear on every page:
You can link your main menu and footer menu items to:
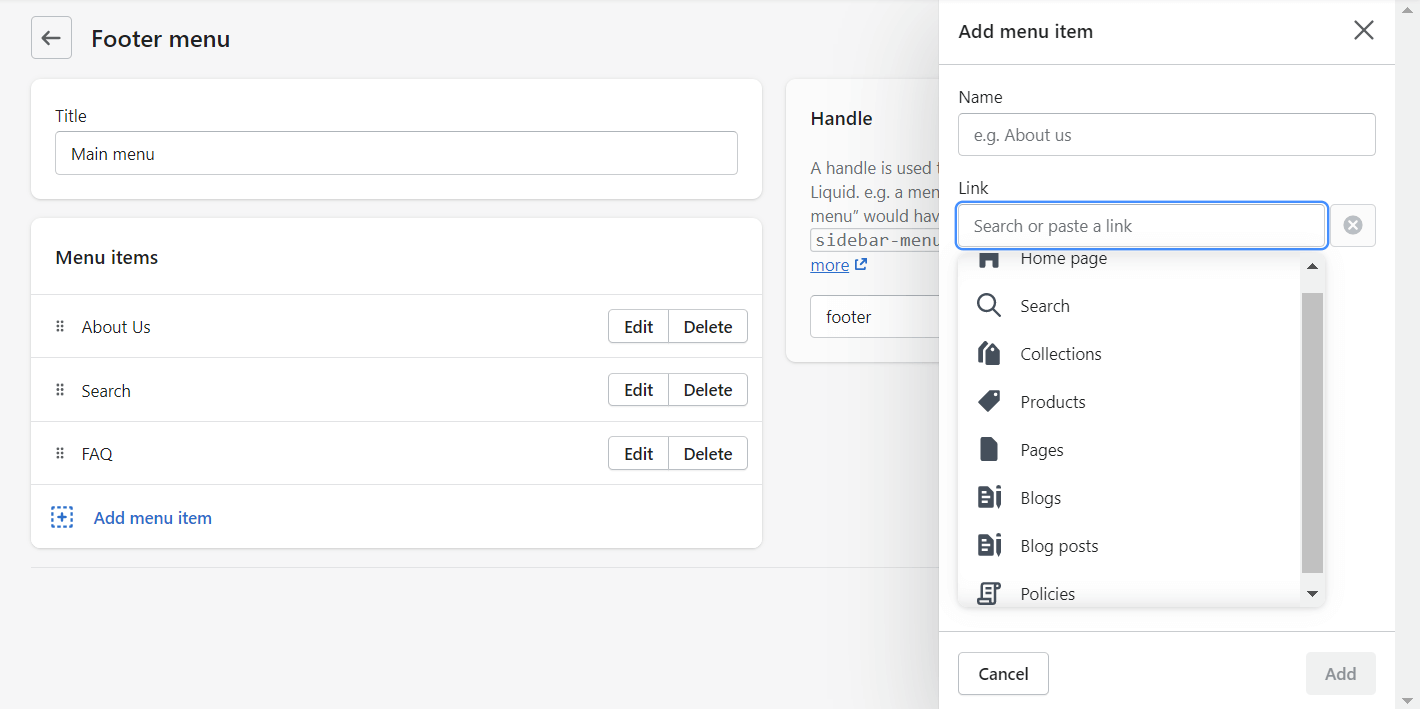
You can also add a new menu by editing the settings in the theme’s Header section. But again—it will depend on the store theme whether it would be possible to add an extra menu or not.
Your home page introduces your customers to your brand, it tells them about your brand’s values, and what they can buy there. A good home page can help you convert customers.
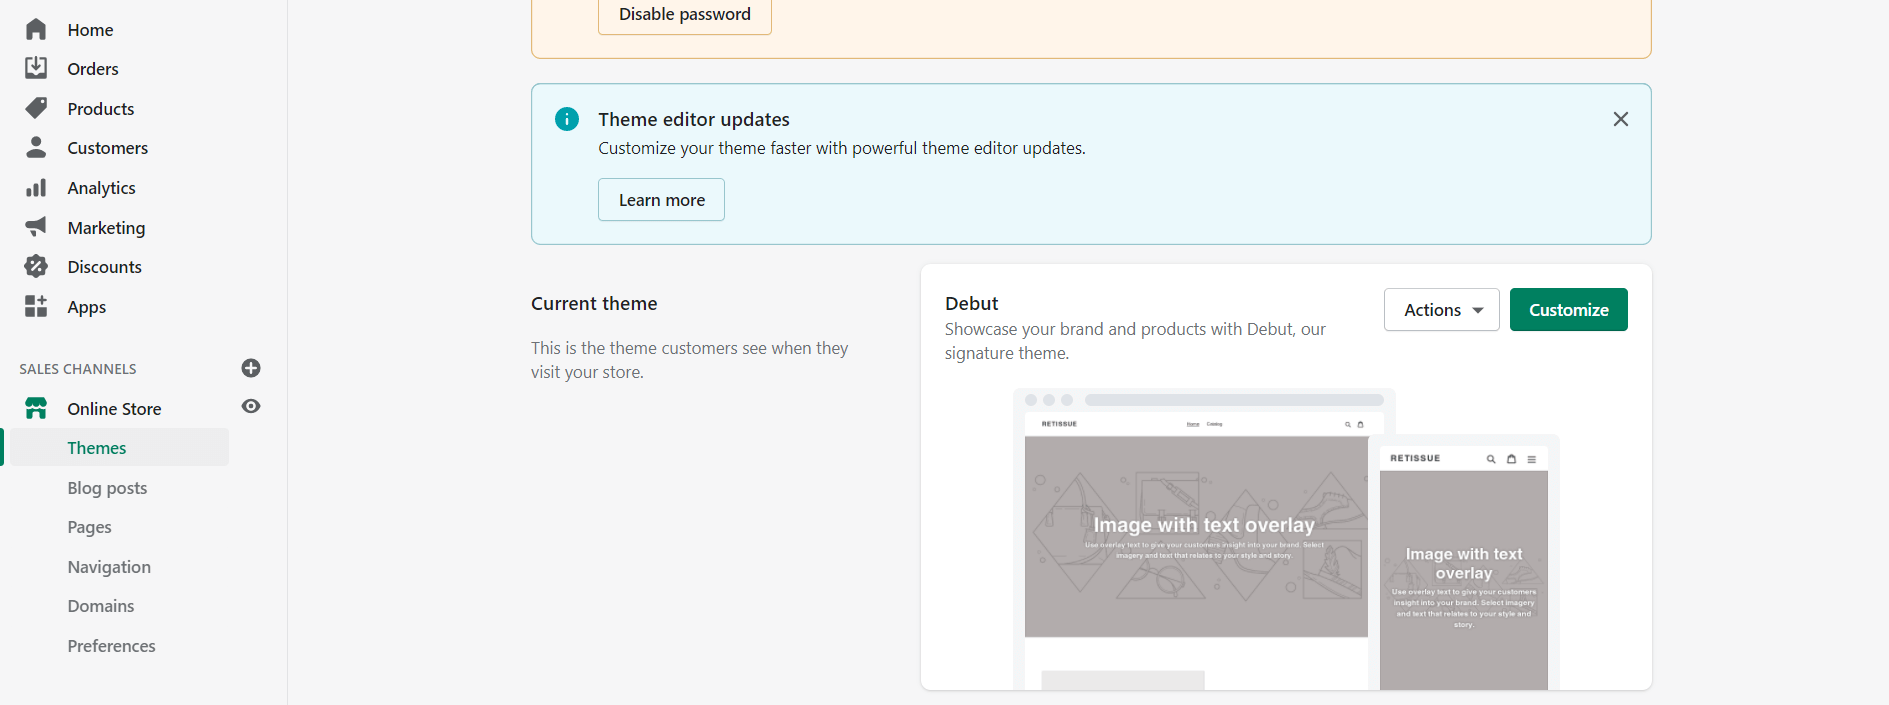
To get started building content for your home page, go to Online Store > Themes and click the Customize button in the “Current theme” section.
At the bottom of the sidebar menu, find an +Add section option and click on it. You can then select the type of section you want (slideshow, featured product, newsletter, etc.) and then click on the Add option.
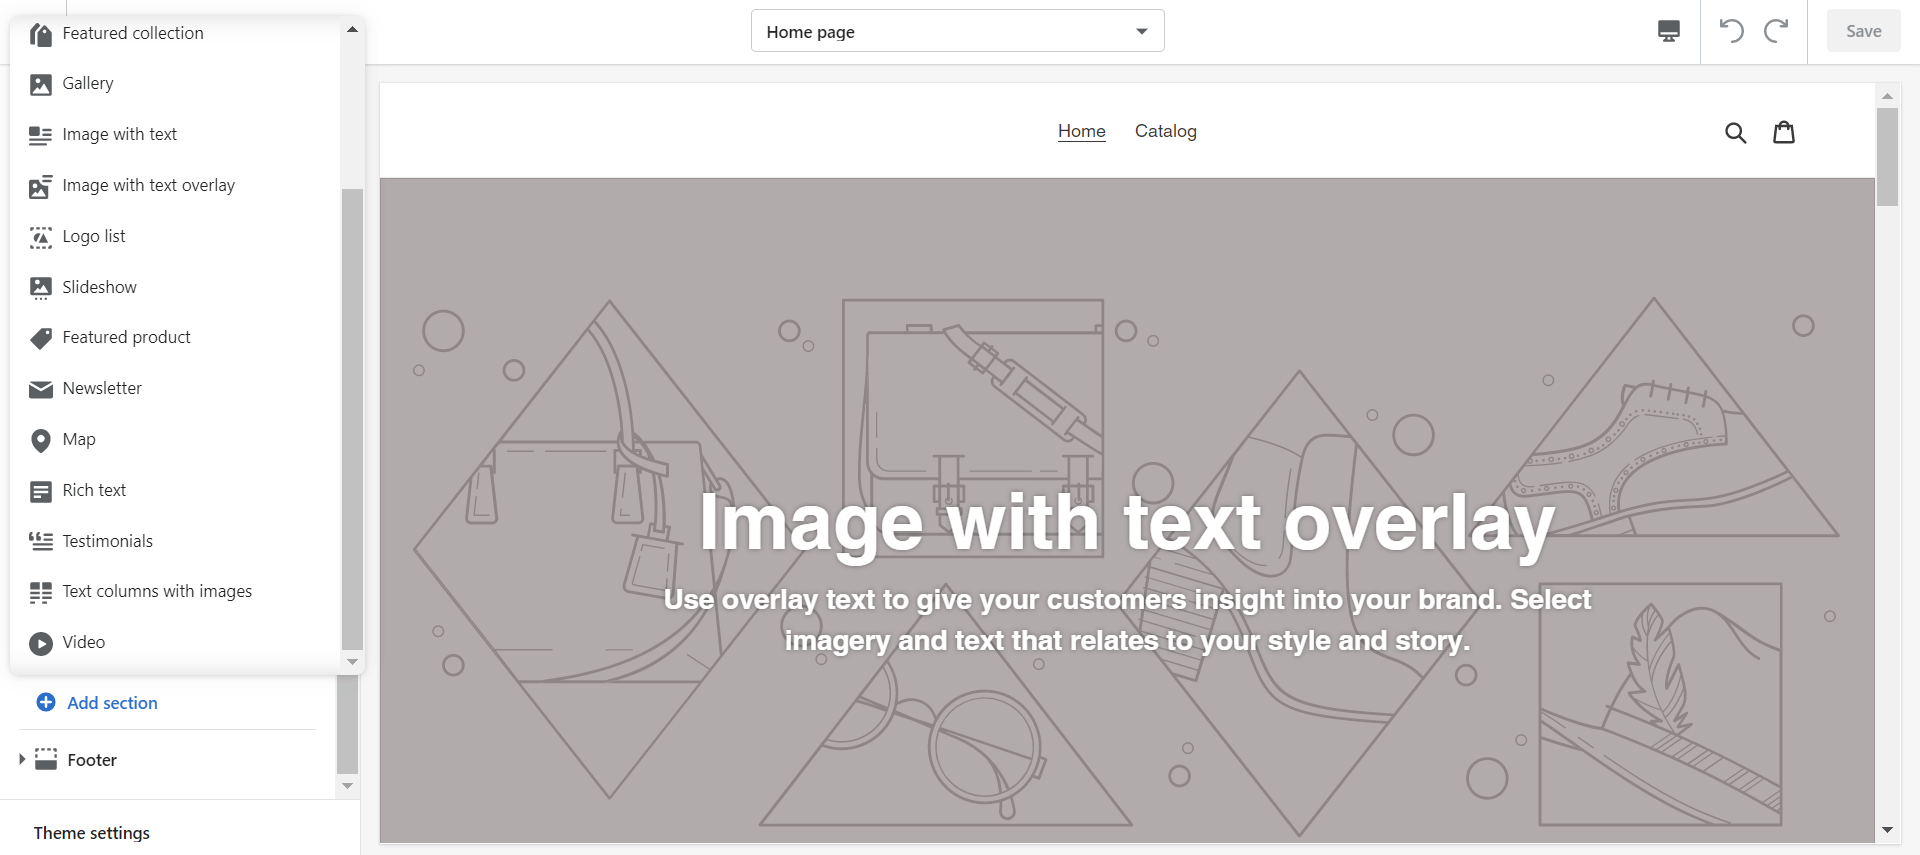
When you add a new section, you can edit, move, and hide it from the Home page. You can also delete it by clicking on it and selecting the Remove section option.
Go through other sections as well and customize them to your liking. It is crucial that you add high-quality photos and text that will engage customers and boost your SEO.
Shopify automatically assigns a Debut theme to all new stores. It’s a good theme but if you decide to use a different one, then check out the free Shopify themes.
You can edit each theme from the Online Store > Themes/ Current theme >Customize page the same way you did with your homepage.
If you want to add a new theme, you can:
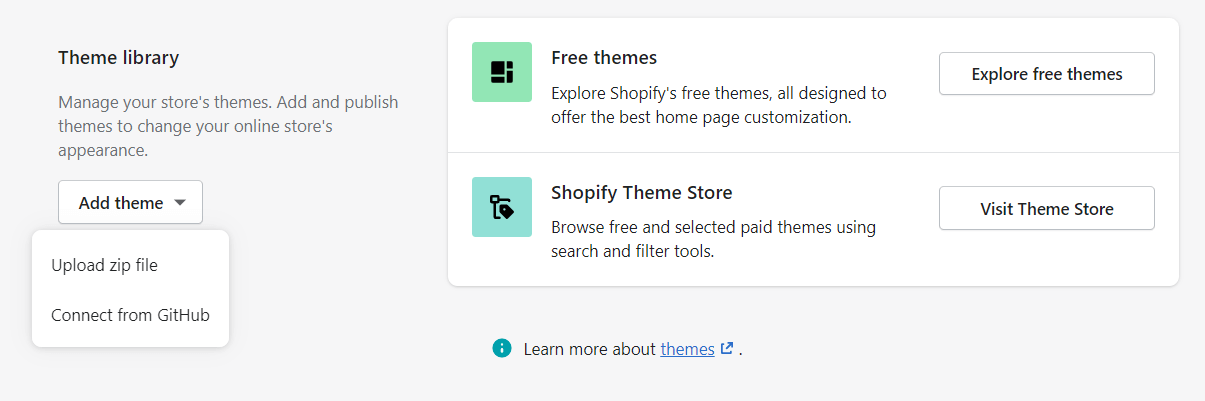
All themes contain sections that you can edit, rearrange, temporarily hide, or remove. You can experiment with different layouts until you’re satisfied with the outlook of your store.
If you need some design inspiration, take a look at the selection of the best Shopify stores.
And in case you come across a store that uses a theme you like, you can easily detect the Shopify theme it uses.
Tip: There’s no need to buy a premium theme until you’ve generated enough money through your sales. You can create a beautiful store with free online logo design apps (e.g.: FreeLogoDesign) and design graphics and photos with apps like Canva.
By now, you’re pretty much done with core building. The last thing that is left to take care of before you open your Shopify store is online marketing.
As a future online entrepreneur you will need to wear a lot of hats, and having decent skills in already mentioned design is only one of them. Another essential skill is marketing.
First, you’ll need to create a Shopify marketing strategy for your store. Think about:
Then, the next step will be to decide on the Shopify apps you want to add to your store. There’s also a ton of useful marketing automation software that will put a lot of your work on autopilot and help you get the best results from your campaigns.
Some of the best apps are free to use, so you won’t damage your budget too much when you’re just about to open your Shopify store.
Tip: If you’re worried that having too many apps could slow down your store, look for omnichannel marketing apps like Firepush that will let you engage visitors and prospects on multiple channels.
If you have managed all that way–congratulations. If you are eager to start your Shopify store straight away, remove your password page (under Settings > Preferences) and start telling the world about your business.

To remove the password, you’ll need to pick a plan.
But if you’d rather spend some more time polishing design, trying out apps and different settings, then hit the button at the very bottom of your screen reading Continue building to extend your trial by another fourteen days.
Once you’re open for business, it’s time to start attracting customers. There are many effective ways to promote your Shopify store which, best of all, will not cost you a fortune.
Secondly, you can consider creating Shopify discount codes that will help you incentivize customers to give your store a shot.
And finally, if despite your best marketing and SEO efforts, your store is getting high traffic but low sales, there are dozens of reasons and ways to fix it.
Don’t get discouraged—troubleshoot, analyze, and fix the issue. Then rinse and repeat until your store is in the best condition it can be.
Starting a Shopify store is a step-by-step process. You begin with setting up an account, then go through the settings, theme, design, building essential pages, and uploading your products.
Keep in mind that there is plenty more to do with your Shopify website, but you can find answers to all of your questions in the Shopify Help Center. What you’ve done so far should be enough to have your store ready to go.
Good luck on your eCommerce journey!

Aggie is a digital marketing expert with a strong understanding of customer journey and sales processes. She creates detailed guides, customer success stories, and other content to help online stores drive sales in an organic way. Besides digital marketing, she has a passion for sports (bike riding), studying, and healthy lifestyle.