
Countless brick-and-mortar businesses have been forced to close in response to COVID-19. Our hearts go out to the business owners and employees who have been affected. We recognize your hardship and want to support you through this challenging time.
If you’ve had to close up shop, there are ways you can sell your products and stay in touch with customers through an online store. This guide will share, step by step, how to start selling online and continue delivering products safely to your local customers.
Can’t get out and deliver? Read our guide on selling online with curbside pickup. Or, follow these steps and connect to a delivery app.
Note: This guide is for businesses that are brand new to Shopify. We’ve extended our free trial to help give retail businesses extra time to build their presence online.
Local delivery allows customers to buy your products online and have you deliver them straight to their doorstep. An email lets them know you’re on your way, so you can drop their package at the door without any face-to-face contact. It’s safe, fast, and convenient.
Here are the steps:
Before you can start selling products online, it’s helpful to have the following items ready:
The first step is to head over to Shopify’s homepage and start your free trial. Your store name will become your domain, or the URL that your customers will go to when they want to order from your store.
In this guide, the URL we’re using is katiescafelocaldelivery.myshopify.com for our business, Katie’s Cafe. You can buy a custom domain later, but it’s not necessary to launch your store.
You can add products in a few ways, but to quickly create a “buy online with local delivery” experience, we recommend the following steps:
? Tip: Keep your online store simple by only adding only your best-selling products or “essentials” and keep current demand in mind. Fewer products will reduce your setup time and get your business back up and running faster.
The theme you choose should reflect your business—think of it as your digital storefront. You can choose one of the free themes we offer or explore the theme store for more options.
Your online store uses a default theme, Debut, to display content. We kept the Debut theme for this guide.
After you choose a theme, you can customize it to fit your brand.
Now, head back to your theme editor. Configure Text columns with images to include more details. For our store, we’re using this section to explain to customers how buying online with local delivery works.
After that, return once again to your theme editor. Now select Header to edit the top of your website. This is a great place to add your logo. You can see what our logo looks like in the example below.
In the theme editor, select Featured collection.
Edit the title then click Select collection. Choose Home page to add all your products to the home page. To finish, hit Select.
The shopping cart page is where customers can view all of the items they’ve added to their cart, or the products they intend to purchase. We’ll want to make some quick changes to set up your “buy online with local delivery” service.
The next step is to head back to the Shopify admin and go to Sales Channels > Themes. On the right side, where you see Current theme, click on Actions, and select Edit languages.
In the field titled Note, add the following instructions: “Please add delivery instructions, so we know exactly where to leave your order.”
Finally, consider playing around with your theme settings. If you have social media, add it now.
None of this is required, but it helps make your site look more professional and customized to your business.
Nice work, you’re almost ready to go! Let’s configure the emails your customers will receive from you after they complete their order. These notification emails will let your customers know the status of their orders.
To begin, make your way to Settings and select Notification emails > Order confirmation. This is the default email that customers will receive when they place their order.
In the Email body (HTML), you’re going to edit a little bit of code. Don’t worry; we’ll walk you through each step.
Let’s begin by selecting the following text from the body of the email—and only this portion—and then delete it:
{% capture email_title %}Thank you for your purchase! {% endcapture %}
{% capture email_body %}
{% if requires_shipping %}
Hi {{ customer.first_name }}, we’re getting your order ready to be shipped. We will notify you when it has been sent.
{% endif %}
{% endcapture %}
Once you’ve deleted the snippet above, the text box should look like this:
In the second line of the email body, paste this text:
{% capture email_body %}
Hi {{ customer.first_name }}, thanks so much for your order! We’re getting your order ready for delivery. We will notify you by email when we are heading out for delivery.
{% endcapture %}
After you’ve done that, this is what you should see: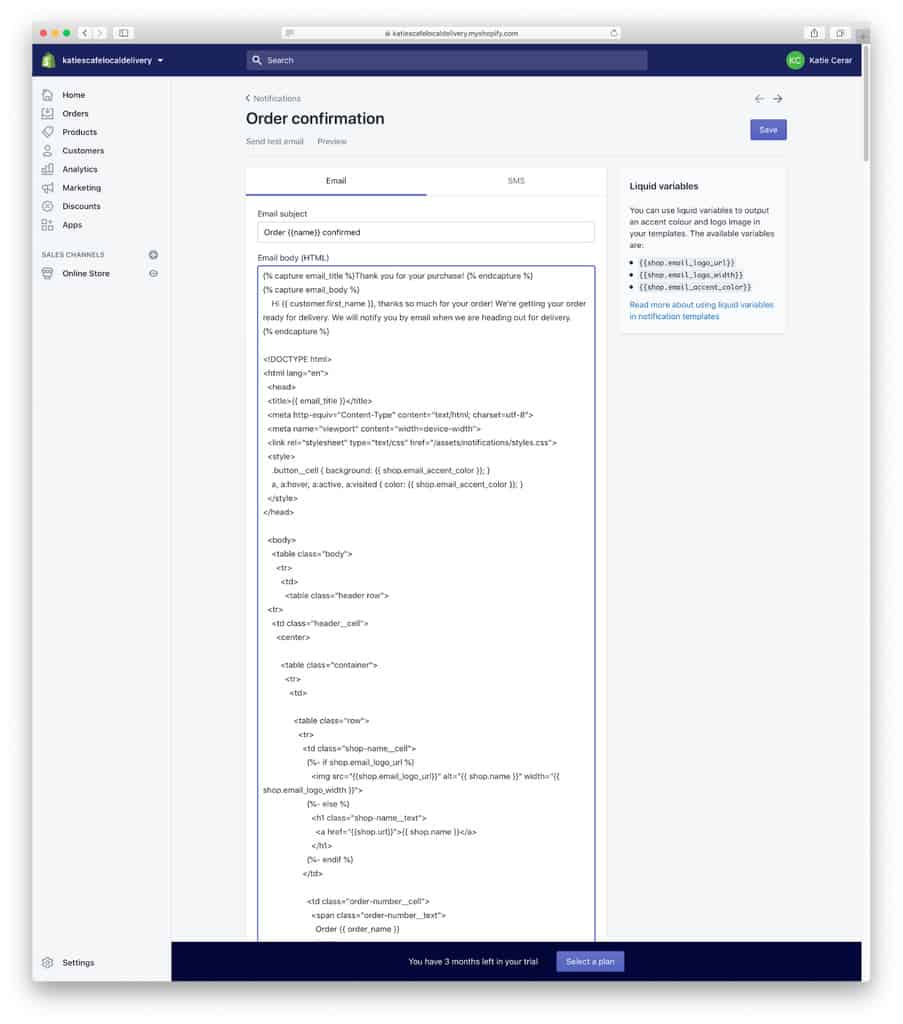
If you want, you can customize the “Hi, thanks so much…” message. But don’t edit anything else. Preview the email to make sure you’re happy with how it looks.
Now, save the template and go back to the notifications list to edit another email template called Shipping confirmation. This is the email you’ll send customers when their order is out for delivery.
Start by deleting this code from the Email body (HTML):
In the first line of the email, paste the following copy:
{% capture email_body %}
Hi {{ customer.first_name }}, thanks so much for your order! It’s headed out for delivery today and should arrive by 5pm and will be dropped on your doorstep.
{% endcapture %}
Then, update your Email subject to read: “Your order {{ name }} is out for delivery”.
You can do everything above in Shopify before you pick your plan. Once you’re ready to go live, it’s time to choose the right plan for you. The Basic Shopify plan is likely all you need to start selling online with local delivery.
Once you select a plan, you’ll be prompted for payment information, but you won’t be charged until your 90-day trial is up.
Go back to your Online Store and Disable password. Once you hit save, your online store will be live!
All Shopify-supported payment methods rely on third-party providers to process your transactions. These providers might charge extra fees, as well as enforce rules about what products you can sell using their service. When you set up a payment method, check with the company providing the service to make sure you understand their rules and fees.
Follow these instructions to make sure you’re set up to get paid.
From this section onwards, we’ll show you how you can prepare and deliver orders. If you’d rather connect with a delivery service, check out these paid apps.
When you get an order, you’ll receive an email from Shopify to the email address you signed up with. You can also log back into Shopify at www.shopify.com to check your orders at any time. Orders will show up in the Orders section of your Shopify admin.
Open the order to see what needs to be prepared. Once you’ve prepared the order, mark it as ready for delivery by adding the tag “ready.” Then click Save.
On the Orders page, you can now search for orders that are “ready” for delivery. Hit Save filters to bring them up easily from now on.
Let’s prepare for delivery. In Orders, bring up your “ready” orders. You can do this by clicking your newly created ready tab.
Open each order to view the delivery address. Additional instructions from the customer appear in the Notes section.
Now to plan your delivery route. In a separate tab, open Google Maps. You need to log in to your Google account, or create a new account if you don’t have one.
Open the menu and select Your places.
Select the saved places tab and click the blue + button.
You’ll be prompted to name a new list. This is your delivery route name. We suggest using the date and time.
In Edit list, click Add a place and enter the delivery address. Add the order number to the notes, along with any additional details.
Keep adding places for each order you have. If you have three orders, you should see three addresses and three teal pins on Google Maps.
Hit the back arrow to save the list. You can access this list on your phone, as long as you’re logged in to the same Google account.
Ready to head out for delivery? In Shopify, go to Orders and bring up your “ready” orders as before. Select all the orders you’ve prepared. Click Capture payments and confirm.
Now select Fulfill orders and confirm. This sends the “out for delivery” email you set up before—so only do this when you’re actually ready to leave.
Finally, change the tags on these orders. Click More actions then select Add tags. Add an “Out for delivery” tag and save.
Remove the “ready” tag by clicking More actions then Remove tags. Click the X next to the “ready” tag and save.
Now, these orders will appear if you search for “out for delivery.” Click Save filters.
As you’re delivering, you can use your Google Maps list to find each address. Tap on the pin to see notes about the saved place, including the order number and additional information you added earlier.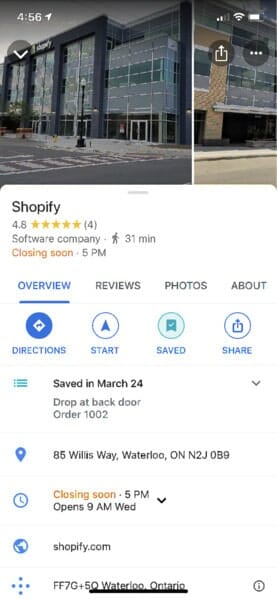
We recommend removing the order from your list on your mobile phone as you complete each delivery. Tap the Saved icon to do that.
When you get back, open Shopify and go back to Orders. Bring up your “out for delivery” orders and remove the “out for delivery” tag.
With your Shopify store now live and available to customers, there are a few other steps you can consider to improve their shopping experience.
This article originally appeared in the Shopify blog by Steve Howe and has been published here with permission.

