

Table of contents
As a Shopify Partner, development stores can be a game-changer for your business as a source of recurring income. In this guide, we’ll explore development stores and how they benefit Shopify Partners, the biggest considerations for making and using them, and a step-by-step process to get started.
What are development stores?
Development stores are test stores you can build on your client’s behalf, then transfer ownership to them. When you do this, you earn a recurring commission on their monthly subscription cost. That’s what we call a win-win.
Specifically, a development store is a free Shopify account you can use to build, test, and experiment with the Shopify platform. You can also test any themes or apps you create, giving you a sandbox environment with all the functionality of the Shopify Advanced plan, minus a few restrictions.
And because you can create an unlimited amount of development stores, with no time limit, you have an unlimited amount of potential.
Partners use development stores for two main purposes:
- Build a Shopify store on behalf of a client (and when you transfer it to your client, you’ll earn a recurring commission)
- Test an app or a theme that’s still in development
In both cases, the process of creating a development store is the same, but certain features like developer preview might prevent you from transferring the store to a client.
Note: You first need a Shopify Partner accountto create and access development stores.
Development store referrals
A development store referral is when you refer a new merchant to Shopify by signing them up to the platform, creating a development store for them, and transferring store ownership over to the client when you’re done.
After your client switches to a paid plan, Shopify will pay you a percentage of their subscription fee.
You’ll continue to receive your monthly development store referral commission as long as you’re an active Shopify Partner. (Active partners have referred at least one active merchant to Shopify within the last 12-month period, as outlined in the Partner Program Agreement.)
Note: Don’t build stores as part of the Shopify free trial.You can only earn referral commission by transferring a development store (not a trial store) to a merchant.
Development stores vs. merchant stores
Development stores have some important differences from stores that merchants create for themselves:
- As a Shopify Partner, you can create an unlimited number of free development stores.
- You’ll start earning referral commissions on development stores after you transfer them to clients.
- There is no time limit on how long you can work on a development store. Clients only start to pay for their stores when you transfer ownership to them and they select a paid plan.
Many Shopify Partners use development stores to grow their revenue and level up their skills—with good reason. Here are several key benefits that will create new opportunities to build your business.
Earn recurring commission with development store referrals
A development store referral is when you refer a new merchant to Shopify by signing them up to the platform, creating a development store for them, and transferring store ownership when you’re done.
When you make a development store referral, you earn recurring commission based on your client’s subscription. The percentage of this commission varies depending on whether you’re a Shopify Partner or Shopify Plus Partner.
Payouts recur monthly as long as the client remains a paying Shopify customer and you remain an active Shopify Partner. (Active partners have referred at least one active merchant to Shopify in the last 12-month period, as outlined in the Partner Program Agreement.)
Even if you don’t build a full website, you can still earn the development store referral commission by doing a bare-bones setup for a client, including creating a domain, configuring basic theme settings, setting up core pages, and adding or editing products.
But be careful not to build stores as part of the Shopify free trial. You can only earn referral commission by transferring a development store (not a trial store) to a merchant.
Earnings and terms

*Note: Shopify Plus Certified App Partners and Shopify Plus Integration Partners do not qualify for Shopify Plus Partners earnings.
Build ongoing business relationships
Building a store for a client is often the start of an ongoing collaboration. Many partners maintain long-term business relationships with clients, who continue to delegate technical tasks to partners even after the initial website build.
Need help finding new clients? Here are 6 Tips on How to Get Clients.
Attract new clients by showcasing your work
You can use development stores as a portfolio to promote your skills and creativity on the Shopify platform. When your development store is ready to showcase your newest themes, apps, and other features, share the store password with prospects or clients for them to see firsthand what you’re capable of creating for them.
Level up your Shopify skills
Development stores are a way for you to test not only your apps, but also product creation, custom domains, and order processing using Shopify’s Bogus Gateway. And with developer preview enabled, you can test upcoming features.
Development stores are a risk-free environment to explore which Shopify features will bring the most significant opportunities for your business. Savvy agencies use them to learn and share Shopify platform expertise with prospects before features are released publicly.
Get exposure through theme and app store listings
When you create a new app or theme, you can use a development store as a demo store in Shopify Theme Store or App Store listings. When a visitor clicks the demo link in your listing, they can visit your development store without a password. And here’s the best part: You don’t need to enable this functionality—it happens automatically.
Learn more about demo stores for the Shopify Theme Store and demo links for the Shopify App Store.

Step 1: Explore features and limitations
Development stores have limitations to make sure they’re used only for development. But don’t worry—they include most features available on the Advanced Shopify plan.
While building and testing a development store, you can access features to:
- Process an unlimited number of test orders
- Create an unlimited number of unique products
- Create up to 10 private apps
- Assign a custom domain
- Use the discount engine
- Recover abandoned checkouts
- Use real-time carrier-calculated shipping
- Access the advanced report builder
- Create shipping labels, provided a credit card is on file
But keep in mind these limitations:
- You can only install free apps and partner-friendly apps.
- You can only test orders using the Bogus Gateway or enabling test mode for your payment provider. You can’t test orders using real transactions through active payment providers. Learn more about testing orders in development stores.
- You can’t remove the password page. (But if you’re listing it as a demo store in the Shopify App or Theme Store, the password page will be automatically bypassed.)
Understanding transfer-disabled stores
If you plan to transfer ownership or launch a development store in the future, these two use cases will permanently disable your ability to do so:
- Enabling developer preview for a development store
- Installing a draft app on a development store
Shopify will warn you if you try to perform any action that will disable the future transfer of a development store.

Transfer-disabled stores have a Transfer disabled label in the Partner Dashboard.
Note: After store transfer is disabled on a development store, the change can’t be reversed. If you want to transfer anything you developed in a transfer-disabled store to a client, you need to recreate your changes in a new development store.
Developer preview
When you create a development store, you have the option to enable a developer preview. A developer preview gives you early access to new Shopify features so you can build and test your apps against upcoming features before they’re released to merchants.
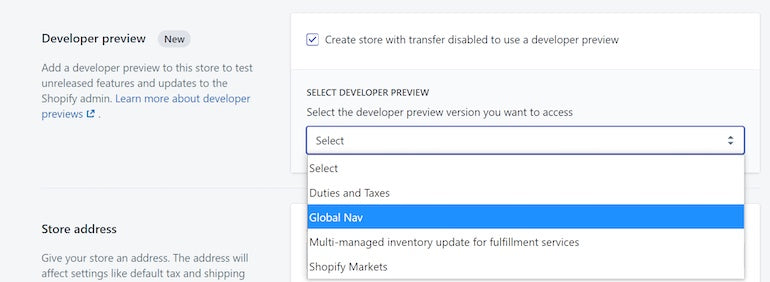
A development store with a developer preview enabled includes all the features available on the Advanced Shopify plan. But there’s one key limitation: The store can’t be transferred to another owner or transitioned to a paid plan.
Learn more about developer previews.
Draft apps
Draft apps are used by Shopify Partners during development and can only be installed on development stores for testing purposes. These apps have to undergo a Shopify review or be converted to custom apps before you can use them on your store.
Step 2: Create a development store
Having access to unlimited development stores means you can test, create, and explore as many test accounts as you’d like. You first need a Shopify Partner account to access development store functionality, so be sure to create one if you haven’t already.
Here’s how to get started:
1. From your Shopify Partner Dashboard, click Stores.
2. On the Stores page, click the Add store button.
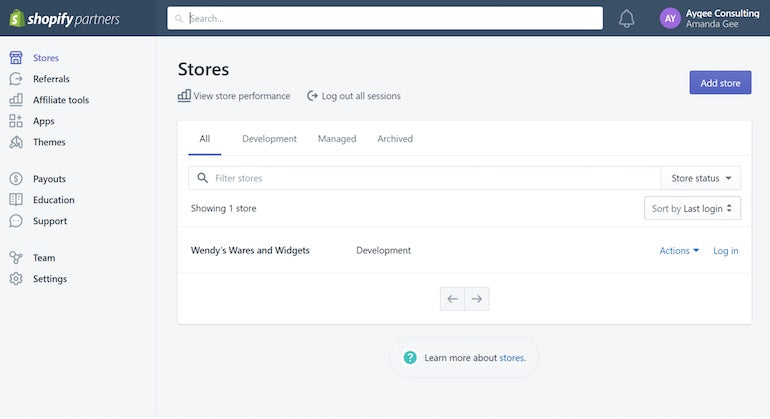
3. For your store type, choose Development store.

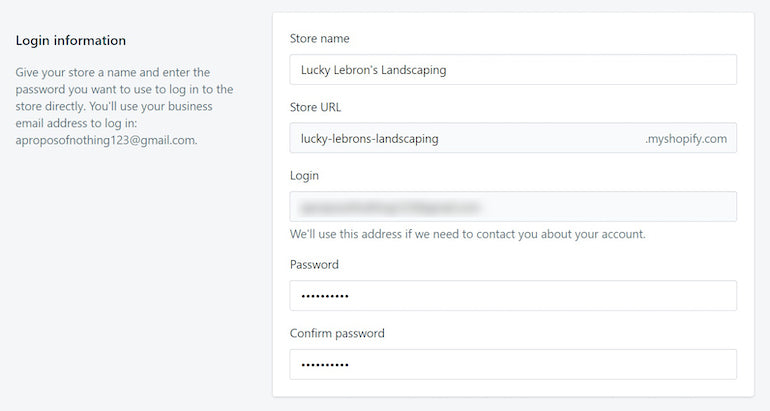
4. In the Login information section, enter a name for your store and a password. By default, the email associated with your Partner Dashboard is used as the login email, but you can change it in the store settings after creating it.
5. *Optional: If you’re not planning to transfer this store to a client and you’d like to enable a developer preview, check Create store with transfer disabled to use a developer preview. Select a developer preview version from the drop-down list.
6. In the Store address section:
- Enter your address if this store is for you and not a client
- Enter your client’s address if you plan to transfer the store to them
7. In the Store purpose section, select the reason why you’re creating this development store. For example, if you’re building for a client, select Build a new store for a client.
8. When you’re done, click Save.
After it’s created, you can log in to your new development store through the Stores tab in your Partner Dashboard. Then you’re ready to go.
Step 3: Build and enhance your store’s functionality
Now that your development store is ready, it’s time to test your themes and apps or start building your client’s store.
You can choose and customize a theme, migrate information from another platform, add products to the store, organize products into collections, set up payment and shipping information, among other options.
Before starting, talk to your client about their vision for the store. Depending on your client’s goals and requirements, you can create a basic or sophisticated store. Make sure you have a complete understanding of what your client wants.
When you’re ready, follow this general checklist for starting a new Shopify store to cover the basics.
Here are some ways you to level up your store:
- Migrate your client’s product, customers, and orders data from another platform using the Store Importer app.
- Add multiple products at one time by importing them with a CSV file.
- Customize a theme to better suit a client’s needs.
- Buy a domain from Shopify. You can help create a store’s brand by using a custom domain.
- Create pages that describe the store. Common page types include About Us, contact information, FAQs, refund policy, shipping, and privacy.
- Work with your client to develop high-quality images for their products. Review Shopify’s tips for creating and uploading images.
- Review your client’s tax settings or help your client to contact an appropriate tax expert. Many merchants need to charge taxes on their sales and report and remit those taxes to their government.
- Add apps from the Shopify App Store. Apps let you quickly extend the functionality of the client’s store.
Tip: When building a store for a client, finish as much development work as possible before transferring ownership.
Installing Shopify apps
Developers can install a selection of apps from the Shopify App Store onto development stores. All Shopify Partners get access to our collection of partner-friendly apps, which are free when being tested in development stores. The paid apps on this list only start charging once the development store switches to a paid plan.
If you want to add your app in the Shopify App Store to the partner-friendly collection, submit this form. Keep in mind that if you want to install non-partner-friendly apps, you need to transfer your development store to a paid plan.
Here’s how to install apps onto a development store:
- From the Shopify App Store, click the app you’d like to add.
- Next, click the Add app button.
- Enter your store’s address to authenticate the app.
- Finally, confirm the installation of the app.

You’re ready to go!
Running test orders
Test orders help you verify that your development store’s checkout process and settings for order processing, inventory, shipping, email notifications, and taxes are all correct. Development stores can process unlimited test orders.
There are two ways to test orders in a development store:
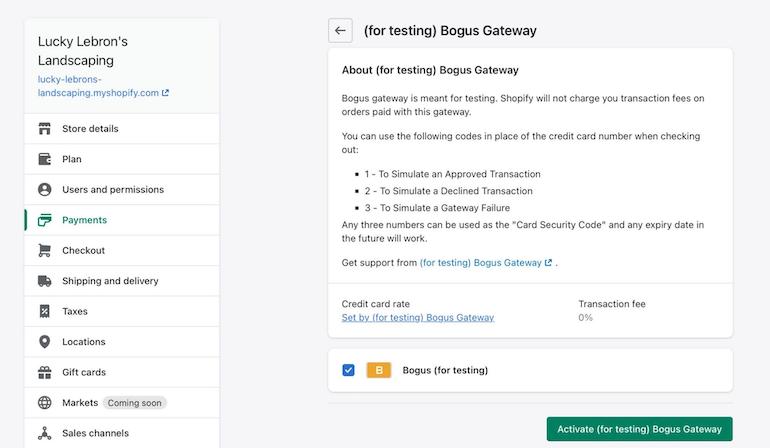
1. Use Shopify’s Bogus Gateway to simulate a transaction
Bogus Gateway is a payment provider that any store can use to create test orders. First, you must enter test payment information at checkout. Using these steps, you can simulate different types of transactions depending on the information entered.
2. Enable test mode for your payment provider
Shopify Partners can enable test mode for:

To create orders and simulate transactions, use a test credit card number. Learn more about how to create successful transactions, failed transactions, and transactions in different currencies.
Note: You can also create test orders using the Shopify admin REST API or GraphQL API. To test your development store using real transactions, you need to transfer your store to a paid plan. Learn more about transferring development stores to clients.
Step 4: Share your store with your team or clients
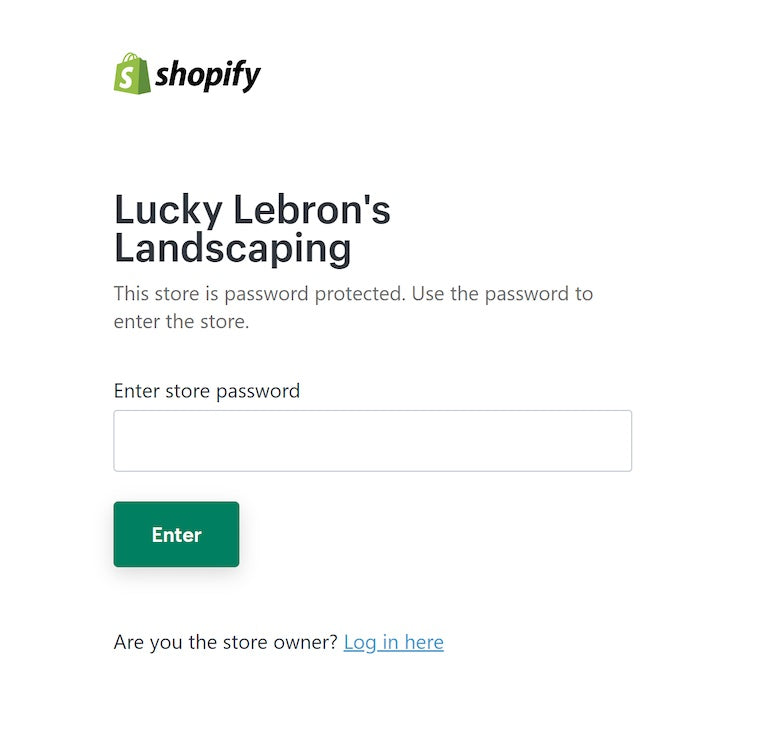
At some point during development, you might want to share your store with others. Whether sharing internally with your team or externally with your client(s), remember that all new development stores are password protected.
This means that any visitors to development stores can only access your development store in these ways:
- By entering a password on the development store password page
- By logging into the development store’s admin
- Through a Shopify Theme Store or Shopify App Store demo link
Unlike the customizable password page for a store on a free trial or paid plan, the development store password page isn’t linked to the online store’s theme and can’t be customized.
You can only remove the password page after transferring the store to a merchant or switching the store to a paid plan.
Viewing or setting the password
- From your Shopify admin, go to Online Store > Preferences.
- In the Password protection > Password field, enter a password. This is the password you’ll give to the visitors who you want to access your online store. Don’t use the same password you use to log in to your admin.
- Click Save.

Note: The Message for your visitors field isn’t editable for development stores.
Viewing and editing the customizable password page
Although the customizable password page isn’t used to control access to your development store, you can still view or edit it after you’re logged in to the Shopify admin.
To view the customizable password page, logged-in visitors can navigate to https://your-store-name.myshopify.com/password, where your-store-name is the name of the development store.
You can edit the customizable password page using the theme editor or by editing the theme’s password.liquid file.
Step 5: Prepare the store for transfer
Before transferring ownership of a development store to your client, do these important steps first.
1. Add your client as a staff member first
- Add your client as a staff member and make sure they complete their portion of the staff account setup. After transferring ownership, you’ll stay on as a collaborator, but you’ll no longer have access to financial information.

2. Add your client’s address to the store settings
- You need to add your client’s address to the store settings before you transfer ownership, especially if your client is based in a different country than you. In some cases, transferring a store with the wrong address can cause your client to be charged extra taxes on their Shopify invoice.
Learn more about changing your store’s address, or setting or changing your legal business name and address.
3. Consider transferring ownership before switching to a paid plan
- If you switch to a Shopify Plus plan before changing ownership, you become the organization owner as well as the store owner. The organization owner can’t be changed through the Shopify admin, so it’s best practice to transfer ownership before upgrading to a paid plan.
To transfer organization ownership after switching to the Shopify Plus plan, contact Shopify Plus Support.
4. Make sure your client manages their Shopify POS Pro features
- If your client is using Shopify POS with POS Pro features, they must select the POS Pro subscription for each location needing these features after selecting their ecommerce plan.
Note: When transferring to a live subscription plan, the store owner needs to provide billing information for the store. Let your client know the credit card they use for the store’s subscription will also be used to purchase themes, domains, and apps.
Step 6: Transfer the store to your client

There are two main reasons to transfer a store to an active plan:
- The work on the store is complete, and the store is ready to sell products.
- The work on the store isn’t complete, but the store needs a feature that’s only available on a paid Shopify plan.
Tip: After a plan is applied to a store, you can pause it again by coordinating with the merchant to allow for more development before its launch.
Transferring a development store
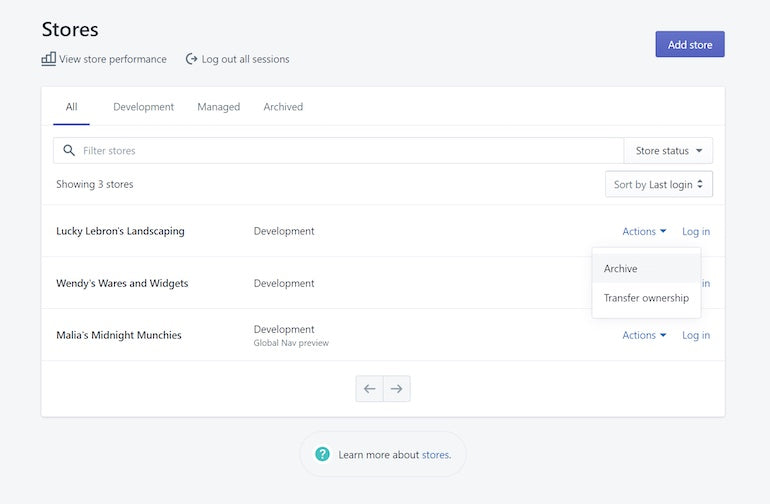
1. Log in to your Partner Dashboard, and click Stores.
2. Next to the store you want to transfer, click Actions and select Transfer ownership.

3. On the Transfer store ownership dialog, select the new owner from the list of eligible new owners.
If you haven’t added your client as a staff member yet, click Add a staff account and create a new account for your client before continuing. After you send an invite, your client has seven days to finish their portion of the setup.

4. When you’re done, click Transfer store. The store now appears on the Stores page in your Partner Dashboard under the Managed tab.
The new owner will receive an email with instructions to create the account and select a plan. Until your client accepts the transfer, the store is paused.
After you’ve transferred a store to your client, make sure to give them this information:
- How to access the store, including the URL (client-store.myshopify.com/admin)
- Your Shopify plan recommendation
- Any other recommendations, like apps, webinars, or other resources to scale their business
After the client begins paying for a Shopify plan, a collaborator account is automatically created and you start to receive your monthly recurring revenue share.
Activating a paused store
When a development store is paused, it’s in a suspended state. To gain access to the store, the new owner needs to log in and enter their billing information. Shopify will then move the store over to an active subscription.
Shopify charges on a prorated billing cycle. Any credit card the store owner enters will be billed immediately for a subscription charge.
As soon as the store becomes active, you can log in using your partner account credentials, with full access to edit and develop the store further.
But because you’re no longer the account owner, you won’t have access to the store’s financial information, like billing details and Shopify Payments payout information.
Tip: After a plan is applied to a store, you can pause it again by coordinating with the merchant to allow for more development before its launch.
Transferring a third-party theme
If you’ve built a store for a client and it includes a third-party theme, then you need to transfer the theme to the client:
- If the theme still needs code customization, you need to buy the theme on behalf of the client and bill them for the cost of the theme. When you transfer ownership of the development store, your credit card or PayPal account is automatically removed from the store’s billing settings.
- If the theme doesn’t need any code customization, then leave the theme as a free trial. Your client doesn’t need to pay for the theme until they want to publish it, or if they want to customize it. They do this after you transfer the development store.
But keep in mind:
- When you buy a theme from the Shopify Theme Store, it is only licensed to the store you originally bought it for. If you want to transfer a theme license to another store, contact Shopify Support.
- Unlicensed themes don’t qualify for support or updates when new features are released. To learn more about licensing, see Shopify Terms of Service.
What are the risks of not using a development store to refer merchants?
If you’re not using a development store to facilitate a merchant’s migration or build their new store, you won’t receive a monthly commission from their subscription fee.
Also, development stores offer an opportunity to test a store’s functionality in a staging environment. By not using them, you run the risk of things breaking on your client’s live website as you test for performance and errors.
Can I keep track of a development store after I transfer ownership?
Yes, on the Referrals page of your Partner Dashboard you can see this information:
- The affiliate link that your clients can use when creating a new Shopify account
- Detailed revenue amounts for each clients you’ve referred to Shopify
How do I manage access to a development store?
Shopify agency partners often have access to multiple development stores and managed stores, and have multiple staff members who perform different tasks in the organization.
To increase oversight over your staff members and maintain merchant security, you can limit store access to only the staff members who need them.
You can manage access to stores in two places:
- The Team page. On this page, you can set a staff member’s level of access for different store types and manage access to specific stores.
- The Store details > Team members page. From each store’s page, you access the Team members page to learn who has access to the store and add or remove staff member access.
Can I switch a development store to a paid plan without transferring ownership?
Yes. You can switch a development store to a paid plan but still be the store’s owner. You might want to do this if you need to test a feature that’s not available in development stores.
Keep these considerations in mind when you retain store ownership:
- If you switch a development store to a paid plan, then you can’t earn a recurring commission on that store. To comply with the Partner Program Agreement, you need to contact Shopify Partner Support to have the commission removed from the store.
- If you switch a development store to a paid plan, then you can’t transfer it using the Partner Dashboard. If you want to transfer the store to a client later, you’ll need to transfer ownership and remove your payment details manually.
Here’s how to do it:
- Log in to your Partner Dashboard and click Stores.
- Find the store you want to transfer, and click Log in.
- From the Shopify admin, click Settings > Plan.
- In the Plan details section, click Change plan.
- Click Choose plan to select one of the available plans.
- Select a billing cycle and review the description of the credit card charges you’re agreeing to.
- Select a payment method, and enter your payment method information.
- Click Start plan.

Can I use Shopify CLI with development stores?
No, you can’t use Shopify CLI with development stores if you only have Partner staff member access. If you want to use Shopify CLI to work on a development store, you need to be the store owner or create a staff account.
If you’re the store owner, you need to log in to the store directly using the store URL at least once (for example, using my-example-store.myshopify.com/admin) before you log in using Shopify CLI. Logging in to the Shopify admin directly connects the development store with your Shopify login.
When used strategically, development stores are an incredible way to earn more income for your business, build new and existing client relationships, and level up your expertise on the Shopify platform.
And when your work on one development store is done, you can move on to the next!
After transferring store ownership to a client or completing an internal project, consider these next steps:
- Update your portfolio or showcase to include your latest development store
- Reach out to new and existing clients about your latest work
- Contact select clients to share new Shopify features or functions you learned during the build process
What to do after your project is complete
After you transfer a store to a client, they might want more help with their store, for example, building additional features, modifying features, or performing technical tasks. You can negotiate your own fees for these services and continue to access their store through a collaborator account.
When you no longer want to work on your own development store, archive it to remove it from the Stores page in your Partner Dashboard. After archiving a store, you can unarchive it later to continue working on it.
How to archive and unarchive a store
To archive a development store:
- From your Partner Dashboard, click Stores.
- Click the name of the development store you want to archive.
- Click Archive.
To unarchive a development store:
- From your Partner Dashboard, click Stores.
- Click the Archived tab.
- Search for the store you want to unarchive, and click on it.
- Click Unarchive.

Resources
Learn more about building, experimenting with, and transferring development stores:
- Create a theme using a development store
- Build stores for a merchant
- Shopify GitHub integration to connect to a development store
- Becoming a full-stack freelancer shows you how to build a business by helping other people build theirs. Find out how to find clients, create proposals, decide what to charge, and much more.
- The Ultimate Guide to Finding Web Design Clients outlines tactics for finding new business.
- Follow the Shopify Partners blog for more tips and insights on the best ways to find and work with clients.
- If you’re already an experienced Shopify Partner, you can apply to offer your services through the Shopify Experts marketplace.
Ready to grow your revenue and business capabilities with Shopify?
It all starts with a development store. Log in to your Shopify Partner account (or create one if you’re not a partner yet) today.
Grow your business with the Shopify Partner Program
Whether you offer marketing, customization, or web design and development services, the Shopify Partner Program will set you up for success. Join for free and access revenue share opportunities, tools to grow your business, and a passionate commerce community.

