

Whether we like it or not, converting traffic to sales has much to do with the photos. First, the catalog photo must make someone click.
Then, the detail shots on each product page must convince them to add to the cart.
Not everyone is a professional photographer, and hiring one is not always realistic if you’re tight on funds. The solution is to take your on-brand seasonal photos at home. With the help of accessible tools like smartphones and photo editing apps, such as Photoleap, you can unleash your creativity and craft captivating visuals that showcase your products in the best light possible.
Taking attention-grabbing product photos at home is more accessible with a couple of inexpensive tools and these easy-to-apply techniques.
Let’s dive in and elevate your Shopify store photos!
If you’re going to be taking a lot of product shots, it helps to have a dedicated area for photography. A well-organized studio and a streamlined workflow can help you take many professional product photos for your ecommerce business in a short time.
Here’s what you’ll need:
You’ll want your setup to be lit from the side. Side lighting helps highlight the shape and textures of the object being photographed. Start by placing your table beside your window, with your background behind it. Set your backdrop in an L-shape to create a table/wall effect.
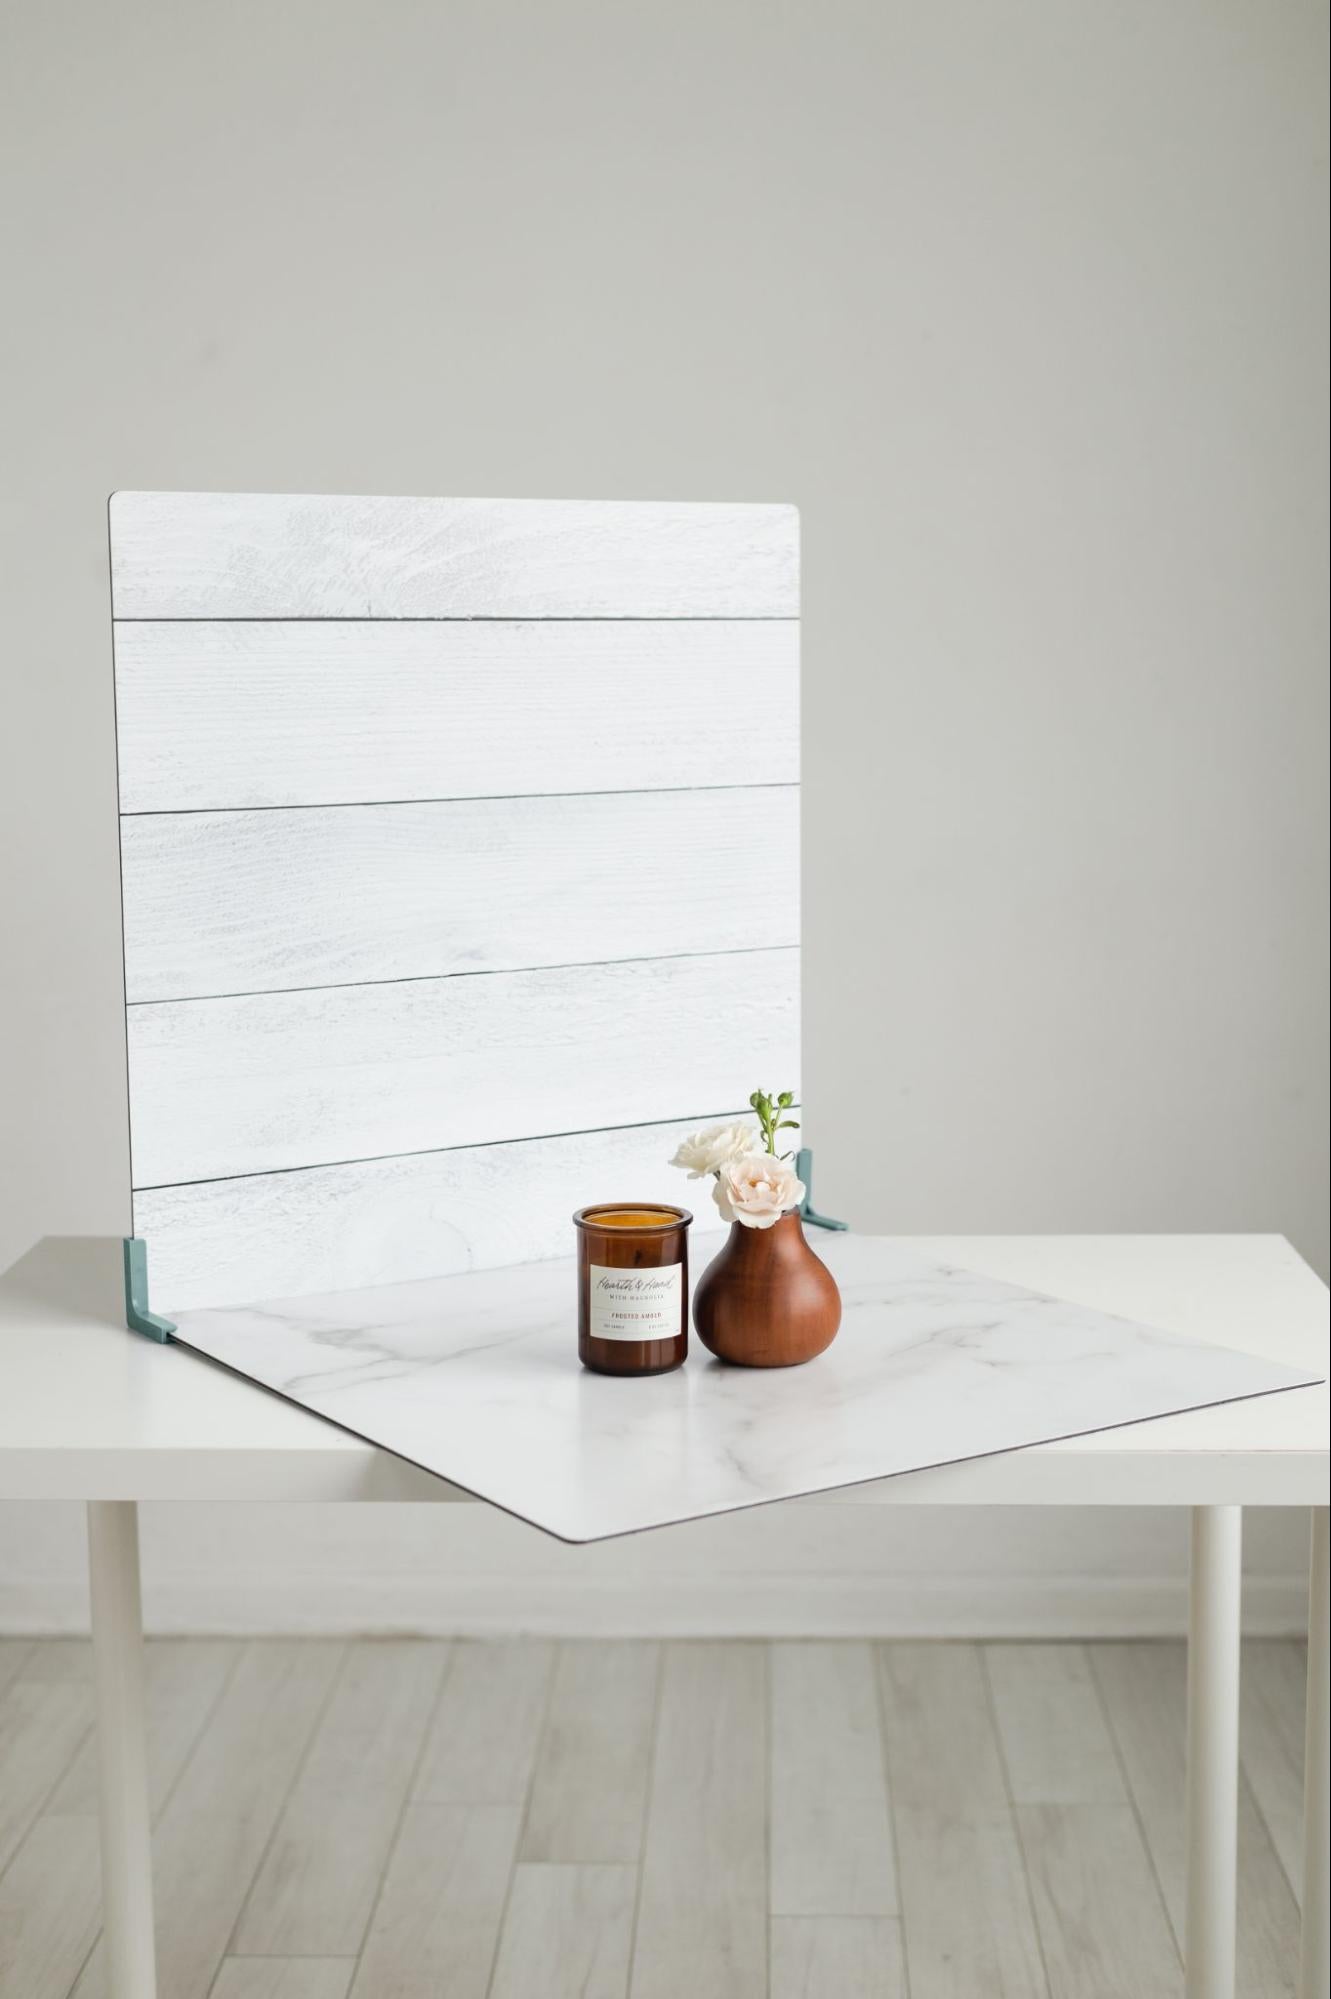
Mount your reflector opposite the window to bounce light back onto your subject.

If you don’t have a reflector, a white poster board or a trifold poster board works just as well. Trifolds like this one are great because they stand up on their own.

With this studio setup, you can swap products in and out quickly to take multiple product photos. You can also experiment with different tripod and camera placements, depending on which angles work best with your subject.
Full-white backgrounds are great for your main product images, but experimenting with different props, angles, and styling will help breathe life into your photos and give your audience a better sense of your products’ physicality.
There are a lot of composition styles that you can try, but when it comes to ecommerce photography, two of the more common compositional styles are the diagonal and the “C.”
For ecommerce sellers with limited photography budgets, styling shots with premium faux florals and botanicals offers reliable, repeatable styling without seasonal constraints, according to Rachel Dunn from The Faux Flower Company, a luxury online flower store. “You can shoot consistent product photos year-round using the same greenery and flowers, reducing reshoots and maintaining visual cohesion across your catalogue.
A diagonal setup is excellent for eye-level shots where your camera lens is positioned at the same level as your product. The idea here is to place objects in a diagonal line from back to front, with the tallest objects in the back and the shortest in the front.

Consider objects a customer may use with your subject when choosing background and foreground props. For example, a bath poof and towel make sense with a skin care product. Alternatively, you might select attractive objects that fit your color scheme, even if they don’t relate to your product.
Try glass bottles, vases, plants, or a fruit bowl for background objects. Try a sprig of greenery, citrus slices, flowers, or a sprinkle of something textured, like coarse salt, oats, or loose tea for foreground objects.
Let’s build a diagonal using a skin care product to understand better how to employ this technique. Start by placing one or two tall props directly in front of your vertical surface in the back right or left corner.

Place your main subject near the center of your horizontal surface, at least six inches before the vertical backdrop. Keeping it at least six inches from your vertical surface will blur it when you shoot with a shallow depth of field.

Place a short prop in the opposite front corner to create a diagonal line when you look down on it.

That’s seriously it! The diagonal composition might look strange when viewed from above, but shot from the front with a shallow depth of field; you start to see why this style of composition is so typical in ecommerce photography:

When creating a diagonal, imagine your surface as a tic-tac-toe grid. This will help you place each object into a square. Alternatively, create overlap by placing the foreground prop on the intersection of two grid lines.

To create overlap between your foreground prop and subject, place the foreground prop on the intersection of the grid lines (like I’m doing in this photo) rather than in the front corner square.

See how good that touch of overlap looks? Slight overlap adds visual interest and makes your photo more professional-looking without distracting from your subject.
A flat lay may be a better angle if your product is flat (like artwork or paper goods). The second composition is the “C,” and it’s fantastic for flat-lay product photos. The trick is to arrange your subject and props in a crescent shape, leaving the middle area bare.

Learn more: 40+ Tools and Resources For Creating Beautiful DIY Product Photography
Lighting is essential for really defining your images. If possible, use natural light. Placing a table next to a large window usually works well. This gives you a good amount of light with a soft shadow. If the shadow is too sharp, you can place a screen inside to soften it.
But the “natural” part also means it changes throughout the day, depending on the season, weather, and direction your window faces. Typically, photographers refer to the last hour before sunset and the first hour after sunrise as the “golden hours” because these times provide the perfect amount of light for shooting.
Shooting on an overcast day is also best to avoid direct sunlight. Like strong backlight, direct sunlight can be too harsh and create unsightly dark shadows.
If you have to use artificial lights, two identical softbox setups can usually do the job, using one as your key light and the other as fill to soften shadows.
No matter what you photograph or what type of light you use (natural or artificial), you will get shadows. The goal is to assess and modify your shadows to achieve a look you (and your customers) will love. As you look at your scene, try to observe two things about the shadows: location and quality.
Shadow location depends on two things: prop position and light position. If you’re shooting objects of different heights, make sure a shadow from a tall object isn’t landing on a short object and obscuring it.

In this photo, you can tell the light source is on the right because the shadow from the bottle is covering the shorter lavender dish on the left. To fix that, you can swap object positions.

See how the dish is brighter? The downside is that this changes the composition you already decided on. The fix? Switch the direction of your light by carefully rotating your setup.

The quality of your shadows is an assessment of how hard or soft they are. Hard light creates crisp shadows with a sharp transition between the shadow and the background, so you can easily trace the border with a pencil. Soft light creates subtler shadows that blend gradually into the background.

The quality of shadows is determined by light distance and light size. Distant light sources create more complex shadows, while close light sources create softer ones. To achieve soft shadows, place your setup right next to the window. Move (or roll) your setup further from the window to make more complex shadows.
The size of your light can also impact whether shadows appear hard or soft. Small light sources (like a ring light or a phone camera flash) create hard light because they concentrate light over a small area. Significant sources (like big windows or artificial lights) create soft light because they disperse light over a greater area.
To soften your light, consider using a diffuser. A diffuser is anything placed between your light source and your subject to reduce its intensity and spread it out over a larger area. Diffusers make light sources appear larger than they are.
To diffuse natural light, you have a couple of options: you can hang a white bed sheet or a translucent shower curtain over the window. If you shoot frequently, you may want to hang translucent white curtains instead.

Of course, you can’t make your window more prominent, but this is where your reflector comes in. Using a reflector to diffuse and spread the light over a large area will help soften your shadows.
Let’s look at different combinations of diffuser and reflector in photo form:
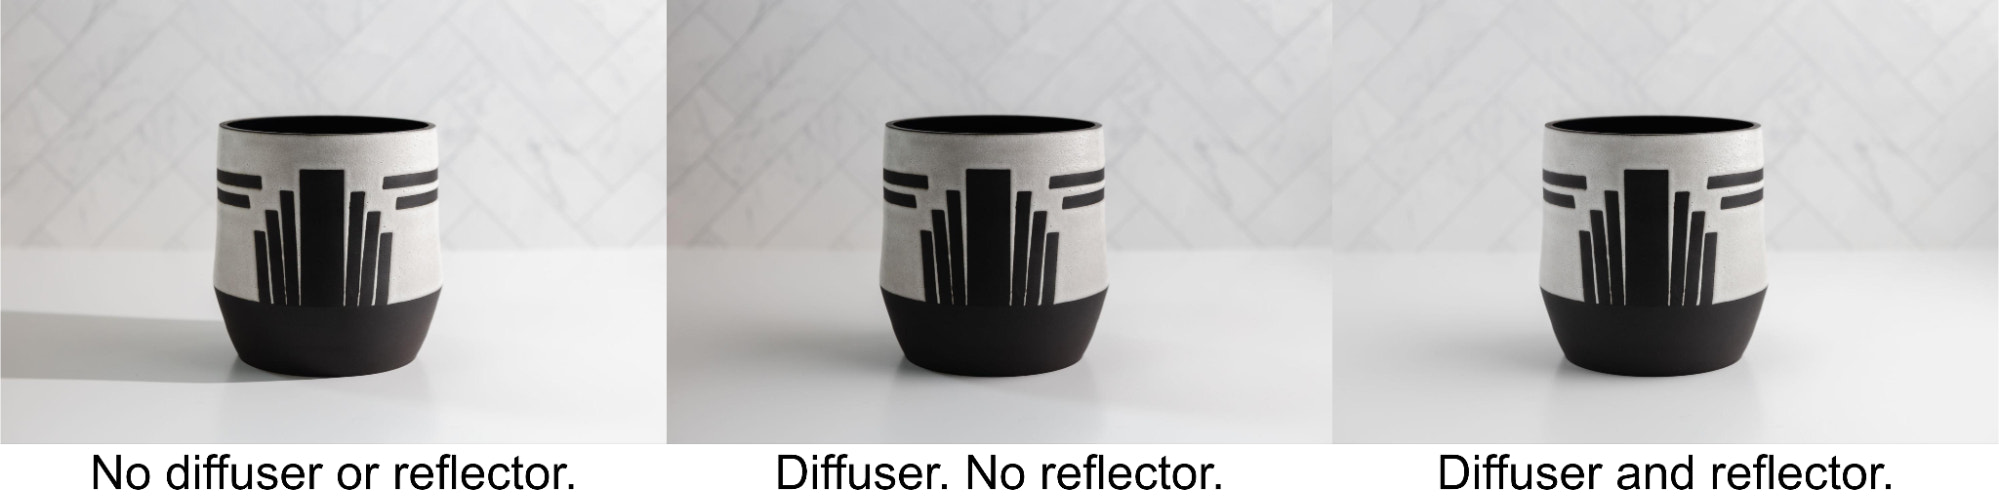
Notice how the white reflector softened the shadow even more than with a diffuser alone. It also brightened the whole left side of the cup and the background.
That’s how to modify light using two easy and affordable tools: diffusers and reflectors. Now that you’ve achieved the shadows you like best for your product and brand let’s get to shooting!
Good product photographers know to capture products from any angle that might be relevant to customers. Your product photos create a vivid mental image of your product for your customers, as though they’re seeing it in-store. Close-ups, eye-level shots, and even bird’s-eye view shots can help them do this.
When setting up your shots, here are some things to consider:
Remember to underestimate the importance of a tripod to minimize blur and keep the angle consistent across multiple products.

The whole purpose of product photography is to sell more on your Shopify store. That means capturing a customer’s attention while keeping your product the star. The best way to do that is to take pictures from any angle that might be relevant to your customers.
For those of you who are a bit more advanced, if your camera allows, set the lens to a small aperture, a.k.a. a high f-stop, and set a slow shutter speed. The higher the f-stop setting, the smaller the aperture. This will give you a wide depth of field that brings your entire product into focus, giving it a crisp look. But your camera must always be well-fixed on your tripod, or you will get blurry images.

The key to creating that gorgeous blur is shooting with a shallow field depth. Only a narrow (or “shallow”) strip of your scene will be in focus. On a DSLR camera, widen the aperture using a low f-stop like f/2.8 to f/4.5.
Going even lower than that works, too, but your background and foreground will be very blurred—it’s up to your eye whether you like that.
Using a phone camera in portrait mode gives you a similar effect. Rather than changing the size of the aperture like DSLRs do, phone cameras use machine learning to blur the background and create a similar effect.
Once you’ve taken a few shots, try mixing and matching different backdrops to experiment with various effects, like we did here:

Mixing and matching different vertical and horizontal backdrops will give you much content without extra styling effort. With just one photoshoot, you can change your product page photos to suit the season (if you want to), and you’ll have an abundance of content for social media.
Choose backdrops of different colors and intensities that complement your brand aesthetic and look great together. That way, you can create light/light, dark/dark, and mixed dark/light combinations that add variety to your listings and catch your attention on Instagram.
After you’ve taken your shots, you’ll want to move on to retouching them. Expensive photo editing software isn’t necessary for this step, as many free photo editing options are available for post-production. If you’ve taken great shots, you’ll only need to do some light editing to make the images pop.
Here are some things to consider when editing your photos:
Once you’ve edited your photos, it’s time to prepare them for uploading.
It would be a colossal waste to create and edit stunning product photography only to find out it slows your ecommerce site down. That’s why this step is essential. After you’ve edited your photos, you’ll want to compress them to ensure they load quickly and easily in your Shopify store, Amazon, and other online marketplaces.
On Shopify, the maximum image size is 4472 by 4472 pixels with a file size of up to 20 megabytes; however, even this is quite large. While images this size will load, they won’t load quickly. You should use a size of 2048 by 2048 pixels for square product photos.
Also, keep in mind that many Shopify themes have a “zoom” function that allows users to take a closer look at your photos. When users zoom, they view the full size of the photo, so anything smaller than 2048 by 2048 pixels might make the zoom function difficult to use.
Online tools like TinyPNG and Compress JPEG can help you compress the file size. Most photo-editing software tools (like Adobe Photoshop) also have compression functions.
Good product photography is essential to online selling. When browsing your ecommerce store, product photos help potential customers envision what the product looks and feels like in real life.
Product photos showcase your product’s best features and can help answer questions customers might have about how they’re used and why your product is worth buying. If a picture is worth a thousand words, a good product photo is better than any sales pitch.
Ecommerce product photography is the art of producing high-quality commercial images to sell products and services online. Good product photography remains a crucial aspect of selling online.
Ecommerce photography helps increase conversion rates by showcasing your product’s best features and developing your brand’s visual identity. Good ecommerce photography can put your products above the competition by showcasing their best features. For more free stuff about photography visit https://photographertouch.com/

