Verified & Reviewed
Published on August 27, 2026 Written By Meredith Flora
Published on August 27, 2026 Written By Meredith Flora

Subscribe for More
Every software company has an AI story right now. Almost none of them own the operation underneath it.
That distinction was the center of a recent ShipBob webinar What is MCP and Why Your Supply Chain Needs It. Led by ShipBob’s Head of Brand and Product Marketing, Brittany Barron, and Distinguished Engineer, Sagar Kohli, ShipBob AI experts unpacked why ownership matters.
“Your storefront can be AI ready in a weekend,” Brittany said. “A supply chain can’t.”
Most platforms in this space are software layered on top of someone else’s operation. They can show you a dashboard or generate a report, but they can’t act, because they don’t own the warehouse, the carrier relationships, or the fulfillment logic underneath the screen.
ShipBob’s fulfillment engine runs on more than a decade of proprietary technology and delivers 97.6% delivery estimate accuracy, backed by precise inventory placement, in-region optimization, and carrier selection that happens automatically on every order. That accuracy is the foundation everything ShipBob AI is built on. You can’t hand an AI tool write-access to a supply chain you don’t fully control.
Why ShipBob’s MCP is different
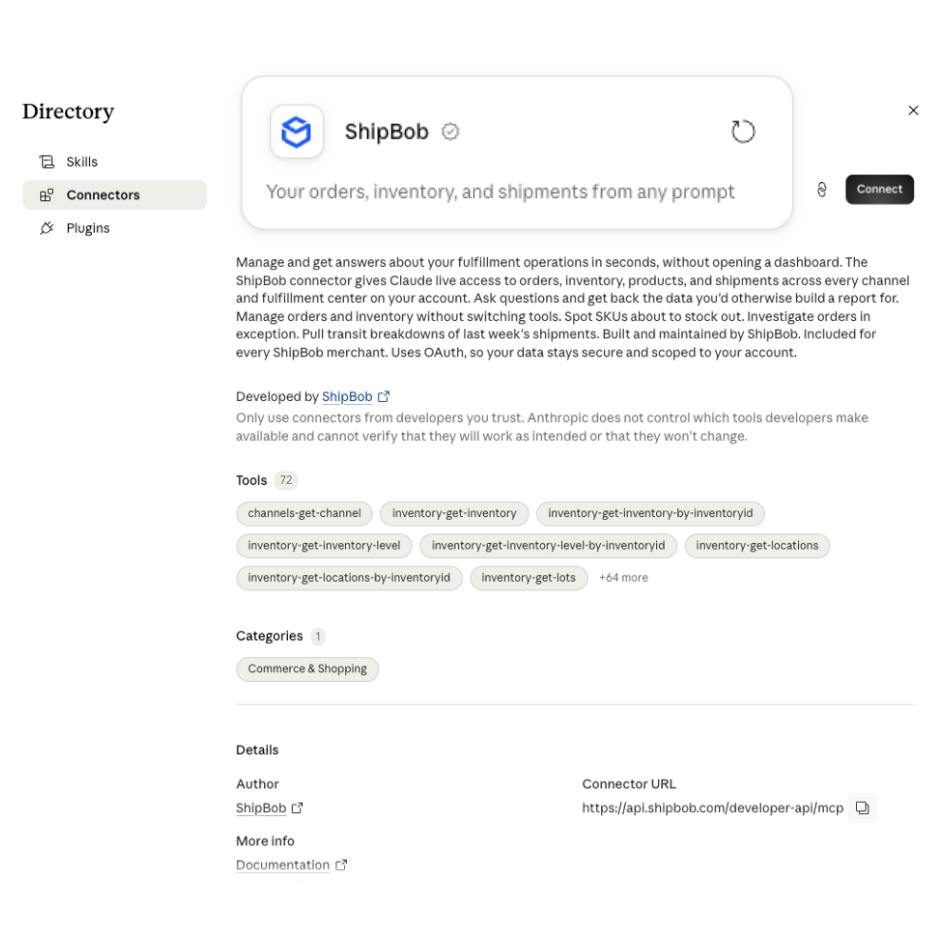
ShipBob’s MCP launched earlier this year as an open, standard interface connecting AI assistants directly to ShipBob’s operation, and adoption has moved fast: usage is up 8.5x in just over ten weeks, with more than 130,000 tool calls logged.
The reason merchants are adopting it so quickly comes down to what it actually lets you do.
“All these AI assistants now have access to ShipBob’s action layer. You can ask in plain language to get fulfillment data, and take action on it in the same step.”
Sagar Kohli, Distinguished Engineer at ShipBob
A copilot that can only read tells you an order is stuck or a SKU is low. ShipBob’s MCP, connected to 70+ tools including Claude and ChatGPT, creates the warehouse receiving order, resolves the exception, or reroutes the shipment, with your confirmation, in the same conversation.
Sagar walked through this live: a warehouse receiving order (WRO) built from a single typed prompt in under thirty seconds, a second one built automatically from an uploaded packing slip PDF, and a scheduled inbound health report that caught 167 under-received units on its own, no one had to go looking for it. Work that used to take a six-step manual form now takes one sentence or one drag-and-drop.
What’s next
Brittany closed with a look ahead. Bobby, ShipBob’s in-app AI agent, is already in beta with a group of ShipBob’s customers, bringing this same action layer natively into the ShipBob dashboard.
“It’s just another way to streamline operations right where you work,” she said. Bobby is expected to reach general availability this fall.
On the MCP side, Sagar previewed what’s in flight: granular read and write permissions so business owners control exactly who can act on their account, lot-level detail management, and expanded support for B2B orders.
“ShipBob doesn’t just help you compete. We help you lead.”
Brittany Barron, Sr. Director of Product Marketing
The ShipBob AI webinar series session dedicated to exploring Bobby is scheduled for September 17.
In the meantime, here’s exactly how to set up what Sagar demoed, using the same starter prompts and templates from ShipBob’s public GitHub repo.
How to set up ShipBob MCP: a step-by-step guide
Your ops team generates data every minute: orders, inventory, receiving, shipments. That data has always lived in a dashboard, out of reach of the AI tools your team already uses to get work done. Connecting ShipBob MCP puts your live operation directly in front of Claude or ChatGPT, with 70+ read and write actions across 10 areas, so a question gets answered and acted on in the same conversation instead of a second trip to your dashboard.
Every demo below, in order, is also documented with starter prompts in ShipBob’s GitHub repo, so you can copy, paste, and adjust as you go.
How to connect ShipBob MCP to Claude
What You’ll Learn: How to connect Claude Desktop to your ShipBob account with a one-click connector, so Claude can see your live fulfillment data (orders, inventory, shipments, receiving) and take action on it.
What you’ll need: A Claude account and a ShipBob account (sandbox or production).
Steps
- Open Claude Desktop and go to Settings → Connectors.
- Search for ShipBob and select it.
- Click Connect.
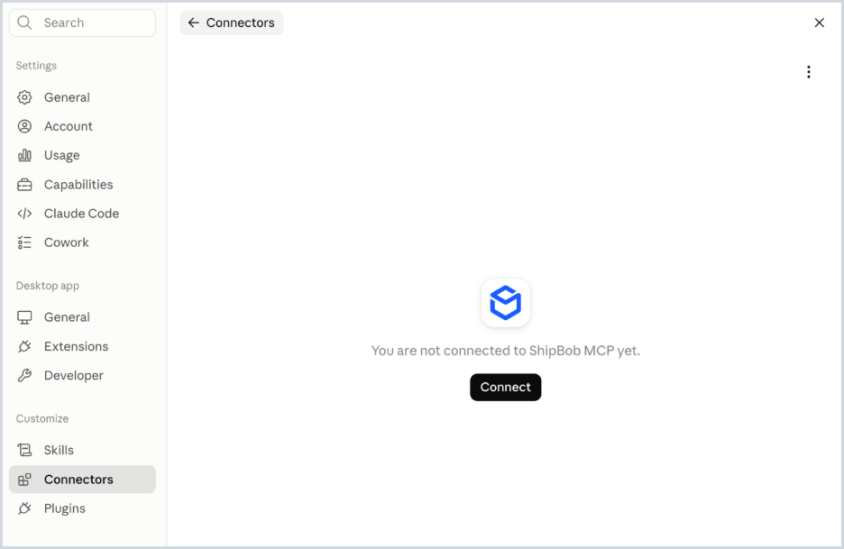
- Sign in with your ShipBob account when prompted, then click Authorize.
- ShipBob now shows as Active in your Connectors list.
Alternative: Instead of searching for it inside Claude Desktop, you can connect directly from the One-Click Official ShipBob Claude Connector.
To confirm it worked, start a new chat and try:
“What can ShipBob MCP do for me?”
What to expect: Claude lists what it can access: typically orders, inventory levels, shipments, and receiving.
Troubleshooting: If it says it can’t find anything, double check the connector shows Active under Settings → Connectors.
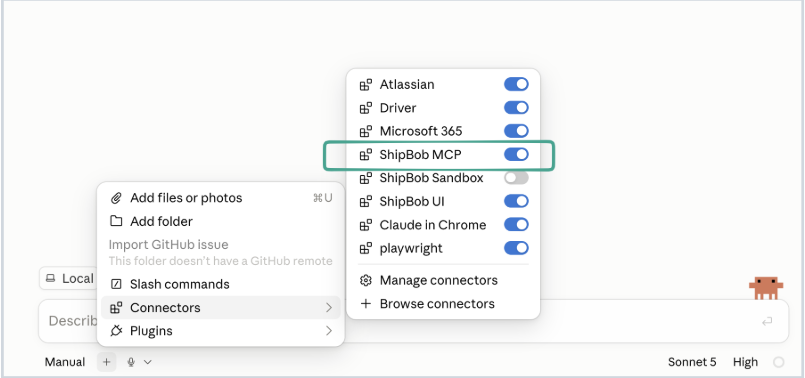
Try it yourself: Ask a real question about your account, like “How many orders shipped yesterday?” or “What’s running low on inventory?”

Using ChatGPT instead?
What you’ll learn: How to connect ChatGPT to your ShipBob account as a custom connector, so ChatGPT can see your live fulfillment data (orders, inventory, shipments, receiving) and take action on it.
What you’ll need: A ChatGPT Plus, Team, or Enterprise account and a ShipBob account (sandbox or production).
Steps
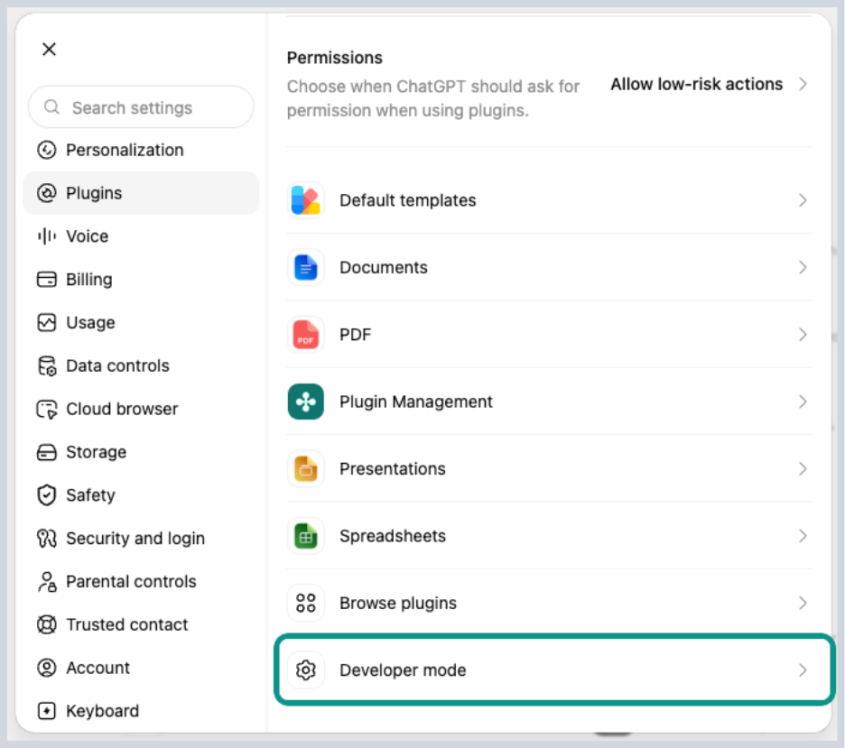
ShipBob MCP is still going through OpenAI’s plugin verification process, so for now you add it to ChatGPT as a custom plugin rather than a listed one. Here’s how:
- Open ChatGPT and go to Settings → Plugins, then click Developer mode.
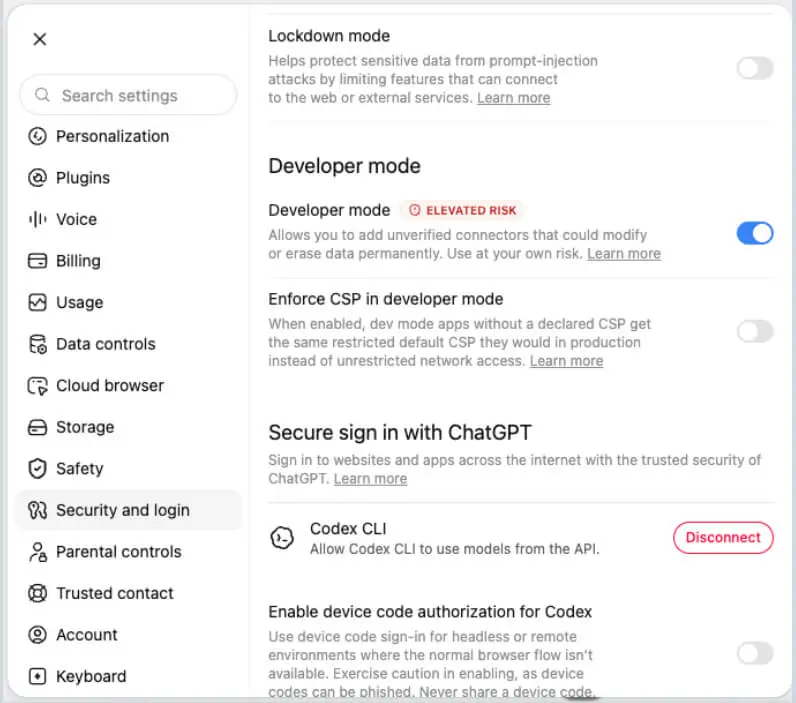
2. Toggle Developer mode on, then save.
3. Go back to Plugins and click the + in the top right to open the New Plugin dialog, then fill it in:
- Name: ShipBob MCP
- Connection: Server URL: https://api.shipbob.com/developer-api/mcp
- Authentication: OAuth
- Check “I understand and want to continue,” then click Create.
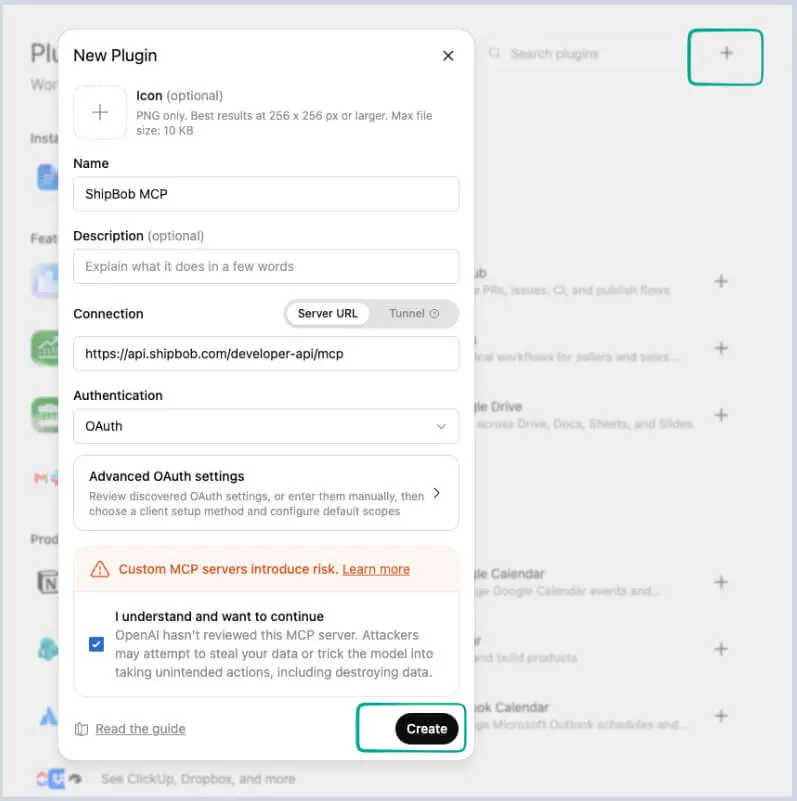
4. Click Sign in with ShipBob MCP, then sign in with your ShipBob account when prompted and click Authorize.
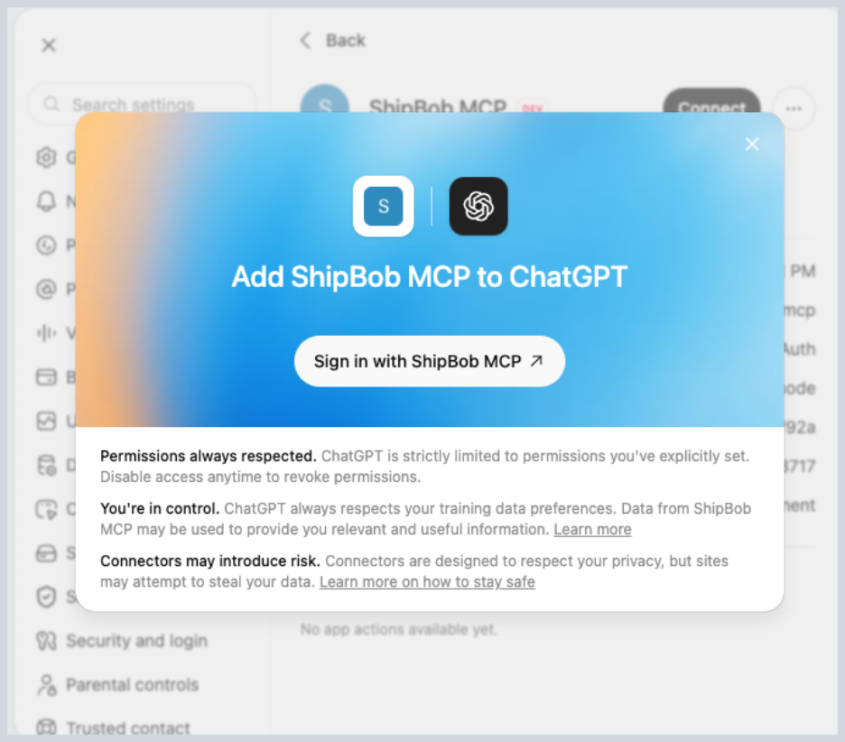
To confirm it worked, start a new chat and try:
“What can ShipBob MCP do for me?”
What to expect: ChatGPT lists what it can access: typically orders, inventory levels, shipments, and receiving.
Try it yourself: Ask a real question about your account, such as:
“How many orders shipped yesterday?” or “What’s running low on inventory?”

How to create a WRO with a single prompt
Turn a multi-step manual process into an automated process through a single prompt in Claude. Save your team time and improve efficiency for your operations team.
What you’ll learn: Create a warehouse receiving order (WRO) in ShipBob by describing the shipment in a prompt.
What you’ll need: Connect Claude Desktop completed.
Steps
Tell Claude the shipment details directly:
Create a warehouse receiving order (WRO) at the Moreno Valley Hub, with an estimated delivery date of August 30, 2026. PO is PO-2026-08-20-1. Include:
– 100 units of SKU SWAG-SHIRT-BLACK (Swag Shirt – Black)
– 120 units of SKU SWAG-SHIRT-GREEN (Swag Shirt – Green)
– 140 units of SKU HOODIE-BLACK (Premium Hoodie – Black)
All items are single SKU only and pack type is pallets.

How to create a WRO by dropping in a packing slip or PO
This is worth setting up as a habit if manufacturer paperwork is a recurring part of your receiving process. It also opens the door to a more automated setup: some teams connect Claude to an email inbox and let it watch for incoming packing slips to trigger this same flow automatically.
What you’ll learn: Create a warehouse receiving order (WRO) in ShipBob by attaching a manufacturer’s packing slip (a PDF) and letting Claude read it.
What you’ll need: Connect Claude Desktop completed. For the packing slip method: a packing slip PDF from your manufacturer, or use the sample packing slip to practice with.
Steps
- Start a new chat in Claude Desktop.
- Attach the packing slip PDF to your message (no manufacturer PDF on hand? Use this sample packing slip).
- Ask:
Create a warehouse receiving order (WRO) from this packing slip. Match the SKUs to my existing products where you can, and flag anything you can’t match.
What to expect: Either way, Claude extracts the SKUs and quantities and either creates the WRO directly or shows you a summary to confirm before creating it. Anything it can’t confidently match to an existing product gets flagged for you to resolve manually.
Try it yourself: Try a prompt or a packing slip with a SKU that doesn’t exist in your catalog yet, and see how Claude flags it instead of guessing.

How to automate inbound monitoring with Claude Routines
Once inventory is moving, the next question is whether it’s arriving on schedule and without discrepancies. Instead of checking your ShipBob dashboard every morning, you can schedule a report to come to you.
What you’ll learn: How to get a daily inbound receiving report delivered automatically using Claude Routines, no Slack required.
What you’ll need: Connect Claude Desktop completed.
Steps
In Claude Desktop, go to Routines in the sidebar, then paste this into the “What do you want automated?” box:

Set up a routine that runs every day at 8am CT. Using the ShipBob MCP, report on the last 48 hours of inbound receiving activity plus all currently pending receiving orders. Write it for an inbound ops manager who has two minutes to read it and needs to know what to chase today.
Title it: Inbound Receiving Report – {date} ({start} to {end} CT)
At a glance
One line, no table: WROs received, WROs with discrepancies, units short, units over, pending WROs, oldest pending in days.
1. Needs review – received with discrepancies
[Table] WRO # | PO | SKU | Expected | Received | Stowed | Delta Recv | Delta Stow | Facility
Delta Recv = Received minus Expected. Delta Stow = Stowed minus Received. Show both signed (+3, -12) and use 0 when they match.
Sort by largest absolute delta first. One row per SKU, grouped by WRO.
2. Pending – not yet received
[Table] WRO # | PO | SKU | Expected | Status | Days Open | Facility
Sort oldest first. Flag anything open more than 7 days with a warning emoji next to Days Open.
3. Received clean – no discrepancies
[Table] WRO # | PO | SKU | Expected | Received | Stowed
Keep this one compact. If there are more than 10 rows, show a per-WRO roll-up instead of per-SKU rows.
4. Overall summary
2-3 sentences on inbound health: receipt accuracy trend, anything stuck, and the single most important thing to act on today.
Formatting rules
– If a section has no rows, write “None” instead of an empty table. Never invent or estimate data. If a field is unavailable from the MCP, put “n/a” and say so in the summary.
– Use plain whole numbers, no decimals, and keep SKU names short enough that columns stay aligned.
– Do not add sections beyond the four above.
What to expect: Claude creates a routine that runs on the schedule you gave it, without you needing to open Claude Desktop and ask each time. You’ll see the routine listed under your scheduled routines, and can edit or delete it the same way.
The report is deliberately exception-first: the “at a glance” line tells you whether you need to read further, discrepancies come before clean receipts, and aging pending WROs are flagged. If your team cares about something else, tell Claude to swap a column or reorder a section, the structure holds.
You can extend this further: connect an email or Slack MCP, and the same routine can deliver the report straight to your inbox or a Slack channel instead of just sitting in your routines list.
Try it yourself: Compare this to the Claude Tag + Slack version up next: which one fits your team better, a routine that reaches you directly, or a report that posts where your team already collaborates?

If your team already lives in Slack, Claude Tags brings the same monitoring into your existing channel instead of a separate app.
What you’ll learn: How to set up Claude Tag in Slack, then use it to get the same daily inbound receiving report as the Claude Routines tutorial, but posted to a Slack channel your team already watches, by tagging @Claude.
What you’ll need: Connect Claude Desktop completed. A Slack workspace where you’re a Primary Owner or Owner (only owners can set up Claude Tag).
Setting up Claude Tag
Claude Tag is Anthropic’s own Slack integration: tag @Claude in a channel and it works using your organization’s connected tools, including ShipBob MCP, under its own workspace identity, not any one person’s account.
Setup is a one-time, admin-only job:
- A Primary Owner or Owner installs Claude Tag into your Slack workspace and provisions Claude’s workspace identity.
- Connect ShipBob MCP the same way you’d connect any other tool, so Claude Tag can query your live fulfillment data.
- Choose where Claude Tag can work: organization-wide, specific public channels, or a private channel for sensitive work.
- Optional: set a spend limit per channel or for the whole workspace, with alerts at 75% and 95% usage, so costs stay predictable.
Once that’s done, anyone in an enabled channel can just tag @Claude, no separate install per person.
For a walkthrough of this setup, see this video from Anthropic/Claude itself.
The prompt
In the Slack channel where you want the report, tag Claude and ask it to set up a recurring post:
@Claude every day at 8am CT, using the ShipBob MCP, post the last 48 hours of inbound receiving activity plus all currently pending receiving orders. Write it for an inbound ops manager scanning Slack on their phone, so keep it tight and lead with what needs action.
Title it: Inbound Receiving Report – {date} ({start} to {end} CT)
At a glance
One line, no table: WROs received, WROs with discrepancies, units short, units over, pending WROs, oldest pending in days.
1. Needs review – received with discrepancies
[Table] WRO # | SKU | Expected | Received | Stowed | Delta Recv | Delta Stow
Delta Recv = Received minus Expected. Delta Stow = Stowed minus Received. Show both signed (+3, -12) and use 0 when they match.
Sort by largest absolute delta first. One row per SKU, grouped by WRO. Put the PO and facility in a short line under each WRO group rather than in the table.
2. Pending – not yet received
[Table] WRO # | SKU | Expected | Status | Days Open
Sort oldest first. Flag anything open more than 7 days with a warning emoji next to Days Open.
3. Received clean – no discrepancies
One line per WRO, not a table: WRO #, SKU count, total units received. No per-SKU detail unless something is off.
4. Overall summary
2-3 sentences on inbound health: receipt accuracy trend, anything stuck, and the single most important thing to act on today.
Formatting rules
– Keep tables to 7 columns or fewer so they stay readable in Slack on mobile. Never wrap a table in a code block.
– If a section has no rows, write “None” instead of an empty table. Never invent or estimate data. If a field is unavailable from the MCP, put “n/a” and say so in the summary.
– Use plain whole numbers, no decimals. Do not add sections beyond the four above.
What to expect: Claude confirms the schedule back to you in the thread. From then on, the report posts to the channel automatically at that time every day, no one has to ask for it. You can adjust the schedule or the report format later by tagging Claude again with the change.
The report is exception-first: the “at a glance” line tells the channel whether anyone needs to read further, discrepancies come before clean receipts, and aging pending WROs are flagged. It is also narrower than the Claude Routines version, because wide tables wrap badly in Slack on mobile. PO and facility move to a line under each WRO group, and clean receipts collapse to one line per WRO instead of a per-SKU table.
Try it yourself: Compare this to the Claude Routines version: which one fits your team better, a report that posts where your team already collaborates, or a routine that reaches you directly?

How to connect more than one ShipBob account
Claude supports one MCP connector at a time by default, which raises a common question for merchants running multiple brands: how do you connect more than one ShipBob account?
What you’ll learn: If you run more than one business on ShipBob, each in its own ShipBob account, how to connect all of them so Claude can work across every business in the same conversation, with no switching accounts.
What you’ll need: Connect Claude Desktop completed. The additional ShipBob account(s), and the sign-in details for each
The idea
ShipBob’s MCP endpoint is the same for every business:
https://api.shipbob.com/developer-api/mcp
Claude tells connectors apart by their URL, so adding a second business with that exact same URL won’t work, it collides with the first one. The fix is to make each URL unique: add a ?ref= query parameter, then name the connector after the business. From then on, Claude resolves which business you mean by matching your question to the connector’s name, not its URL.
Placeholders used below
This guide uses one placeholder per business, {business 1} and {business 2}. Replace each with that business’s name everywhere you see it, in the connector name and in the URL.
One rule when you substitute it into the URL: drop the spaces, since a URL can’t contain them. So a business called Apparel Inc gives you the connector name ShipBob – Apparel Inc and the URL ending ?ref=apparelinc. The ref value itself doesn’t matter to ShipBob, it only has to be different for each business.
Steps
Way 1: In Claude Desktop
For Business 1
- Open Claude Desktop and go to Settings → Connectors → Add → Add custom connector.
- In the name field, enter:
ShipBob – {business 1}
- In the URL field, paste:
https://api.shipbob.com/developer-api/mcp?ref={business 1}
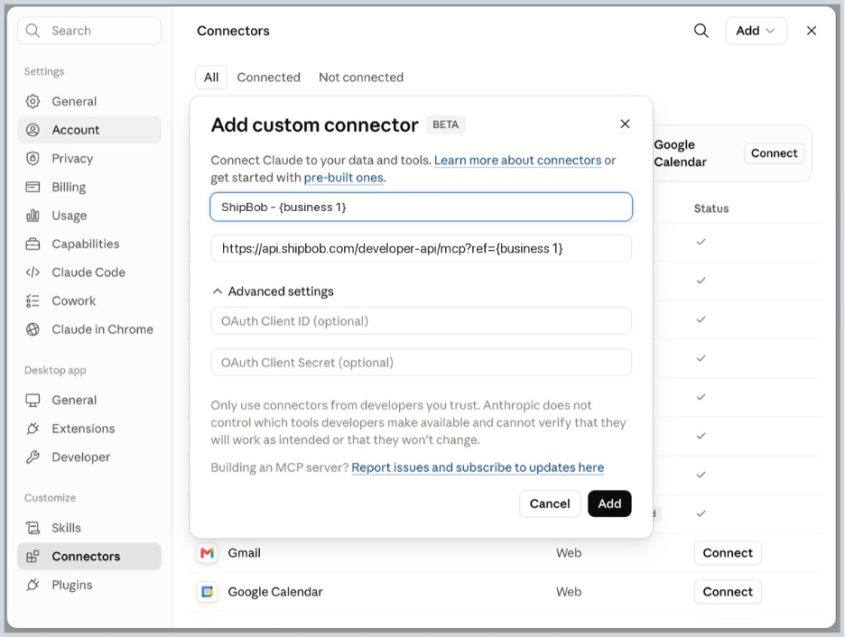
- Leave OAuth Client ID and Client Secret blank, then click Add.
- Sign in with business 1’s ShipBob account when prompted, then click Authorize. The connector now shows as Active.
For Business 2
Same five steps, with the business name swapped and one thing to watch.
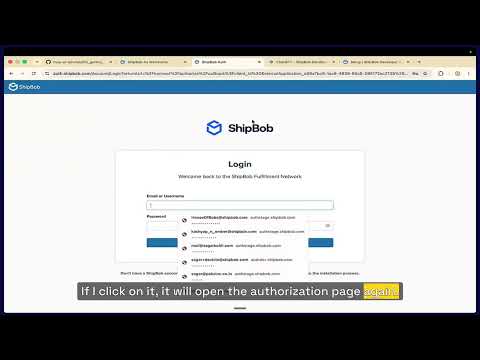
- Before you start, sign out of ShipBob in your browser, or open Claude’s sign-in in a private window. This is the step people miss: if your browser still holds business 1’s ShipBob session, the sign-in is skipped silently and business 2’s connector ends up pointing at business 1’s data.
- Go to Settings → Connectors → Add → Add custom connector again.
- In the name field, enter:
ShipBob – {business 2}
- In the URL field, paste:
https://api.shipbob.com/developer-api/mcp?ref={business 2}
- Leave the OAuth fields blank, click Add, then sign in with business 2’s ShipBob account and click Authorize.
Both now sit in your Connectors list as separate Custom connectors, live at the same time:
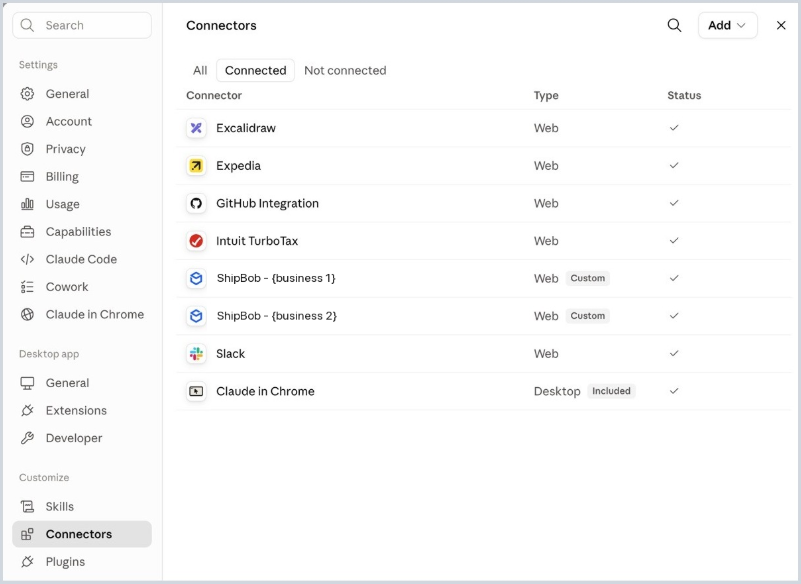
Repeat the same pattern for a third or fourth business, with a different name and a different ref each time.
Way 2: With a config file (Claude Code or any MCP agent)
Add one server entry per business, each with its own ref and its own ShipBob personal access token (PAT):
{
“mcpServers”: {
“shipbob-{business 1}”: {
“type”: “http”,
“url”: “https://api.shipbob.com/developer-api/mcp?ref={business 1}”,
“headers”: { “Authorization”: “Bearer” }
},
“shipbob-{business 2}”: {
“type”: “http”,
“url”: “https://api.shipbob.com/developer-api/mcp?ref={business 2}”,
“headers”: { “Authorization”: “Bearer” }
}
}
}
Each business needs its own personal access token, generated while signed into that business’s ShipBob account. The server key (e.g., shipbob-{business 1}) is what the agent shows when it routes a call, so name it after the business too.
Verify it worked
Start a new chat and ask a question that touches both businesses:
“List my connected ShipBob accounts and, for each one, how many orders are pending fulfillment.”
You should see Claude call both connectors by name and return two separate sets of numbers. If both come back identical, see Troubleshooting below.
What to expect
Claude matches your question to the right connector by name. Ask about “my {business 2} account,” and it reaches for ShipBob – {business 2}. Ask about {business 1} in the very same conversation, and it switches to ShipBob – {business 1}, no reconnecting needed.
When asking Claude something, say which business you mean if it’s not obvious:
“Using my {business 1} account, how many orders are pending fulfillment?”
Troubleshooting
- Both connectors return the same data. The second sign-in reused the first business’s browser session. Remove the second connector, sign out of ShipBob in your browser (or use a private window), then add it again.
- Claude says the connector already exists, or the second one won’t add. The two URLs aren’t unique. Check that the ?ref= value is genuinely different between the two connectors.
- A connector isn’t showing as Active. Open Settings → Connectors and confirm its status, the same check as in Connect Claude Desktop.
- Claude picks the wrong business. Name the business explicitly in your question, and make sure the connector names are distinct enough to tell apart.
Try it yourself: Ask a question that compares both businesses, like:
“Compare pending order counts between {business 1} and {business 2}.”
Get more out of ShipBob’s MCP
ShipBob MCP is one part of a larger AI Hub inside the ShipBob dashboard, alongside Bobby (ShipBob’s AI agent) and an MCP Insights tab that gives you a complete view of every action taken on your account, by any user or tool. Every write action, whether it comes from Claude, ChatGPT, or Bobby, still confirms with you first and logs who ran it.
Want to see it live?
Explore ShipBob AI or check out the starter prompts and templates in ShipBob’s GitHub Guide, built to go along with this tutorial.
FAQs
Do I need a developer background to use ShipBob MCP?

No. Connecting ShipBob MCP to Claude or ChatGPT is a point-and-click setup through each tool’s connector marketplace. Once connected, you interact with your ShipBob account in plain English.
Is it safe to let an AI tool write to my ShipBob account?
Every write action, like creating a WRO, requires your confirmation before it happens. ShipBob MCP inherits the same validations and business rules as the ShipBob API, and every action is logged under the person or tool that ran it.
Should I test in sandbox first?
Yes. Connecting to ShipBob’s sandbox environment lets you try prompts and workflows without touching live orders or inventory. Switch to production once you’re comfortable.
Can I use ShipBob MCP with tools other than Claude?
Yes. ShipBob MCP works with any AI assistant that supports the MCP standard, including ChatGPT. The setup steps are nearly identical.
What if I manage more than one ShipBob account?
Add each account as a separate connector by appending your business name to the connector URL, then authenticate each one individually.