A shoot gives you photos. A month of social content comes from deciding, before you post, which buying question each photo answers.
Sponsored contribution by Lan He of Stillmore, edited by eCommerce Fastlane.
Take a fictional workwear jacket. On launch day, a full length photo lets shoppers see where the hem falls. Three days later, someone asks whether their phone will fit in the chest pocket. That calls for a different picture, and most sellers already have it somewhere in the folder from the shoot. Before booking another shoot, look through the close ups you already have.
This guide turns one product shoot into eight posts over four weeks, using that jacket as the worked example. Each post answers one buying question, which gives you a reason to publish it and gives shoppers a reason to stop on it, whether they find it on Instagram, TikTok or YouTube Shorts.
You can run this plan yourself with a phone and an editing app. With Stillmore’s social content subscription for ecommerce brands, our team plans a campaign around the photos you have and turns them into a coordinated set of short videos, social images and captions, ready to post. Either way, the plan below stays the same.
Match the format to the buying question: a short video suits a first look, a carousel suits comparing details, and an annotated photo suits a question a shopper needs answered before they buy. Treat the pairing as a starting plan to test on your own audience, not a rule, because what holds attention differs by product and by account.
Short video for a first look. If you have a full length shot, a detail and a side view, cut between them in that order. Someone seeing the jacket for the first time can recognize it before you ask them to notice the stitching. Save the measurements for a post they can pause over.
A carousel for comparing details. Put the cuff’s two button settings on consecutive slides, with the wrist in the same position in both photos. Shoppers can swipe back and forth to see how much room each setting leaves. If you only have one sharp image, a labeled still will do the job.
An annotated photo for a buying question. For “Will my phone fit?”, show the actual phone in the pocket and name the model and case in the caption. Someone weighing a purchase can save that single frame with the answer still attached.
Pull only the frames a buyer would ask for by opening the contact sheet beside the live product listing and keeping the shots that answer a question the listing leaves open. For the jacket, that means a full length front view, a side view, a back view, a close up of the cuff and a clear photo of the pocket. If the photographer sent you forty near identical front views, keep the one where you can still see the hem when you crop it for a phone screen.
Beside each file, write down what you could confidently tell a customer who saw it. The side view shows where the hem falls on that model. The cuff close up shows two button positions. This note keeps captions honest, because a caption can only claim what the photo actually shows.
Gaps are useful too. A photo of a closed pocket will not tell a shopper whether a phone fits. If customers keep asking, measure the pocket opening and check it against the current jacket. One quick phone photo of the actual fit might be all you need to add to the shoot, and that is a better use of ten minutes than cutting a new video from the same front view. Fastlane’s guide to planning product video around the hesitation that stops a shopper from buying shows how to rank those recurring questions from reviews, support tickets and return reasons, so you know which gap to fill first.
The launch video should show the full product first, move to the detail that earns a closer look, and end on where the product sits on a person. For the jacket, open on the full silhouette, move to the cuff and finish on the side view. A viewer sees the product, gets a reason to look closer, then sees where it sits on a person. Give the video a beginning and an end before anyone opens an editor, leave the product name on the final frame long enough to read, and link the post to the jacket shown, in the color you feature.
Even a quick phone snapshot of the jacket on a hanger can be a starting point. What matters is that the jacket itself is easy to see.
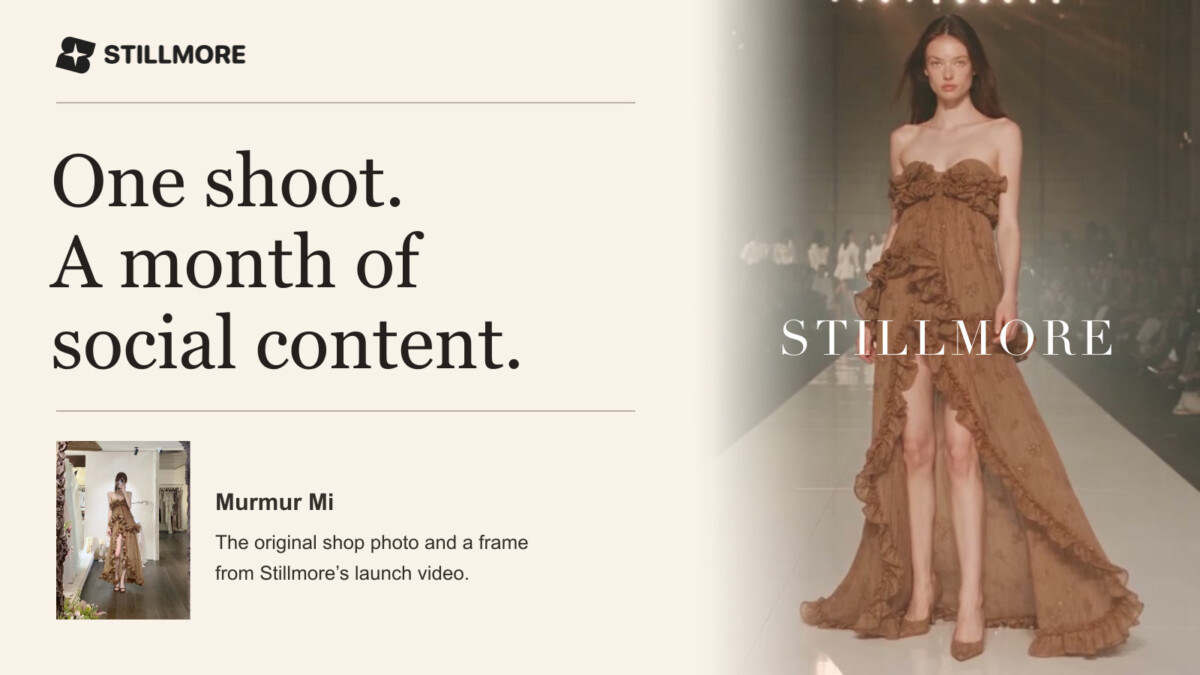
Stillmore’s case study of fashion brand Murmur Mi shows the same pattern at small scale: six short videos for one launch week, made from 13 phone photos the brand supplied. One of those photos was a mirror selfie taken in the shop, showing a brown dress from bodice to hem. By Stillmore’s account, that selfie became the starting point for a runway style film. Look at the bow on the front of the dress. In the shop photo, it is one detail among the ruffles. Stillmore says that two seconds into the finished film the bow fills the frame, and at 0:27 the runway shot shows how the whole skirt falls. That is one brand’s result, not a promise of what your photos will produce, and a source photo that shows the product clearly gives an editor more to work with.
Whoever makes the edit, compare the finished video with the real garment before it posts. Fastlane’s guide to scaling fashion product imagery lists the details worth checking, from color and sleeves to print placement and proportions.
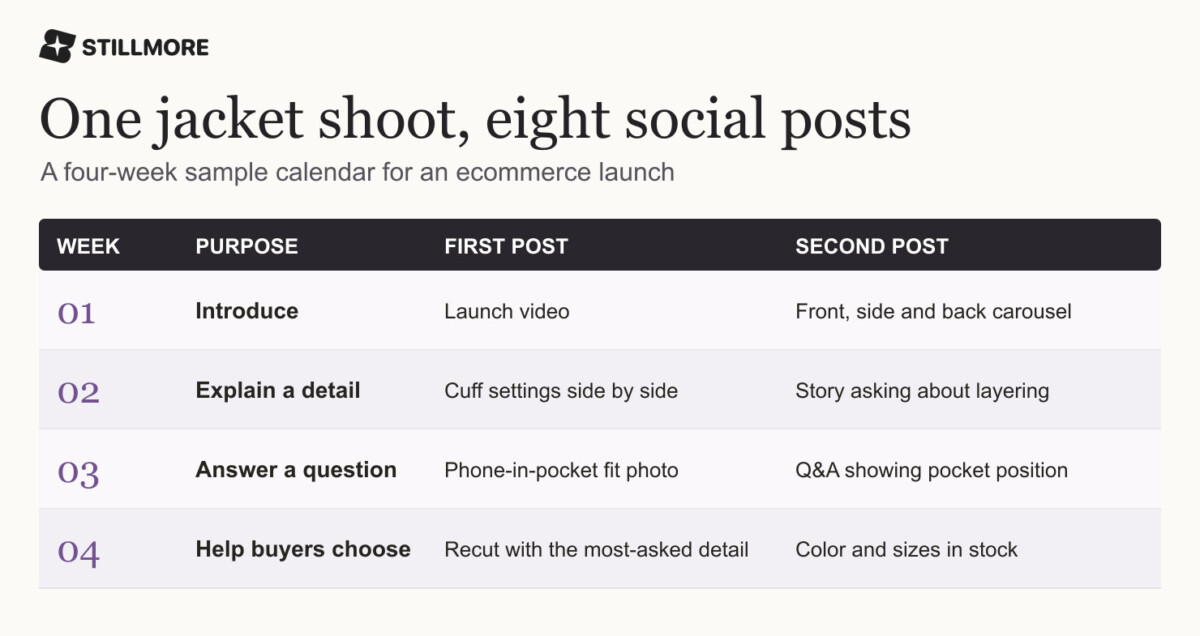
Plan one buying question per week and publish two posts against it, which gives you eight posts across four weeks from a single shoot. The calendar below shows the pairing for the workwear jacket, and the reasoning for each week follows in the next section.
One question per week keeps each post easy to write and easy to judge. The first post of the week earns attention, and the second supports the decision. Swap in your own questions for the jacket’s. If you have no customer questions yet, ask a few recent buyers what almost stopped them from ordering, and plan the first two weeks around their answers.
Week one introduces the product, week two explains one detail, week three answers the question that came back, and week four helps shoppers choose.
Week 1: Introduce the jacket. Publish the launch video first. Later in the week, use the front, side and back photos for a three slide carousel. Lead the caption with a reason to swipe: “Here’s where the hem sits from the side and how the jacket looks from the back.” Someone who discovered the jacket in the video now has enough context to open the product page.
Week 2: Explain one detail. Start with the cuff close up. If the sample has two working settings, button it each way and show the difference. Follow with a Story showing the wider sleeve photo and ask, “What would you wear underneath it?” A shopper’s answer might tell you that the next helpful picture is the jacket over a sweater.
Week 3: Answer the question that came back. Say someone asks, “Will my phone fit in that pocket?” Use the pocket image and the measurements you checked. Name the phone and case if you actually tried them together. For the second post, put the original customer question on the first slide and a wider shot showing the pocket’s position on the next. One post helps someone check fit. The other shows where they’ll reach when wearing the jacket.
Week 4: Help someone choose. Make a short cut using the side view, cuff and pocket. This time, open with the detail that generated the most specific questions. Finish the week with a still of the color and sizes you can actually ship. Check inventory just before posting and send the link to that variant. A shopper who comes back for olive shouldn’t have to hunt through a collection to find it.
Keep a note with three entries for each post (the question it answered, visits to the product page from its tagged link, and one question customers asked afterward), then take one decision back to your photographer at the end of the month. Add campaign URL tags to each link so your analytics can show which post sent which visit.
The three entries each tell you something different. For a launch video, visits tell you whether people wanted a closer look. For a pocket close up, a reply saying “That fits my phone” tells you something a view count can’t.
At the end of the month, take one decision back to the photographer. If people repeatedly asked how the jacket fits over a sweater, add that exact shot to the next brief. Fastlane’s breakdown of building a launch creative system around an approved base set of photos shows how to turn requests like that into a standing shot list. If the cuff post sent people to a listing that never mentioned the adjustable buttons, update the listing while the photos are still current; Shopify lets you add images and videos to a product’s media from the admin. Your last post has now done two jobs: it helped this month’s shopper and told you which picture is worth paying for next time.
The right way to produce these eight posts depends on who on your team can edit video, and each route fits a different situation.
Make the posts yourself if one person can spare about an hour a week and is comfortable in a phone editing app; the plan above needs nothing more than your phone and the photos from the shoot.
Hire a freelance editor or a small studio if you want hands on creative direction and have someone who can brief them and review the cuts each week.
Use a subscription service such as Stillmore’s if you have the photos but nobody to turn them into video; the team plans the campaign, edits the videos and writes the captions, and you choose when to publish. Skip a subscription if you already have an editor, or if you want to direct every cut yourself.
For a launch, Stillmore lets you pick a style in its Inspiration gallery or leave the choice to the team. Its Fashion and Accessories gallery shows the visual styles available to fashion sellers. For the posts that follow, our team selects images from the same shoot and delivers edited videos, stills and captions, and you choose when to publish them on Instagram, TikTok or YouTube Shorts.
Whichever route you take, the checks stay with you: compare every finished piece with the real product, and keep each caption to what the photo actually shows.
Run the eight post plan on one hero product first, and repeat it on the next product only after you can see which posts sent shoppers to the listing. A store with a handful of products and a phone should plan the calendar for its bestseller alone and treat the first month as a test.
A store with a larger catalog should pick the one or two products that drive the most revenue, run the same eight posts on each, and compare the notes from the month before extending the plan to the rest. Planning a calendar for every product at once is how a simple routine turns into a content backlog nobody finishes.
To try this with your own stock, pull three photos of one product from your last shoot and write the buying question each one answers beside it. If you would rather have the planning and editing done for you, browse Stillmore’s Inspiration gallery and choose a style that shows the detail shoppers ask about most.
About the author: Lan He writes for Stillmore about using product photography and short videos to answer shoppers’ questions.
You can plan about eight social posts over four weeks from one product shoot when each post answers a different buying question. That number comes from pairing two posts a week with one question per week: introduce the product, explain a detail, answer a question customers asked, then help shoppers choose. A shoot with more products or more angles can support more, but extra posts only help when each one has a distinct job. If you cannot name the question a photo answers, leave it for a later month and keep the calendar short enough that you actually publish it.
The best type of social post depends on the question the photo answers. A short video suits a first look, a carousel suits comparing details such as two button settings, and an annotated photo suits a buying question such as whether a phone fits in a pocket. If you only have one sharp image, a labeled still is usually enough. Treat these pairings as a starting plan and check which posts send shoppers to the product page, because results differ by product and by audience.
You turn product photos into short videos by choosing three or four frames and cutting between them in a clear order: the full product, the detail that earns a closer look, then the product on a person. A phone snapshot can be enough if the product is easy to see. Leave the product name on the final frame long enough to read, and link the post to the exact item and color shown. You can edit the video yourself in a phone editing app, hire an editor, or use a subscription service that plans and edits the videos for you.
Post first the photo that answers the question a new viewer would have, which is usually a full view of the product. Start with a launch video or carousel that shows the whole item, then save close ups and measurements for later posts that shoppers can pause over. For the workwear jacket in this guide, the full length photo comes first because it shows where the hem falls, and the pocket photo waits until someone asks whether a phone fits. Check inventory before posting so the link goes to a variant you can ship.
Track the question each post answered, visits to the product page from its tagged link, and one question customers asked afterward. Campaign URL tags let your analytics show which post sent each visit, and customer replies tell you what a view count cannot. At the end of the month, use the notes to brief your next shoot: if shoppers keep asking how the jacket fits over a sweater, add that shot. If a post sent people to a listing that never mentioned the detail, update the listing too.